


Microphone Placement
In order to maximize the sound quality, you must pay careful attention to the
placement of your CL7 and how it is positioned for the instrument or vocalist
that you are miking. All microphones, especially uni-directional or cardioid
microphones, exhibit a phenomenon known as “proximity effect.” Very simply
put, proximity effect is a resulting change in the frequency response of a micro-
phone based on the position of the mic capsule relative to the sound source.
Generally, you will get a bass boost when miking in close. When you point a
cardioid mic directly at the sound source (on axis) you will get the best frequen-
cy response, however when you start pointing the microphone slightly away (off
axis) you will notice the low frequency response dropping off and the micro-
phone will start to sound thinner.
For most vocal applications you’ll want to position the microphone directly in
front of the artist. The same may be true for miking instruments, however, you
can make some pretty amazing equalization adjustments by slightly changing
the angle of the capsule to the sound source. This can be a very useful tech-
nique in capturing the optimum sound of drum set, acoustic guitar, piano or
other instruments in a live room or sound stage. Experimentation and experi-
ence are the best teachers in getting good sounds, so plug in!
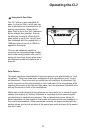
P-Popping
P-Popping is that annoying pop that you can get when the microphone
diaphragm gets a blast of air from a vocalist pronouncing words with the letter
“P” included. There are a few ways to deal with the problem including using an
external pop filter. Some famous engineers have relied on an old nylon stocking
stretched over a bent clothes hanger, which actually works very well. You can
also try placing the microphone slightly off axis (on a slight angle) from the
vocalist. This can often solve the problem without using an external pop filter.
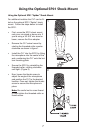
Stand Mounting the CL7
The CL7 can be mounted to a standard microphone stand using the included
swivel mount adapter. If you are using a U.S. 5/8” mic stand, you will need to
remove, by unscrewing, the Euro stand adapter. Simply screw on the swivel
adapter on your mic stand or boom arm. Now, loosen the thumbscrew and
adjust the microphone to the desired angle. Once set, tighten the thumbscrew
to secure the microphone in place.
6
Operating the CL7