


Installation
Runco VX-44d/-55d Owner’s Operating Manual 51
PRE
L
IMINAR
Y
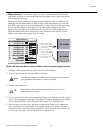
For 1080i digital and 1080p signals, channels are pre-configured at the Runco factory for
each aspect ratio. These channels use Custom size presets to achieve the selected
aspect ratio.
•“Custom” Resizing: The “Custom” re-size descriptor automatically appears in the
Size and Position menu when any of the values for Size, Height, Horizontal Shift,
Vertical Shift or Blanking do not correspond to those for a preset. This option is not
offered in the Size Presets pull-down list.
Other resizing options are described below, for the sake of completeness. In actual
practice, though, they are rarely (if ever) used when the VX-44d/-55d is used with the DHD
Controller.
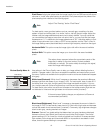
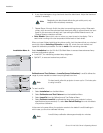
• Default Resizing: When you select a new source, the image utilizes as much of the
projector’s display area as possible for the type of incoming source data, but with
minimal or no changes to aspect ratio. The image will be centered and displayed as
large as possible depending on the source type and projector model:
• A video image or 4:3 graphic image is enlarged to fill the screen height, centered
between black side bars.
• A 5:4 graphic image is enlarged to fill the screen height and is centered between
black side bars.
• An anamorphic (16:9) image fills the whole screen.
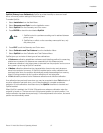
• Full Size: Select Full Size to use all pixels for displaying the image, regardless of
source or original aspect ratio. Incoming source material having a different aspect ratio
than the projector will be stretched to fill the display.
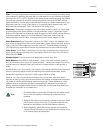
• Full Width: Select Full Width to fill the projector’s display from left-to-right without
changing the original aspect ratio of the image. Depending on the source, data at the
top and bottom may be discarded (cropped), or the display may have black borders at
the top and bottom (called “letterbox”).
• Full Height: Select Full Height to fill the display from top-to-bottom. Depending on the
source, this may create borders.
•Anamorphic: Select Anamorphic to display an anamorphic image in its native 16:9
aspect ratio. The image will fill the whole screen.
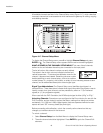
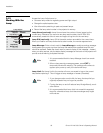
Size: “Size” controls both the image width and height in tandem, maintaining the current
aspect ratio (proportion) of the displayed signal data.
Height: “Height” adjusts the image height while keeping the width constant. Use this
setting to change the aspect ratio of the display.
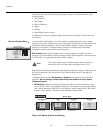
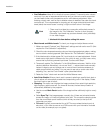
Pixel Tracking: Steady flickering or several soft vertical stripes or bands across the entire
image indicates poor pixel tracking. Proper pixel tracking helps ensure that the image
quality is consistent across the screen, that aspect ratio is maintained, and that pixel
phase can be optimized (see below). Tracking determines the frequency of the pixel
sampling clock, indicated by the number of incoming pixels per line, so that all pixels
generated by a particular source are sampled.
By default, the projector samples at the correct frequency for most sources. For best
results, use a good test pattern such as a smooth gray consisting of a clear pattern of
black and white pixels, or a similar “half on, half off” graphic image. Adjust the slidebar
until the vertical stripes broaden to the point where one large stripe fills the image. If the
image still exhibits some shimmer or noise, adjust Pixel Phase (described below).