


7
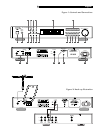
REMOTE EXT IN Jack
This 3.5mm mini-jack receives command
codes from industry-standard infrared receiv-
ers (Xantech, etc.) via hard-wired connec-
tions. This feature could prove useful when
the unit is installed in a cabinet and the front-
panel sensor is blocked. Consult your au-
thorized Rotel dealer for information on these
external repeaters and the proper wiring of
a jack to fit the mini-jack receptacle.
COMPUTER I/O Interface
This RS-232 serial computer interface con-
nection allows you to operate the unit from
a stand-alone home automation controller
or from a PC computer running special soft-
ware. Consult your authorized Rotel dealer
for information on these systems and the
proper interface with your RT-955’s DB9 serial
connector.
NOTE
: Information on commercial software
for using your personal computer to oper-
ate audio/video components, including the
RT-955, can be found at the Rotel website:
www.rotel.com/downloads/
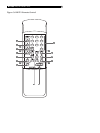
Basic Operating Controls
The following explanations will help you get
familiar with the features, and controls.
Number references corresponding to the il-
lustrations at the front of this manual.
Most functions are duplicated on the front
panel and on the handheld remote control
shipped with your unit. When two reference
numbers appear, one refers to the location
of the control on the front panel, the other
refers to the location of the corresponding
control on the handheld remote. When only
one number is shown, that control is avail-
able only on the front panel or the remote,
as noted in the text.
NOTE
: Controls used for tuning the AM/FM
receiver are described in the next sections
of this manual.
Power Button
The POWER button is located on the front
panel of the RT-955 and is not duplicated
on the remote control.
Push the button IN to turn the unit on. The
LED above the switch and the front panel
display will light up. Push the button again
(returning it to the OUT position), to turn the
unit off.
NOTE
: If you are using a switched outlet on
another component to power the RT-955,
you should leave the POWER switch in the
ON position. The RT-955 will be switched
on and off by the other component’s
switched outlet.
Remote Sensor
This front panel sensor receives infrared sig-
nals from the remote control. Make sure you
do not accidentally block this sensor with
cables or accessories.
Front Panel Display
The large fluorescent display in the center
portion of the RT-955 provides status infor-
mation used in operating the AM/FM re-
ceiver (such as station frequency display,
band, preset memory, RDS information, etc.).
DIMMER Button
Available only on the remote control, this
button temporarily reduces the brightness of
the front panel DISPLAY. Press the button to
toggle between the normal brightness and
reduced brightness. When the tuner is turned
off, the DISPLAY will revert to its normal
setting.
MEMORY Button
The MEMORY button is used to confirm and
memorize various settings in the setup and
operation of the RT-955, including tuner sta-
tion presets. Its use is described in detail in
the relevant sections below.
Setting Country Mode
The RT-955 has two default modes, one for
the USA and one for Europe. These config-
ure the unit for differences in local markets,
including FM tuning intervals, AM tuning
intervals, and differences in the European
RDS and United States RBDS standards. Your
unit has been factory configured to the cor-
rect default mode for the country in which
it was purchased.
To switch to the USA default mode,
press and hold the POWER, MEMORY, and
9 buttons for 5 seconds. The word LOAD-
ING will appear in the DISPLAY and the unit
will power up in the USA configuration.
To switch to the European default
mode, press and hold the POWER,
MEMORY, and 0 buttons for more than 5
seconds. The word LOADING will appear
in the DISPLAY and the unit will power up
in the European configuration.
Basic Tuning Controls
The RT-955 features a digital synthesized
AM/FM tuner with RDS or RBDS capability
and 30 station presets. The unit offers a wide
range of tuning options. Here is an overview
of the tuning options (more detailed infor-
mation is provided in subsequent sections
of this manual):
• Manual frequency tuning lets you
tune up or down to the next station fre-
quency. Set the TUNE/PRESET mode to
TUNE. Turn off AUTO TUNING. Use the
TUNING controls to tune up or down.
• Direct frequency tuning lets you enter
the desired station frequency digits. Press
the FREQUENCY DIRECT button on the
remote and enter the digits using the
NUMERIC buttons.
• Automatic frequency search tun-
ing lets you search up or down to find
the next receivable broadcast signal. Set
the TUNE/PRESET mode to TUNE. Turn
on AUTO TUNING. Use the TUNING con-
trols to search up or down.
• Memory station preset tuning lets
you directly enter the number of a memo-
rized station preset number. Enter the
number of the memorized preset using
the NUMERIC buttons.
• Preset scan tuning lets you scan up/
down through the memorized station
presets. Press the PRESET SCAN button
to begin scanning.
English