


5
English
About Rotel
A family whose passionate interest in music led
them to manufacture high fidelity components
of uncompromising quality founded Rotel over
40 years ago. Through the years that passion
has remained undiminished and the family goal
of providing exceptional value for audiophiles
and music lovers regardless of their budget, is
shared by all Rotel employees.
The engineers work as a close team, listening
to, and fine tuning each new product until it
reaches their exacting musical standards. They
are free to choose components from around
the world in order to make that product the
best they can. You are likely to find capacitors
from the United Kingdom and Germany, semi
conductors from Japan or the United States,
while toroidal power transformers are manu
-
factured in Rotel’s own factory.
Rotel’s reputation for excellence has been
earned through hundreds of good reviews and
awards from the most respected reviewers in
the industry, who listen to music every day.
Their comments keep the company true to its
goal - the pursuit of equipment that is musical,
reliable and affordable.
All of us at Rotel, thank you for buying this
product and hope it will bring you many hours
of enjoyment.
Getting Started
Thank you for purchasing the Rotel RCD-06
Stereo Compact Disc Player. Its precision
transport is back up by an 18-bit equivalent,
multi-level Delta-Sigma D/A converter with 8x
oversampling . These features, combined with
Rotel’s Balanced Design, ensure the RCD-06 will
deliver the highest level of audio performance.
When used in a high-quality audio system,
your Rotel CD player will provide years of
enjoyment.
A Few Precautions
Please read this manual carefully. In addition
to installation and operating instructions, it
provides valuable information on various RCD-
06 system configurations as well as general
information that will help you get optimum
performance from your system. Please contact
your authorized Rotel dealer for answers to
any quesions you might have. In addition, all
of us at Rotel welcome your questions and
comments.
Save the RCD-06 shipping carton and all
enclosed packing material for future use.
Shipping or moving the RCD-06 in anything
other than the original packing material may
result in severe damage that is not covered
by the warranty.
Fill out and send in the owner’s registration card
packed with the RCD-06. Also be sure to keep
the original sales receipt. It is your best record
of the date of purchase, which you will need in
the event warranty service is required.
Placement
Use common sense when placing the RCD-06
in a cabinet or when stacking other equipment.
Make sure that the shelf or cabinet can support
its weight. Do not stack heavy components on
top of the RCD-06. Avoid placing the unit where
it may be subject to excessive heat such as on
top of a large power amplifier or near a heat
register. For best performance, avoid placing
the unit where it may be subject to vibration,
such as near a speaker.
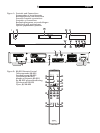
Control Identification
The cover of this manual has a fold out panel
that shows illustrations of the front and rear
panels and the RR-D95 remote control. Each
item in the illustrations is identified with a call
out in a gray box. Through out this manual
the items refered to in the text are identified
by the corresponding call out. The items on
the front and rear panels are identified with
a number call out, such a
1
. The items on
the remote control are labeled with a letter call
out, such as
A
.
Contents
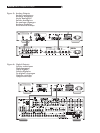
Figure 1: Controls and Connections 3
Figure 2: RR-D95 Remote Control 3
Figure 3: Analog Outputs 4
Figure 4: Digital Outputs 4
About Rotel ............................................ 5
Getting Started ....................................... 5
A Few Precautions 5
Placement 5
Control Identification 5
AC Power and Control ............................. 6
AC Power Input
e
6
Power Switch
1
and Power Indicator
2
6
Output Connections ................................. 6
Analog Outputs
-
6
Digital Output
=
6
Operation ............................................... 6
Infrared Remote Control
4
6
Display
5
6
Disc Drawer
3
6
Transport Control Buttons ........................ 7
OPEN/CLOSE Button
6 A
7
PLAY Button
7M
7
STOP Button
8F
7
PAUSE Button
9N
7
TRACK Buttons
0L
7
DIRECT ACCESS Buttons
B
7
SEARCH Buttons
K
7
Additional Features ................................. 7
PROGRAM Button
J
7
REVIEW Button
I
8
CLEAR Button
H
8
RANDOM Button
D
8
REPEAT Button
C
8
SCAN Button
E
8
TIME Button
G
8
External Remote Input
w
...................... 8
12V Trigger Connection
q
...................... 8
Troubleshooting ....................................... 8
Power Indicator Is Not Lit 8
Fuse Replacement 9
No Sound 9
Specifications .......................................... 9