11
Your RA-1060 is configured at the factory for
the proper AC line voltage in the country where
you purchased it (USA: 115 volts/60Hz AC
or CE: 230 volts/50 Hz AC ). The AC line
configuration is noted on a decal on the back
panel. Plug the supplied cord into the AC INPUT
receptacle on the back of the unit.
NOTE
: Should you move your RA-1060 to an-
other country, it is possible to reconfigure your
amplifier for use on a different line voltage.
Do not attempt to perform this conversion your-
self. Opening the enclosure of the RA-1060
exposes you to dangerous voltages. Consult
a qualified service person or the Rotel fac-
tory service department for information.
If you are going to be away from home for
an extended period of time such as a month-
long vacation, it is a sensible precaution to
unplug your audio and video components while
you are away.
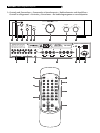
POWER Button
Power Indicator
Press the front panel POWER button, to turn
the RA-1060 on. The power indicator light is
illuminated when the RA-1060 is on. Press
POWER button again to turn the RA-1060 off.
Once the RA-1060 has been turned on with
the front panel button, it can be switched be-
tween normal operating mode and standby
mode with the POWER button on the RR-AT92
remote control.
Auxiliary Power Outlet
(North American version)
The RA-1060 has a switched outlet on the back
panel. Power is available from this outlet when
the RA-1060 is turned on. This outlet can pro-
vide up to 200 watts and is appropriate for
supplying power to signal sources, such as CD
players, tuners, or tape decks. It should not
be used for power amplifiers. Connecting com-
ponents that will draw more than 200 watts
to these outputs could damage the RA-1060.
NOTE
: Do not connect a power amplifier to
the auxiliary power outlet on the RA-1060.
Power amplifiers often draw more power than
this outlet can provide.
12V TRIGGER Connection
Several Rotel amplifiers can be turned on and
off using a 12 volt signal, provided by the 12V
TRIGGER connection. When the RA-1060 is
activated, a 12 volt DC signal appears at this
connector and will turn on an amplifier. When
the RA-1060 is turned off, the trigger signal
is interrupted and the external amplifier will
be turned off.
Audio Controls
The following controls are used to operate the
RA-1060.
VOLUME Control
Turn the front panel VOLUME control clock-
wise to increase the volume, or counterclock-
wise to decrease the volume. Alternatively, press
the VOL buttons on the remote control to ad-
just the volume up or down
CONTOUR Selector
Instead of conventional tone controls, the
RA-1060 has a front-panel CONTOUR con-
trol which selects one of five available settings.
Each setting provides a fixed frequency con-
tour as follows:
OFF: the tone contour circuits are bypassed
to ensure the purest possible sound.
L-1: moderate increase in bass frequencies
(typically +3dB @ 100Hz).
L-2: more increase in bass frequencies (typi-
cally +4dB @ 100Hz).
H: moderate increase in high frequencies
(+3dB @ 10kHz).
LH: combination of L-2 bass and H high fre-
quency increases.
LISTENING Selector
The setting of the LISTENING selector controls
which of the input signals goes to the main
outputs and onto the power amplifier – or, more
simply, which source is heard. Turn the front
panel control to the source you want to hear,
or press the corresponding button on the
RR-AT92 remote.
RECORDING Selector
The RA-1060 can record from any input source
(except TAPE 2) to a recorder connected to
TAPE 1 or TAPE 2 outputs. To select an input
source for recording, turn the RECORDING
control on the front-panel to the desired source.
This selection is independent of the source
selected for listening. While recording, you
may still select a different source using the
LISTENING selector.
If you have a three-head recorder or a DAT
recorder that allows simultaneous read and
write operation, you can monitor your recording
by setting the LISTENING switch to the TAPE
1 or TAPE 2 position.
NOTE
: If you select TAPE 1 with the RECORD-
ING control, the recording signal will only
be available at the TAPE 2 recording outputs,
not the TAPE 1 outputs. To dub a tape, select
TAPE 1 and record to the tape deck connected
to the TAPE 2 outputs.
MUTE Button
To temporarily mute the sound of the system
press the MUTE button on the RR-AT92 remote.
Press the button again to return the sound
volume to the original level. The LED in the
volume control will flash when the unit is muted.
PHONES Output
The PHONES output allows you to connect
headphones for private listening. This output
accepts standard stereo phone (1/4”) plugs.
If your headphones have another type of plug,
such as a 1/8” mini-plug, you will need an
adapter plug. Contact your authorized Rotel
dealer, to get the correct adapter plug.
NOTE
: Plugging in headphones does not cut
off the signal to the speakers. If desired, use
the SPEAKERS selector to turn off the signal
to the speakers for private listening.
English


