


7
power level in triode is high enough that it will likely provide plenty of power
for almost any speaker load.
3) Ultralinear operation – With this configuration, power levels near those of
tetrode mode are achieved with low distortion levels that approach those of
triode operation. For loudspeakers that demand very high levels of power,
ultralinear should provide excellent sound and plenty of power.
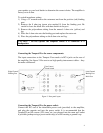
The triode/ultralinear switch allows the user to operate the Tempest II in either of
the two modes. In general, the sonic differences are subtle but for a given
loudspeaker one mode is likely to sound better than the other. There is a
complex relationship between the output transformer and the crossover network
so try both and see which one works best in your system. This switch can be
operated while the amplifier is playing but you will hear a small relay noise
through the loudspeaker.
SETTING THE TUBE BIAS
Tools required: bias tool (provided with amplifier)
The output tubes (the big ones) need to be “biased’ with a grid voltage that
controls the flow of electrical current through the tube. Tube biasing on the
Tempest II has been designed to be both simple and effective. On some amplifiers
biasing is done for two or more tubes simultaneously. With this method, the total
current flowing through the group of tubes may be correct, but the current flow
through any individual tube may vary significantly from the optimal value. With
the Tempest II the bias is set individually for each tube so that the correct
operating point is assured. An added benefit to this approach is that, should a
tube fail prematurely, the single tube can be replaced without having to purchase a
matched set. Use the following procedure to set the tube bias:
WARNING – There are dangerous and potentially lethal voltages inside this
amplifier. Do not touch any part of the amplifier other than as described
below. If you are uncertain about any of these instructions, please contact
your dealer and have them bias the amplifier for you.
1) Allow the amplifier to warm up for at least 30 minutes.
2) Turn the preamplifier volume completely off so that no signal is entering the
amplifier.
3) Remove the top cover. The bias tool is snap attached to the inside top of the
deck lid.
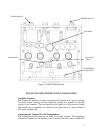
4) Locate the rotary switch and associated small potentiometers (they are blue
and have a small screw in the top). There are four, one for each tube. Note the
biasing meter.
5) Position the rotary switch into the corresponding tube position (ie. V1 for
output tube V1).