


2
INTRODUCTION
Congratulations on your purchase decision! We at Rogue Audio truly believe that
our amplifiers provide the “smartest” value in high-end audio. If you have never
owned a vacuum tube amplifier you will be thrilled by the silky-smooth sound
and incredible detail that only a tube amplifier can provide. And with the Stereo
90 amplifier, you can be sure that you are getting the very best in tube
amplification. We at Rogue Audio are extremely proud of our products and want
you to enjoy them to their fullest potential. So please, take the time to read
through this short manual so that you can be confident that you have set up your
amplifier properly.
UNPACKING THE STEREO 90 POWER AMPLIFIER
Tools required: # 2 Philips Screwdriver
WARNING - This amplifier uses voltages that could cause injury or
death. Never open the amplifier while it is plugged in, and always wait
at least one hour after turning the unit off to unplug and open the unit.
Lethal voltages can remain in the electronics after the unit is
unplugged.
The Stereo 90 amplifier has been painstakingly inspected for cosmetic flaws
during and after assembly. In order not to damage the cosmetic appearance of
your amplifier it is important that you follow the unpacking instructions carefully.
1. Remove the Styrofoam packing material from the box, and remove the two
small white boxes. One of the boxes contains the Output Tubes, while the
other contains the power cord.
2. Lift the unit from the box, and carefully remove the protective plastic bag.
Remove the shipping pallet from the bottom of the amp. The pallet serves two
purposes. First, and foremost it acts to tie down the mechanically isolated
transformer platform. Secondly, it provides strength to the main chassis. Both
of these are critical to ensure that no damage occurs in transit.
3. Save the packing materials. The packing materials and box have been
carefully designed to protect your valuable equipment during shipping so you
don’t want to throw them away.
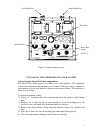
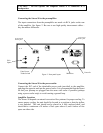
4. Remove the top cover of the amp using a #2 phillips screw driver to remove
the 10 cover screws. Using a glove or a clean dry cloth , install the tubes using
the diagram in Figure 1. The Output Tubes will have a label designating their
proper locations.