


Frequently Asked Questions
Limited Warranty
WARNING: Changes or modications to this equipment not expressly approved by the party responsible for compliance could
void the user’s authority to operate the equipment.
NOTE: This equipment has been tested and found to comply with the limits for a Class B digital device, pursuant to Part 15 of
the FCC Rules. These limits are designed to provide reasonable protection against harmful interference in a residential installa-
tion. This equipment generates, uses and can radiate radio frequency energy and, if not installed and used in accordance with
the instructions, may cause harmful interference to radio communications.
However, there is no guarantee that interference will not occur in a particular installation. If this equipment does cause harmful
interference to radio or television reception, which can be determined by turning the equipment off and on, the user is encour-
aged to try to correct the interference by one or more of the following measures:
• Reorient or relocate the receiving antenna.
• Increase the separation between the equipment and receiver.
•
Connect the equipment into an outlet on a circuit different from that to which the receiver is needed.
• Consult the dealer or an experienced radio/TV technician for help.
This device complies with Part 15 of the FCC Rules, and applicable Industry Canada regulations. Operation is subject to the
following two conditions: (1) this device may not cause harmful interference, and (2) this device must accept any interference
received, including interference that may cause undesired operation of device.
The manufacturer is not responsible for any radio or TV interference caused by unauthorized modictions to this equipment.
Such modications could void the user’s authority to operate this equipment.
(For Canada)
This Class A/B digital apparatus meets all requirements of the Canadian Interference-Causing Equipment Regulations.
FCC & Industry Canada Information
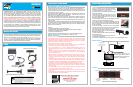
Installation & Operation
Virtual Reality Video Labs
®
warrants, to the original purchaser, that its products are free from defects in material
and workmanship for 30 days from the date of original purchase, as part of our commitment to product excellence.
Virtual Reality Video Labs
®
and/or its afliates routinely improve the designs, materials or production methods of its
existing products. Because it is impractical to publicize all changes in every product, we reserve the right to make
such changes without notice.
CONDITIONS OF WARRANTY:
If during the 30 day warranty period your new product is found to be defective, Virtual Reality Video Labs® will repair
such defect, or replace the product, without charge for parts or labor subject to the following conditions:
1. All repairs must be performed by Virtual Reality Video Labs
®
and/or its afliates in Eatontown, New Jersey.
2. The equipment must not have been altered or been damaged through negligence, accident, or improper opera-
tion.
3. The replacement of parts are exempted from this warranty when replacement is necessary due to normal wear
and tear.
4. All warranty claims must be accompanied by a copy of the sales receipt or bill of sale.
5. Repair or replacement parts supplied by Virtual Reality Video Labs
®
under this warranty are protected only for the
unexpired portion of the original warranty.
6. In the case of car stereos, this warranty does not extend to the elimination of car static or motor noise; correction
of antenna problems; costs incurred for the removal or reinstallation of the product; damage to tapes, speakers, ac-
cessories or car electrical systems.
7. Virtual Reality Video Labs
®
will not be responsible for any charge incurred for installation.
OWNER’S RESPONSIBILITIES:
Virtual Reality Video Labs
®
will make every effort to provide warranty service within a reasonable period of time.
SHOULD YOU HAVE ANY QUESTIONS ABOUT SERVICE RECEIVED, OR IF YOU WOULD LIKE ASSISTANCE IN
OBTAINING SERVICE, PLEASE CALL TOLL FREE 1-800-445-1797, 8:30am - 4:30pm EST.
In order to provide you with the proper warranty service, we request that you adhere to the following procedure:
1. Include a copy of your sales receipt or bill of sale with your unit when it is returned for warranty service.
2. If it is necessary to return your product for service, please return it securely packed, preferably in the original ship-
ping carton, and freight and insurance prepaid to the following address: Virtual Reality Video Labs, Service Depart-
ment, 41 James Way, Eatontown, New Jersey 07724.
3. Please include a detailed explanation of the problem you are having.
4. If your product is found by Virtual Reality Video Labs
®
to have a defect in material or workmanship, within the
warranty period, it will be repaired or replaced at no charge and returned to you prepaid. Where permitted by Iaw
Virtual Reality Video Labs
®
liability shall be limited to that set forth in this warranty. This warranty shall be the exclusive
remedy of the purchaser.
Virtual Reality Video Labs
®
makes no other warranty of any kind, expressed or implied; and all implied warranties, are
hereby disclaimed by Virtual Reality Video Labs
®
and excluded from this warranty, Virtual Reality Video Labs
®
and/or
its afliates, the manufacturer, distributor and seller shall not be liable for any injury, loss or damage, incidental or
consequential, arising out of the use or intended use of the product.
Changing the Frequency
Scanning for available FM/AM/HD channels
1. Press the SCAN button to scan for available analog FM/AM channels and/or digital
HD channels, one after one, till you nd your favorite station.
2. Press and hold the SCAN button for less than 2 seconds, it will search forward for
the next strongest frequency, then stop.
3. Press and hold the SCAN button for more than 2 seconds, it will search backward
for the next strongest frequency, then stop.
Manual Tuning
1. Press the BAND button to select either AM or FM.
2. Change the frequency with the “+” or “-” button.
Saving Preset Stations
To save a frequency in your radio’s memory, complete the following steps:
1. Press the BAND button to select either AM or FM.
2. Press the SCAN button until you nd a station you want to save as a pre-set.
3. Press the PRESET button to start setting up Preset. You will see P01 - P10, press
either the “+” or “-“ button to navigate the pre-set list.
4. Stop at one of the pre-set numbers (P01-P10) on the list, then press the PRESET
button to assign the frequency you have tuned to that pre-set number.
Note:
Your radio provides 10 preset positions for each band, AM or FM, for a total of 20.
Selecting Preset Station
To select a Preset Station saved in your radio’s memory:
1. Press the BAND button to select either AM or FM.
2.
Press the PRESET button, you will see the the rst pre-set on the list P01, and the
frequency will be blinking.
3. Press “+” or “-“ to go up or down the list until you nd the pre-set you wish to tune
to, for example P05 FM100.7,
4. Press the ENTER button. Then the radio will tune to the frequency stored at that
pre-set. You can change the station saved to any pre-set by saving a different station
to that pre-set number.
Enter Button
Press the ENTER button to see the data from the HD Radio broadcaster, including <Art-
ist>; <Song Name>, <Signal Strength Indicator>, <Frequency>, <Scrolling Text> etc.
Menu Button
Press Menu button repeatedly to access the Display or Scan Menus:
1. Display – Choose between FIXED or SCROLLING text on the display.
2. Scan – Choose between scanning ALL channels or HD channels only.
Press the ENTER button again to return to the display to normal.
Multicast Channels
In addition to digital sound quality, FM HD Radio broadcasters can offer multiple pro-
gramming channels simultaneously using their existing frequency on the radio dial.
These additional channels can offer expanded news, talk and music formats. When
your radio tunes in the HD Radio channel, if a number appears on the right side of
the station frequency (for example: 89.3-1) this indicates the existence of multicast
services. Use the TUN-/+ to select a multicast channel for the frequency.
System Delay
Digital systems inherently produce an audio delay. To overcome this delay, HD Radio
technology uses a station’s analog signal to enable fast tuning of an AM or FM sta-
tion. After approximately 5 seconds, the audio from the analog signal changes to a
digital HD Radio signal. If the radio station has implemented the HD Radio broadcast
correctly, the blend is smooth. However, if the station has not, you will experience a
skip in content of up to 5 seconds for a - 2 or higher channel.
This is not an issue with your HD Radio receiver. This is an HD Radio broadcaster’s
implementation issue, which should be corrected by the station over time. Today’s
analog is only present on the main channel. Should you tune directly to a station’s
multicast channel, the HD Radio Adaptor will delay playing audio or content for up to
5 seconds. This is a normal operation.
Q. Why does my audio quality change after a few seconds on some HD Radio sta-
tions?
A. HD Radio stations blend analog signals to the digital HD Radio signal. The blend
is typically smooth, but in some cases, the audio quality can take a few seconds to
reach enhanced digital levels. This is not an issue with your HD Radio receiver it is the
broadcaster’s HD Radio implementation.
Q. Why is the display lit and showing information, but there is no sound?
A. Your FM stereo receiver may be muted, or the Auxiliary In jack is not enabled.
Q. What can I do if my audio is distorted or I don’t hear any radio?
A. Keep the power cable away from the radio and antenna while in use. Make sure the
FM antenna and power cable are not touching each other or the radio (except where
they connect to the radio).
If your radio is still distorted or you don’t hear any audio, you may be experiencing
one of the following conditions:
• Is the radio muted? If so, unmute the radio or turn up the volume.
• Is the radio in AUX mode? If so, your auxiliary device may not be sending audio
signals or may not be correctly connected.
• Change your vehicle’s location.
• Check all connections, including the power and antenna.
• The signal is too weak, tune to a stronger station or move your vehicle.
• If you are using an amplied antenna with adjustable gain, turn down the gain all the
way and adjust slowly upward.
NOTES
GIVE US A CALL, WE'LL HELP YOU INSTALL.
1-800-445-1797
PLEASE DO NOT RETURN PRODUCT TO STORE.
Visit us on the WEB
www.vr-3.com
For Information and Technical Assistance,
Call Toll-Free in U.S.A. and Canada.
As part of our commitment to excellence in Virtual Reality Sound Labs
®
products, Intellectual Solutions and/or its afliates
routinely improve the designs, materials or production methods of its existing products. Because it is impractical to publicize all
changes in every product, we reserve the right to make such changes without notice.
This product is covered by one or more of the following U.S. Patents: 5278826; 5278844; 5315583; 5465396; 5517535; 5559830;
5566214; 5579345; 5633896; 5646947; 5703954; 5745525; 5764706; 5809065; 5828705; 5850415; 5878089; 6108810; 6148007;
6178317; 6259893; 6292511; 6295317; 6317470; 6345377; 6400758; 6430227; 6452977; 6480536; 6487256; 6510175; 6523147;
6532258; 6539063; 6549544; 6556639; 6563880; 6570943; 6590944; 6622008; 6639949; 6671340; 6891898; 6895060; 6898249;
6901242; 6970685; 6982948; 7043681; and 7127008
HD Radio
TM
Technology Manufactured Under License From iBiquity Digital Corp. US and Foreign Patents. HD Radio
TM
and the
HD Radio
TM
logos are proprietary trademarks of iBiquity Digital Corp.
©2007 Intellectual Solutions, Inc., All Rights Reserved.All designs, logos and images are the exclusive property of Intellectual
Solutions, Inc. and/or its afliates. All rights reserved. 121907 Printed in China 00000
SPECIFICATIONS
General ......................................Analog FM/AM/RDS and Digital HD Radio Receiving
Frequency Range ........................................... AM 530~1710 KHz, FM 87.9~108 MHz
Tuner Sensitivity ................................................................AM -87 dBm , FM -91 dBm
Input Connector ................................................................................... DC IN, ANT IN,
Output Connector ........................................................................ANT OUT, LINE OUT
Control Functions .....Power, Band, Enter, Auto, Tuner +, Tuner -, Scan, Menu, Preset
LCD Display ............................................................... 16 x 2 characters with backlight
Antenna ...............................................................................................Car ANT Socket
Power Supply ................................................................................... DC 12 ~ 14.4 Volt
Dimensions ..............................................Display 130mm (W) x 35mm (H) x 15mm (D)
Please read this user’s manual before installing, setting up, or using your new HD Radio receiver.