98
BATTERY INSTALLATION AND INFORMATION
(continued)
5. Charge the rechargeable batteries for 16 hours before using the
headphones for the first time.
6. Battery charges last approximately eight hours before recharging
is necessary.
NiMH Rechargeable Battery Memory Effect
When an NiMH rechargeable battery is first used, it is important to fully
charge it and then allow it to discharge three times in order to maximize
the battery’s storage capacity. Avoid recharging the battery until it is
fully discharged. When a battery is recharged before it is completely
discharged, it develops a memory that will limit the amount of charge
in the future. This reduces the battery’s storage capacity for subsequent
charges and so reduces the amount of time your headphones can be
used before recharging is necessary.
NiMH Natural Power Discharge
Due to their chemical design, all rechargeable batteries incur some
degree of natural discharge. This means they automatically lose their
charge in varying degrees, and the battery’s capacity drops even when
not in use. The size of this power loss varies, depending on the battery’s
type, size, design, internal resistance and, most especially, the
temperature. The higher the temperature, the greater the power loss
through natural discharge.
NiMH Battery Warning
CONNECTING THE CRADLE/TRANSMITTER
Follow this quick setup guide to ensure trouble-free installation of your
headphones. To connect the cradle/transmitter to the audio source,
follow these steps.
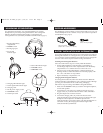
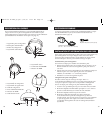
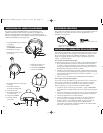
1. Connect the AC/DC main power adapter to the DC IN power
supply socket (11) at the back of the cradle/transmitter. Then,
connect the adaptor to an electrical outlet. Important: This power
unit is intented to be correctly oriented in a vertical or floor mount position.
2. Insert the audio input cable (13), located on the back of the
cradle/transmitter into the headphone jack of your audio source
(e.g., stereo, TV, CD player, DVD, etc.).
3. The audio signal LED indicator light (9), located on the front of the
cradle/transmitter, illuminates as soon as you have connected the power
adapter to the outlet and the audio cable to an active signal source.
OPERATION
Standard Usage
1. Switch on the audio source (TV, DVD, CD player, etc.) to which the
cradle/transmitter is connected. If your audio source is a DVD or
CD player, start a disc.
Warning: The cradle/transmitter has an automatic function that
switches it off if it does not receive an audio signal for approximately
4 minutes. If the volume on the audio source is too low, the
cradle/transmitter also switches off after four minutes. This feature
was installed to comply with current legislation that reduces the
amount of radio emissions in the environment. To ensure that this
function is not accidentally triggered, set the audio source volume at
approximately 50 percent capacity. Consult your component user’s
manual for details on how to set the volume for headphones.
2. The cradle/transmitter is now ready to receive an audio signal.
The cradle/transmitter is activated automatically when receiving
an audio signal from the audio source.
3. Check to make sure the audio signal LED indicator light (9) on the
front of the cradle/transmitter is lit, indicating that the unit is ready.
4. Place the headphone ON/OFF switch (2), located on the right
headphone, to the ON position.
5. Check to make sure the stereo LED indicator light (5) on the left
headphone is lit, indicating a strong signal.
6. The cradle/transmitter and the headphones feature double phase lock
loops (PLL) for radio frequency transmissions. Select one of the three
channels on the back of the cradle/transmitter (12) and the corresponding
channel on the left headphone (7). Be sure that the same channel (1, 2
or 3) is selected on both the cradle/transmitter and the headphones.
The Phase Lock Loop (PLL) function automatically locks the chosen
channel, providing top-quality audio reception with no sound loss.
7. Before wearing headphones adjust the volume using the VOLUME
control (6), located on the left headphone, to a comfortable volume
level.
8. When you are through using the headphones, switch them off using
the ON/OFF switch (2), and place the audio source on standby.
Maximum Performance
When the audio source offers a variable volume output, maximum
performance can be achieved. Variable volume outputs include
headphone jacks, computer speakers and some TV RCAoutput jacks.
Variable Volume Output. When using an audio source with a variable
output jack, you can reduce any distortion and achieve maximum
performance by following these steps:
1. Set the volume of the audio source component to mid-level.
2. Adjust the headphone VOLUME control (6) until the desired result
is achieved.
WHP141 US IB REVC_K.qxd 4/25/07 1:17 PM Page 8
If you are using NiMH or NiCd batteries, the batteries will charge when the
headphones are powered with the AC power adapter. Do not power the
headphones with the AC power adapter if you installed alkaline or other non-
rechargeable batteries—this could cause the batteries to leak. Do not mix
batteries with different chemistry types (for example, a zinc battery with an
alkaline battery). Do not mix new and used batteries. Do not leave batteries
installed in the product when not in use for long periods. Respect the
environment and the law. Before disposing of rechargeable batteries, ask
your distributor if they can be recycled and whether or not the distributor
collects rechargeable batteries for recycling.


