


5
INSTALLATION
Please follow this quick set-up guide to ensure trouble free installation
of your headphones.
Step 1:
Connect the built-in 3.5mm Stereo Audio Cord to the audio output
jack of your audio source, e.g. TV, HiFi, CD, DVD player etc. The 3.5mm
plug is standard and will fit in the jack marked PHONES or
LINE OUT that is available on most portable CD, MP3 players or
portable audio device.
* If you are connecting to a stereo receiver or if your audio source has
two RCA output jacks (red and white in color), use the Y-connection
Cord that is included for connecting the transmitter to the
the jacks marked AUDIO OUT or LINE OUT.
Step 2:
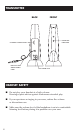
Connect the plug end of the AC Adapter to the DC IN Socket,
located on the back of the transmitter, and plug the adapter into
the AC wall outlet.
Important: This power unit is intended to be correctly oriented in a
vertical or floor mount position.
Step 3:
The transmitter is now ready to receive an audio signal. When there
is a signal received from the audio source, the Power LED Indicator
will glow RED to confirm that the transmitter is operating.
Make sure the transmitter is located on a secure flat surface, preferably
above head level. This will assure the best performance and allow the
headphone to receive the wireless signal.
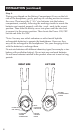
* The transmitter has an auto-cut-off function. When there is no audio
signal (such as when a CD has finished and the player stops) for
a period of about 90 seconds, the power of the transmitter will be
automatically cut off. You will then hear some noise from the headset
and the LED on the earcup will turn RED. Once an audio signal is
restored to the transmitter (resume playing the CD or audio program)
then the LED on the transmitter will glow RED indicating that it is
transmitting audio once again (the LED on the headphone will turn
back to GREEN to indicate normal operation).