


10
SPECIAL FEATURES
RECORDING AND DUBBING
You can record from any component connected to the
receiver/amplifier or dub (copy) cassette tapes.
Notes:
• Tape quality greatly affects the quality of the
recording. Your cassette deck can play Type I, Type
II, and Type IV tape. We recommend Radio Shack
brand tapes.
• Before recording or dubbing, be sure the cassettes
onto which you want to record or dub have their
erase-protection tabs in place. To prevent
accidental erasure of a tape, remove the erase-
protection tabs. For more information, see “Erase-
Protection Tabs.”
• To record at the beginning of a cassette, turn the
cassette’s hub with your finger or a pencil until the
dark part of the tape enters the opening in the
edge of the cassette. Before dubbing, position both
tapes this way to prevent missing recording
material at the very beginning of a tape.
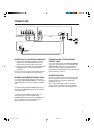
Recording from Line-In Sources
To record from the device connected to the cassette deck’s
LINE INPUT jacks, follow these steps.
1. Press POWER to turn on the cassette deck.
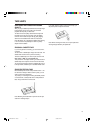
2. Load a blank tape (or one you want to record
over) into Deck 2. Be sure the side you want
to record on is facing you and the full reel is
to the left.
3. Press 3 on Deck 2 to set the tape direction
and then press 7 .
4. Set DOLBY NR for the noise-reduction system
you want to use. See “Dolby Noise Reduction”
on Page 7.
5. Set REV MODE. See “Loading and Playing a
Cassette Tape.”
6. Press RECORD(¶). The cassette deck enters
the record pause mode.
7. Play the loudest part of the selection you want
to record.
Set REC LEVEL so the LEVEL meter goes to -3 dB
most of the time and to 0 dB at peaks. This gives the
recording a high signal-to-noise ratio with minimum
distortion.
8. Start the source you want to record, then press
3 on Deck 2 to begin recording.
9. To stop recording, press 7 on Deck 2.
PRB1200A.En.01.13.DOC 9/2/99, 9:18 PM10