


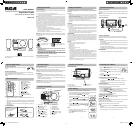

Installing an iPod Dock Adapter
1. Before connecting your iPod, it’s
recommended that you install the
appropriate iPod Dock Adapter (supplied
withtheiPodorsoldseparately)inthedock
of the unit.
2.InsertyouriPodDockAdapterintothedock
until it sits rmly in place.
Removing the iPod Dock Adapter
1. RemovetheiPodDockAdapterasillustrated
in the gure to the right.
2. Replace it with another one you need.
Inserting Your iPod
1. Insert your iPod into the connector in the
dock.
2. Press the
STANDBY/ON button to turn on
the unit.
3. Press the FUNCTION button repeatedly
untiltheindicator“iPod”appearsonthe
display.
4. Press the
PLAY/PAUSE button to start
playing.
Notes:
• TheiPodwillchargeautomatically(until
fullycharged)onceitisdockedinthecradle.
• TopreventinterferencetoAMradiosignals,pleaseswitchotheiPod
whilelisteningtoAMstations.
Pausing Playback
• Pressthe PLAY/PAUSE button.
• Toresumeplayback,pressthe
PLAY/PAUSE button again.
Skipping to a Another Track
• Presseitherthe or button according to the desired direction.
• Pressthe
buttontoskiptothebeginningofthecurrenttrackor
previoustrack.Pressthe
buttontoskiptothebeginningofthe
nexttrack.
Locating a Particular Point on a Track
• Keepeitherthe or buttonpressedduringplayback,according
to the desired direction, and release at the desired point.
Repeat Playback
Repeat lets you play songs repeatedly (a single repeat or all songs
repeat).
Compatible iPod Types
• iPodnano(1stgeneration)1GB,2GB,4GB
• iPodnano(2ndgeneration)2GB,4GB,8GB
• iPodnano3rdgeneration(video)4GB,8GB
• iPodnano4rdgeneration(video)8GB,16GB
• iPod5thgeneration(video)30GB,60GB,80GB
• iPodclassic80GB,120GB,160GB
• iPodtouch(1stgeneration)8GB,16GB,32GB
• iPodtouch(2ndgeneration)8GB,16GB,32GB
Note:AlsosupportsiPhonewheniPhoneissetto“airplanemode”.
Listening to Your iPod
Preset EQ
Timer Setting
Sleep Timer Setting
Display Function
Troubleshooting Guide
Limited WarrantyLimited Warranty
Maintenance
1. Press the STANDBY/ON button to turn on the unit.
2. SlidetheOPENknobtoopentheCDdoor.Placeadiscinthecenter
withthelabelsidefrontandthenclosetheCDdoorgently.
3. Press the FUNCTIONbuttontoCDmode.“- -”willblinkonthe
display.Thenthetotaltrackno.isshownonthedisplay.
4. Press the
PLAY/PAUSE button to start playing.
• Adjustthevolumelevels.
To Pause Playback
• Pressthe PLAY/PAUSE button.
• Toresumeplayback,pressthe
PLAY/PAUSE button again.
To Stop Playback
• PresstheBAND/ STOP button.
Skipping to Another Track
• Presseitherthe or button according to the desired direction.
Press the
buttontoskiptothestartofthecurrenttrackorskip
toprevioustracks.Pressthe
buttontoskiptothebeginningof
thenexttrack.
Locating a Particular Point on a Track
• Keepeitherthe or buttonpressedduringplayback,
according to the desired direction, and release at the desired point.
REPEAT PLAYBACK
Repeat Current Track
• Pressthe MEM.UP/ buttonuntil“
REPEAT
”blinksonthedisplay.The
currenttrackwillbeplayedrepeatedly.
Repeat the Entire CD
• PresstheMEM.UP/ buttonuntil“
REPEAT
”stopsblinkingandremains
on.Alltrackswillbeplayedrepeatedly.
Cancel Playback Mode
• PresstheMEM.UP/ button until repeat indicator disappears.
RANDOM PLAYBACK
Alltracksonthedisccanbeplayedinrandomorder(Usingtheremote
control only).
Random Playback
• PresstheRANDOM button on the remote
controland“RANDOM”willbeshownonthe
display.Alltrackswillbeplayedrandomly.
Afteralltrackshaveplayed,theunitwillstop
automatically.
Cancel Random Playback
• PresstheRANDOM button on the remote control again during
RANDOMplaybacktoreturntonormalplayback.
PROGRAMMABLE CD PLAYBACK
Aprogramofupto20trackscanbesettoplayinapresetorder.
1. InCDstopmode,pressthePROG/MEM/
(
)buttonand“MEMORY”&“- -”willblinkon
the display.
2. Press the
or button to select the desired
trackthenpressthePROG/MEM/
( ) button
tostorethetrackinmemory.
3. Toaddadditionaltracks,repeatstep2(upto20tracks).
4. Tostartplayback,pressthe
PLAY/PAUSE button.
To Check the Program:
• PresstheBAND/ STOP button and the or button.Eachtime
the
buttonispressed,thetracknumberappearsonthedisplay.
To Change the Programmed Tracks during Program
Playback:
• PresstheBAND/ STOP button and press the PROG/MEM/ ( )
button repeatedly to search the program number, then press either
the
or buttontoselectthedesiredtrack.PressthePROG/
MEM/
( )buttonagaintoregisterthenewlyselectedtrackinto
program.
To Erase the Whole Program, Do One of the Following:
• PresstheFUNCTIONbuttontochangetoradio/iPod/AUXmode.
• Pressthe
STANDBY/ON button to turn o the unit.
• PressBAND/
STOPbuttonrepeatedlyuntil“MEMORY”disappears.
CD Playback CD Playback
RANDOM
MEMORY
iPod Dock Adapter
Listening to Your iPod
Listening to Your iPod
Thissystemsupportsavarietyofequalizersandsoundeects.
Duringplayback,pressthePRESET EQ button to select a desired music
mode.EachtimethePRESET EQ button is pressed, the music mode will
bechangedtothenextoneasfollows:
-> (ROCK)-> -> (CLASSIC)
The timer function will turn the unit on at a preset time.
To Set Timer
1. In standby mode, press and hold the TIMER button on the remote
controluntiltheTIMERindicatorblinks.
2. Press and hold the PROG/MEM/
( )buttonuntilthehourdigitsblink.
3. Press the
or button to adjust the desired hours then press
the PROG/MEM/
( ) button once to conrm. The minute digits
willbegintoblink.
4. Press the
or button to adjust the desired minutes then press
the PROG/MEM/
( ) button once to conrm. The TIMER indicator
willstopblinkingandremainon.
5. Theunitwillwakeupto“RADIO”,“iPod”,“AUXIN”or“CD”whenthe
timer reaches the preset time.
• ForRADIOtimer,rsttuneintoadesiredstation.
Press the
STANDBY/ON button to enter standby mode, then set
the timer following the above steps.
• ForCDtimer,rstpresstheFUNCTIONbuttontoCDmodeandinsert
oneCDintotheunit.
Press the
STANDBY/ON button to enter standby mode, then set
the timer.
• ForAUXINtimer,rstconnecttheplugtotheAUXINjackinbackpanel.Press
the
STANDBY/ON button to enter standby mode, then set the timer.
• ForiPodtimer,rstinsertyouriPodintotheconnector,Pressthe
FUNCTION button to iPod mode. Press the
STANDBY/ON button
to enter standby mode, then set the timer.
Note:Beforesettingtimer,youcanadjustthevolumelevelsinRADIO/
CD/iPod/AUXINmodeforthetimer.
To Cancel Timer
• PressandholdtheTIMER button on the remote control until the
TIMERindicatorgoesout.
CD Mode
1. Duringplayback,presstheDISPLAY button repeatedly to shue
betweentheCDplaybackmodeandthecurrenttime.
2. Whenstopped,presstheDISPLAY button to shue between the total
numberofCDtracksandthecurrenttime.
Radio/iPod/AUX Mode
• PresstheDISPLAYbuttontoshuebetweenthecurrentplayback
mode and the current time.
The sleep timer automatically turns the unit o after a certain time.
1. Whiletheunitison,presstheSLEEPbuttonand“
”appearson
the display.
2. Press the SLEEP button repeatedly to select the desired sleep time
as below:
3. The unit will automatically turn o once it counts down the sleep time.
• ToclearthepresetsleeptimepresstheSLEEPbuttonuntil“
00
”
appears.
Cleaning the Unit
Donotusevolatilechemicalsonthisunit.Cleanbylightlywipingwithasoftcloth.
Cleaning the CD
IftheCDskipsorwillnotplay,thediscmayneedtobecleaned.
Before playing, wipe the disc from the center outwards with a cleaning cloth.
After playing, store the disc in its case.
Handling the Disc
OnlytouchtheCDontheedgetoavoidngerprintsonitssurface.
Donotstickpaperortapenorwriteanythingonthesurface.
PROBLEMS SOLUTIONS
CD
Systemdoesnot
turn on
• MakesureACadapterissecureintheoutlet,andoutlet
has power.
• Makesureyou’veselectedCDmode.
Discinplacebut
unit won’t play
• Makesuredisclabelisfacingfront.
• Makesurediscisclean.
• Pausemodeisactivated.
• Discmaybedamagedordirty;checkdisc.
Discskips • Makesuretheunitisonasecurespot.Vibrationor
jarringcancausethedisctoskip.
RADIO
PoorFMreception • MakesureFMantennawireisfullyextended.
• Electricalinterferenceinyourhomecancause
poorreception.Movetheunitawayfromthem
(especially those with motors and transformers).
PoorAMreception • Rotatetheunithorizontally.
iPod
iPoddoesnotdock
properly or does not
install properly.
• Remove your iPod from the dock and check for
obstructionontheconnectorsinthedockandon
your iPod.
iPod does not
respond to the
speakersystem.
• MakesurethatyouriPodisworkingproperlybefore
dockingintotheunit.PleaserefertoyouriPod
manual for details.
AVC MULTIMEDIA ("AVC") makesthefollowinglimitedwarranty.These
limitedwarrantiesextendtotheoriginalconsumerpurchaserandislimited
to non-commercial user of the product.
One Year Parts & Labor Warranty
AVCproductspurchasedintheUnitedStatesarewarrantedtobefreefrom
defectsinmaterialsorworkmanshipforaperiodofoneyearfromthedate
of their original retail purchase. If the unit fails to conform to this warranty,
we will service the product using new or refurbished parts and products, at
AVC's sole discretion.
Duringaperiodofoneyearfromtheeffectivewarrantydate,AVC will
provide, when needed, service labor to repair a manufacturing defect at
itsdesignatedServiceCenter.ToobtainwarrantyserviceintheUnited
States,youmustfirstcallourCustomer Support Center at 1-800-506-
5746 or 1-877-252-6873, during the hours listed in the box below. The
deterninationofservicewillbemadebyAVCcustomersupport.
PLEASE DO NOT RETURN YOUR UNIT TO AVC WITHOUT PRIOR
AUTHORIZATION. New or remanufactured replacements for defective parts
or products will be used for repairs by AVCatitsdesignatedServiceCenter
foroneyearfromthedefectivewarrantydate.Suchreplacementpartsor
products are warranted for an additional one year from the date of repair or
replacement.TheCustomerwillberequiredtoshiptheunittotheService
CenterindicatedatthetimeCustomerSupportiscontactedtomakethe
necessary repairs. The customer is responsible for all transportation charges
to the service facility.
Packaging and Shipping Instruction
Whenyousendtheproducttothe AVC service facility you must use the original
cartonboxandpackingmaterialoranequivalentasdesignatedbyAVC .
Your Responsibility
(1)Youmustretainyourbillofsaletoprovideproofofpurchase.
(2) These warranties are effective only if the product is purchased and
operatedintheU.S.A.orCanada.
(3)Warrantiesextendonlytodefectsinmaterialorworkmanship,anddo
notextendtoanyproductorpartswhichhavebeenlostordiscarded,
or damage to product or parts caused by misuse, accident, improper
operation or maintenance, or use in violation of instructions provided
with the product, or to product which has been altered or modified
withoutauthorizationofAVC, or to products or parts thereof which
have had the serial number removed or changed.
Out of Warranty
In the event your product requires repair after the limited warranty period has
expired,pleasecontactourCustomerSupportCenterat1-800-506-5746,
1-877-252-6873 or
www.RCAav.com
Hours:Monday-Thursday:9am-7pm,Friday:9am-5pm,Saturday:9am-NOON
Easterntime.
Important:
Youareresponsibleforanytransportation,shippingorinsurancerelativetothe
return of the product to our Product Returns Center.
All warranties implied by state law, including the implied warranties of
merchantabilityandtnessforaparticularpurpose,areexpresslylimitedto
thedurationofthelimitedwarrantiessetforthabove.Withtheexception
of any warranties implied by state law as hereby limited, the foregoing
warrantyisexclusiveandinlieuofallotherwarranties,guarantees,
agreements and similar obligations of manufacturer or seller with respect
to the repair or replacement of any parts. In no event shall AVC be liable for
consequential or incidental damages.
Noperson,agent,distributor,dealerorcompanyisauthorizedtochange,
modifyorextendthetermsofthesewarrantiesinanymannerwhatsoever.
The time within action must be commenced to enforce any obligation of
AVC arising under the warranty or under any statute, or law of the United
Statesoranystatethereof,isherebylimitedtooneyearfromthedateof
purchase. This limitation does not apply to implied warranties arising under
state law.
This warranty gives you specic legal rights and you may also have other
rights,whichmayvaryfromstatetostate.Somestatesdonotallow
limitation on how long an implied warranty lasts, when an action may
bebrought,ortheexclusionorlimitationofincidentalorconsequential
damages, so the above provisions may not apply to you.
For more information on other products and services, please contact our
web site at www.RCAav.com
Important:Alsokeepyour“BillofSale”asproofofpurchase.
Modelno.....................................................Productname.................................................
Type of set ..................................................................................................................................
Serialno.......................................................Invoiceno........................................................
Datepurchased.........................................Dealername...................................................
FORSUPPORT,SERVICEANDREPAIR,PLEASEVISITwww.RCAav.com
Specificationsandexternalappearancearesubjecttochangewithout
notice.
• PresstheMEM.UP/ button on the remote control. The repeat
indicator appears on the iPod screen.
• Tocancelrepeatplayback,presstheMEM.UP/
button until the
repeat indicator disappears.
Note: Please refer to the owner’s manual that was included with your
iPod for more details.
Random Playback
Randomplayssongs/albumsfromyouriPodinarandomorder.
1. Press the RANDOM button on the remote control once and the
random indicator appears on the iPod screen. All songs will be
played without sequence.
2. Press the RANDOM button on the remote control twice and the
random indicator appears on the iPod screen. All songs of this
albums will be played without sequence.
• Tocancelshueplayback,presstheRANDOM button until the
shue indicator disappears.
Note: Please refer to the owner’s manual that was included with your
iPod for more details.
AUX IN Connection
Connecting to AUX IN for Other Sound Sources
YoucanconnectaudiodevicessuchasyouriPod,CDplayers,MP3Players,
orPCtotheunitviatheAUXINjack.Todothis,connectanaudiocable
with3.5mmplugsfromthelineoutorheadphoneoutjackoftheother
audiodevicetotheAUXINjackontheunit’sbackpanel.
Listening to the Connected Device
1. Press the FUNCTIONbuttontoAUXINmodeand“AU”isshownon
the display.
2. Turnontheaudiodeviceyou’veattachedtotheAUXINjack.
- 8 - - 9 - - 11 -- 10 -
- 12 -
- 13 - - 14 -
PrintedinChina811-711691W062
Need More Help?
Please visit online help at http://www.RCAav.com
811-711691W062 ENG RCA.indd 2 2009-05-22 15:05:35