EN
General controls
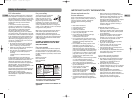
Discs for playback and recording
9
EN
8
2
1
3
4
5
6
7
8
9
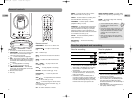
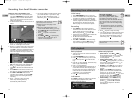
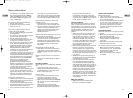
Main unit
1. Connector for Small Wonder camcorder
2. ON/STANDBY – To turn on or off the unit.
The indicator around the button lights
when the unit is turned off.
3. – To start and pause the playback.
4. REC – To start the recording. The indicator
around the button lights during recording
and flashes while initializing or stopping
recording.
5. – To stop playback or recording.
6. – To open or close the disc tray.
7. CAMCORDER DOCKED – This indicator
lights when the Small Wonder camcorder
is connected to the unit.
8. Remote control sensor
9. Disc tray
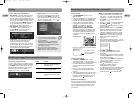
Remote control
ON/STANDBY – To turn on or off the unit.
OPEN/CLOSE – To open or close the disc
tray.
0-9 – Numeric keys
INFO –To show the on-screen info banners
(p. 13).
INPUT – To select the audio visual sources
(p. 10).
REV /FWD –To play in fast or slow
motion (p. 13).
STOP –To stop playback or recording.
RECORD – To start recording (p. 11-13).
PLAY/PAUSE –To start or pause the
playback.
SKIP /– To skip backward or forward a
chapter, title or track (p. 11-13).
– To move through on-screen menus
in the direction of the arrow button (e.g., to
move right, press ).
OK – To confirm selections in menus.
MENU –To access the disc menu or select
PBC mode of VCD on or off (p. 14).
SELECT –To select video for recording from
the Small Wonder camcorder (p. 12).
PLAYMODE –To select repeat or shuffle
playback modes (p. 14, 16).
VIDEO OUT – To select between progressive
or interlace output mode when component
video connections are made (p.7); to select
displaying images on the connected TV or
Small Wonder camcorder while the camcorder
is connected to the unit (p. 12).
SET UP – To access the Memory Maker’s
player menus (p. 17).
REC QUALITY –To select the recording
quality (p. 17).
AUDIO, SUBTITLE, ANGLE – To select audio,
subtitle and angle setting respectively (p. 13-
14).
ZOOM –To enlarge image when watching
DVD or VCD (p. 13).
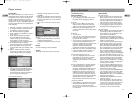
Discs for recording
DVD+R 2.4x, 4x, 8x, 16x and 32x
DVD–R 2.4x, 4x, 8x, 16x and 32x
DVD+RW 2.4x, 4x and 8x
DVD–RW 2.4x, 4x and 8x
• This recorder is not compatible with DVD-
RAM, CD-R, or CD-RW discs for recording.
• This recorder is compatible with dual-
layered discs.
• The first time you load a disc, the DVD
recorder will format it. This should only
take a few seconds.
• DVD±R disc must be finalized (refer to
recording on page 11) after recording for
playing in another DVD player. The DVD
recorder automatically asks if you want to
finalize a disc when you eject the disc.
Discs for playback
DVD Video discs with region
code 1 or ALL
DVD±R/RW discs, DVD±R discs
(the discs must be finalized
for playback)
CDs (Audio CDs, CD-R, CD-RW,
mp3, jpeg discs)
Video CD discs (VCD, SVCD)
• Discs for recording (DVD±R/RW) are not
assigned region numbers.
•You cannot play the following types of
discs: Laserdiscs, CD-I, CD-ROM (computer
only discs), discs recorded using other
broadcast standards (i.e. PAL or SECAM), or
DVD-RAM discs.
• Some discs may not be compatible due to
laser pickup and disc design.
• Insert 2 batteries (AAA, LR03) at
the back of the remote control
prior to use.
• Point the remote control at the unit, not
the TV, to operate. Make sure there is a
clear path between the remote control
and the unit, so the signal is not
blocked.
• Refer to the pages in the user manual
for operation details as indicated in the
parentheses.