


Owner’s Manual
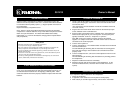
BATTERY INSTALLATION
Open the battery compartment by sliding the compartment cover in the
direction of the arrow printed on the cover. Install two AAA alkaline batteries
in accordance with the polarity symbol ( + ) diagram printed on the base of
the compartment.
Replace the battery compartment cover.
Note: There is a short, black ribbon attached to the interior of the battery
compartment. Install the batteries on top of this ribbon and place the excess
ribbon on top of the batteries. This ribbon will facilitate future battery
replacement (i.e., to remove the batteries, simply grab the exposed ribbon
and pull upwards).
Battery Notes
Follow these precautions when using batteries in this device:
1. Use only the size and type of batteries specified.
2. Be sure to follow the correct polarity when installing the batteries as indicated in the
battery compartment. Reversed batteries may cause damage to the device.
3. Do not mix different types of batteries together (e.g. Alkaline and Carbon-zinc) or old
batteries with fresh ones.
4. If the device is not to be used for a long period of time, remove the batteries to prevent
damage or injury from possible battery leakage.
5. Do not try to recharge batteries not intended to be recharged; they can overheat and
rupture. (Follow battery manufacturer’s instructions.)
A FINAL WORD ABOUT THOSE AAA BATTERIES.
To preserve the life of the batteries, always turn the Headphones OFF when
not in use. If the red LED does not light when the headset is turned on, it is
an indication that the batteries are not supplying sufficient power. Make
certain the batteries have been properly installed or replace them with fresh
batteries.
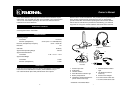
PLUGGING IN & TURNING ON
1. Locate a 120 volt AC outlet no more than approximately five feet from the
sound system and plug the Transformer on the end of the AC/DC Power
Cord into the outlet.
(This Transformer converts standard 120 volt AC household current into
12 volt DC current).
2. Plug the other end of the AC/DC Power Cord into the AC/DC input jack
on the underside of the Transmitter base.
3. Plug the Audio Cord leading from the underside of the Transmitter base
into the audio output jack on your sound system. Sound system jacks
typically are labeled “audio out,” “earphones” or “phones.”
Note: With some sound systems, it will be necessary to install the
supplied 1/4" adapter on the end of the Audio Cord in order to make the
connection to the audio output jack.
4. Turn the sound system on.
5. Turn the Transmitter on. The ON/OFF Switch is located on the underside
of the Transmitter base.
The red LED will light confirming that the Transmitter is receiving power.
If the LED does not light, make certain that all connections have been
properly made.
6. Turn the Headphones ON. (This same control adjusts the volume on the
right earphone).
The red LED will light confirming that the batteries are providing power to
the Headphones.
7. Adjust the headband so that it fits comfortably.
8. Adjust the left and right volume controls on the Headphones. (In the
event of insufficient volume, check the volume control on the sound
system).
DOESN’T SOUND RIGHT TO ME
If you experience static or distortion in the Headphones:
1. Check all connections.
2. If applicable, make certain the sound system is tuned properly.
3. Make certain you are within approximately 100 feet of the Transmitter.
32
33-1219