


14
Remote Control Operation
11. Press
7
77
7
.
Iý'&<J
Iý'&<JIý'&<J
Iý'&<J
appears. To change the distance between the
listening position and the rear (surround) speakers, repeatedly
press
8
88
8
or
9
99
9
until you reach the desired level (
&ý
&ý&ý
&ý
to
)&ý<J
)&ý<J)&ý<J
)&ý<J
).
12. Press
ENTER
.
<HEDJ
<HEDJ<HEDJ
<HEDJ
appears.
13. Press
SETUP
to exit.
Surround Effects
Important:
The center and rear speakers only operate when the unit
is set to a surround sound mode and the source material being
played is recorded or broadcast in Dolby Digital, DTS or Dolby Pro
Logic surround sound.
Stereo broadcasts or recordings will produce some rear channel ef-
fects when played in a surround mode. However, mono sources will
not produce any sound from the rear speakers.
Changing System Settings - Special Circumstances
When you make a copy of DVD/CD via TAPE output, set the front
speaker size to
<#B7H=;
<#B7H=;<#B7H=;
<#B7H=;
. Set the surround mode to
IJ;H;E
IJ;H;EIJ;H;E
IJ;H;E
.
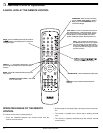
USING THE REMOTE CONTROL UNIT TO
CONTROL ADDITIONAL COMPONENTS
You can set your remote control to control other components such as
a VCR, TV, satellite receiver or cable box.
1. Turn on the component to be programmed.
2. Look up the brand and corresponding code(s) in the code list
(see “Manuracturer’s Codes” on Page 23).
3. While holding down the appropriate source button (
VCR
,
TV
, or
SAT
) on the remote control, use the number keys enter the first
code from the code list.
4. Release the component button, then press
POWER
.
If you have entered the correct code, the component turns off.
If the component does not turn off, repeat Steps 3 and 4 and
subustitute use the next code (if available) listed for the brand of
your component until the component responds to the remote
command.
Note:
To turn on or off the receiver when you select the VCR, SAT, or
TV function, press
POWER
twice.
Cautions:
• This remote control unit may not operate on all models of the
brands shown.
• If batteries are removed from the battery compartment of the
remote unit, replace the batteries within 30 minutes or the codes
are lost. You must then re-enter all previously programmed
codes.
• The buttons on the remote control unit may not work correspond-
ingly with those on the components brands.
• Experiment with the remote control and your components to see
which buttons work. If only a few functions operate, repeat Step
4 to see if another code operates more buttons.
CONTROLLING THE TUNER
1. Press
POWER
. The last selected function appears.
2. Press
TUNER
.
3. Press
BAND
to select the desired band.
4. Repeatedly press
TUNING/PRESET
)
))
)
or
-
--
-
to tune in the
desired station.
To change the frequency by one step,
press
TUNING/PRESET
)
))
)
or
-
--
-
quickly (less than half a second).
To tune to the next clear frequency,
hold down
TUNING/PRE-
SET
)
))
)
or
-
--
-
, then release the button. The system automatically
tunes to the next strong station.
Listening To FM Stereo Broadcasts
In FM mode, press
FM MODE
to select stereo or mono. When you se-
lect the stereo mode,
IJ
IJIJ
IJ
appears to the right of
Jkd[Z
Jkd[ZJkd[Z
Jkd[Z
. It goes off
when you select mono.
When you listen to very weak FM stereo stations, you might hear
higher-than-normal background hiss. Switch to mono to eliminate the
hiss.
Presetting Radio Stations
You can preset 30 AM and 30 FM stations regardless of the recep-
tion. Tune in the desired stations using auto or manual tuning.
Manual Preset
1. Press
BAND
to select the desired band.
2. Repeatedly press
TUNING/PRESET
)
))
)
or
-
--
-
to tune in the
desired station.
To change the frequency by one step,
press
TUNING/PRESET
)
))
)
or
-
--
-
quickly (less than half a second).
To tune to the next clear frequency,
hold down
TUNING/PRESET
)
))
)
or
-
--
-
, then release the button. The system automatically
tunes to the next strong station.
3. Press
MEMORY
.
C;CE
C;CEC;CE
C;CE
flashes for 5 seconds. When
C;CE
C;CEC;CE
C;CE
goes
off, press the button again (
C;CE
C;CEC;CE
C;CE
flashes again).
4. Select the preset number with
TUNING/PRESET
)
))
)
or
-
--
-
.
5. Press
MEMORY
again.
6. Repeat Steps 1–5 to memorize other stations (up to 30 stations
for each band). If you store a new station on a memory number
in which a station is stored, the old station is cleared.
To store stations on the other band, repeat Steps 1–6, substituting
the other band in Step 1.
Note:
If you want to store more stations later, you might find that
pressing
TUNING/PRESET
)
))
)
or
-
--
-
only moves the tuner to the next
preset station (instead of moving the frequency one step). If this hap-
pens, press
TUNING MODE
to return to manual tuning (see “Switching
Between Preset Stations and Manual Tuning”).