


7
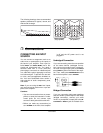
Connections
RIGHT
terminals for each channel (as
shown here).
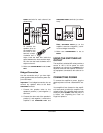
To connect the
speaker wires to
the amplifier, turn
the knob on the
terminal counter-
clockwise until it
stops, insert the bare wire inside the
space between the knob and the ampli-
fier, then turn the knob clockwise until it
stops to secure it.
3. Make sure
STEREO/MONO
is set to
STE-
REO
.
Bridged Connection
Use this connection only if you have high-
power speakers that can handle a power out-
put of 350 watts.
Important:
For a bridged connection, do not
connect any speaker wires to the black
SPEAKERS
terminals.
1. Connect the speaker wires to the
speaker’s positive (+) and negative (–)
terminals.
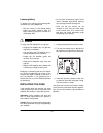
2. Connect the other end of the speaker’s
positive (+) and negative (–) wires to the
amplifier’s red
SPEAKERS LEFT
and
SPEAKERS RIGHT
terminals (as shown
here).
Note:
SPEAKERS RIGHT (+)
on the
amplfier is used as a negative (–) termi-
nal for a bridged connection.
3. Make sure
STEREO/MONO
is set to
MONO
.
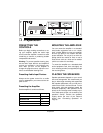
USING THE SWITCHED AC
OUTLET
The amplifier’s switched AC outlet provides a
source of 120 V, 60 Hz power for audio
equipment you connect to it.
POWER
on the
amplifier turns both the amplifier and the au-
dio equipment connected to this outlet on or
off.
CONNECTING POWER
To connect the amplifier to power, plug the
attached power cord into a standard AC out-
let.
Your amplifier’s fuse (located on the amplifi-
er’s back panel) protects the amplifier from
voltage surges. If the amplifier does not work
when you press
POWER
, check the fuse. If it
is blown, see “Replacing the Fuse” on
Page 9 to replace it.