


For more information visit our web site at http://www.polkaudio.com
1514
ENGLISH ESPAÑOL FRANÇAIS DEUTSCH
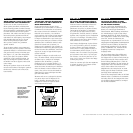
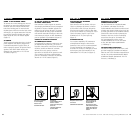
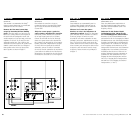
INSTALLING AND ADJUSTING
LEVELING FEET/CARPET SPIKES
Your RT tower speakers are supplied with
adjustable leveling feet/carpet spikes. They
can be found in a plastic bag that is taped
to the packing material. To install, lay the
speaker on its side (be careful not to scratch
the finish) and screw in the feet as far as
they will go into the threaded inserts in the
base of the speaker. If your speakers are on
a wood or tile floor, slip a rubber sheath over
each spike. If the speaker is on a carpeted
floor, the bare spikes will provide the best
stability and the best possible sound quality.
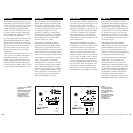
Once all four feet have been installed, place
the speaker in its chosen location. If you are
using the carpet spikes, place pressure on
the top of the speaker until the spikes pene-
trate the carpet and make contact with the
hard surface under the carpet.
Attempt to rock the speaker, side to side
and front to back. If the speaker is stable
in all directions, your job is done.
INSTALACIÓN Y AJUSTE DE LAS
PATAS/PERNOS PARA ALFOMBRAS
PARA NIVELAR
Sus bocinas de torre RT vienen con
patas/pernos para alfombras para nivelar
ajustables. Se encuentran adentro de una
bolsa de plástico pegada con cinta al materi-
al de empaque. Para su instalación, coloque
la bocina sobre un costado (tenga cuidado de
no rayar el acabado del gabinete) y atornille
las patas hasta el fondo de la rosca de las
aperturas de inserción localizadas en la base
de la bocina. Si sus bocinas se van a situar
sobre un piso de madera o loseta, coloque un
revestimiento de caucho en cada uno de los
pernos. En cambio, si la bocina está situada
sobre un piso alfombrado, los pernos descu-
biertos proporcionarán la mejor estabilidad
y la mejor calidad de sonido.
Ya que estén instaladas las cuatro patas,
coloque la bocina en el lugar seleccionado.
Si usted está utilizando los pernos para
alfombra, presione la parte superior del
gabinete hasta que los pernos penetren la
alfombra y estén en contacto con la superfi-
cie dura por debajo de la alfombra.
Trate de mecer la bocina de un lado para
otro y de atrás hacia adelante. Cuando la
bocina esté estable in cualquier dirección,
la instalación ya se hizo.
INSTALLATION ET AJUSTEMENT
DES PIEDS À PICOTS
Vos colonnes RT sont fournies avec des pieds
à picots avec roulettes d’ajustement. Ils se
trouvent dans un sac de plastique attaché à
l’emballage. Pour les installer, couchez l’en-
ceinte sur le côté (sans l’égratigner) et vis-
sez les pieds jusqu’au fond des écrous inté-
grés à la base. Si vos enceintes sont placées
sur un plancher de bois ou de tuile, glisser
une patte de caoutchouc sur chaque picot.
Si vos enceintes sont placées sur un tapis,
les picots métalliques offriront la meilleure
stabilité et la meilleure qualité sonore.
Les quatre pieds installés, placez l’enceinte
à l’endroit choisi. Si vous utilisez les picots
métalliques, appuyez sur le dessus de l’en-
ceinte jusqu’à ce que les picots transpercent
le tapis et touchent le plancher.
Vérifiez la stabilité de l’enceinte. Si elle est
de niveau et ne chancèle pas, votre travail
est terminé.
MONTAGE UND EINSTELLUNG
DER FÜßE/TEPPICHSPIKES
Ihre RT Standlautsprecher werden zum
Ausgleich von Bodenunebenheiten mit ein-
stellbaren Füßen (Teppichspikes) geliefert.
Sie befinden sich in einem PVC-Beutel,
der am Verpackungsmaterial befestigt ist.
Zur Montage der Füße legen Sie die
Lautsprecher auf die Seite (geben Sie acht,
daß dabei das Gehäuse nicht beschädigt
wird) und schrauben die Füße so tief wie
möglich in das dafür vorgesehene Gewinde
am Boden der Lautsprecher ein. Stehen
die Lautsprecher auf Keramikfliesen oder
Holzboden, können die Spikes zusätzlich
mit einer Gummihülse versehen werden.
Auf Teppichboden sorgen die ungeschützten
Spikes für optimale Standfestigkeit und
Klangqualität.
Nachdem alle Füße montiert sind, stellen
Sie die Lautsprecher an die gewählte
Position. Falls Sie Teppichspikes angebracht
haben, bringen Sie den Lautsprecher mit
sanftem Druck in Position, bis die Spikes
die feste Schicht unter dem Teppichboden
erreicht haben.
Bewegen Sie nun das Gehäuse vorsichtig
in alle Richtungen, um sicherzustellen,
daß es die notwendige Stabilität hat.