


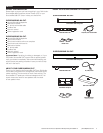
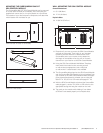

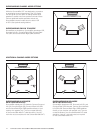

RESTING THE SURROUNDBAR ON A SHELF
T
he SurroundBar’s detachable feet can be reversed
and, depending on their orientation, will make the bar sit
flat or tilt up at 10°. Without the feet, the SurroundBar tilts
up 5°. Press the detachable rubber feet into the groove on
the bottom of the SurroundBar, plug in the speaker cable
and set the mode switch to either 7CH, 5CH or LCR,
depending upon your intended setup (see pages 6 - 10).
Place the speaker on a flat surface below or above your
TV and aimed directly toward your seating position.
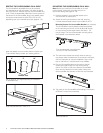
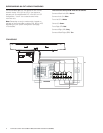
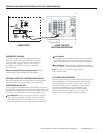
MOUNTING THE SURROUNDBAR ON A WALL
N
ote: Before you install your SurroundBar on its wall
mount bracket, make sure the mode switch is on
the correct setting (see pages 6 - 10).
1. Hold the speaker in your intended location to be
sure there are no obstructions.
2. Attach the wall mount bracket to the wall, ensuring
it’s level and positioned exactly in the middle of the TV.
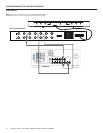
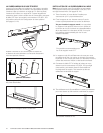
Mounting Screws For SurroundBar Bracket (not included)
The SurroundBar mounting bracket should be attached
to the wall using a minimum of five (5) #6 or #8 drywall
or wood screws, either bugle head or flat head, 1 1/2"
long or longer. The five recommended mounting points
are indicated in the illustration below.
3. The wall mount bracket has enough holes so that you
can always make the attachment to at least one wall stud,
which is important for a secure installation. Use a molly
bolt or wall anchor if a second stud is not available.
4. Plug the SurroundBar cable into the back of the bar,
ensure the mode switch is on the correct setting
(either 7CH, 5CH or LCR), then slide the SurroundBar
down onto the bracket’s mounting tabs, making sure
the SurroundBar sits securely on the wall mount bracket.
5. Tug gently on the SurroundBar while holding it from below
to ensure it is secure on its bracket.
4 Polk Audio Customer Service 800-377-7655 (Outside USA & Canada: 410-358-3600)
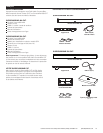
Wall mounted bar.
Shelf mounted bar sits in front of TV.
Flat, 5° angle or 10° angle depending on orientation
of detachable feet.
0°
5°
10°
Rubber Feet
Five recommended mounting points
for the CHT wall mount bracket.