


PLEASE TAKE INVENTORY
Please check to ensure you have everything in your Polk Audio
®
SurroundBar
®
400 Component Home Theater (CHT) or your
SurroundBar 500 CHT carton. Inside, you should find:
SURROUNDBAR 400 CHT:
SurroundBar 400 loudspeaker
Wall mount bracket
15' (4.6m) color-coded cable
2 rubber feet
Owner’s manual
Online registration card
SURROUNDBAR 500 CHT:
SurroundBar 500 loudspeaker
SDA control module
SDA control module wall mount template
Rack mount ears wit
h screws
Wall mount bracket
15' (4.6m) cable
2 rubber feet
Owner’s manual
Online registration card
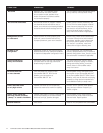
Important Note: If anything is missing or damaged, or if your
Polk Audio SurroundBar CHT system fails to operate, please
notify your dealer immediately. We recommend keeping your
original carton and packing materials in case you need to ship
the unit in the future.
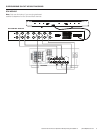
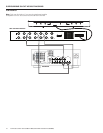
ABOUT YOUR SURROUNDBAR CHT
Thank you for choosing the SurroundBar CHT from Polk Audio.
You’re about to discover how the legendary Polk Audio sound
makes watching TV and movies so much more exciting. The
SurroundBar CHT produces a wide soundstage and rich, full
sound without the need for rear speakers and the clutter
of rear speaker wires.
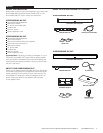
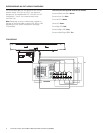
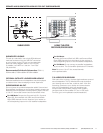
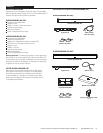
INSIDE YOUR SURROUNDBAR CHT CARTONS:
Wall Mount Bracket 15' (4.6m) Color-Coded Cable
SurroundBar 400 Loudspeaker
Wall Mount Bracket
15' (4.6m) Cable
SurroundBar 500 Loudspeaker
SDA Control Module
Rack Mount Ears
(Hardware Included)
SDA Control Module
Wall Mount Template
Rubber Feet
Rubber Feet
SURROUNDBAR 500 CHT:
SURROUNDBAR 400 CHT:
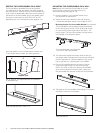
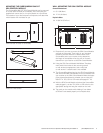
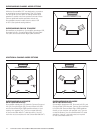
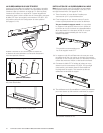
Crossover Module Wall Mount Template
1.Determine crossover module location.
2.Hold or tape the template to the mounting location,
eitherina vertical or horizontal position.
3.Mark the holes for the keyhole mounting screws
4.Attach the mounting screws into the wall stud or,
ifdirectlyinto drywall, by using wall anchors. Leave
enoughofthe screw exposed so that the keyhole
slotswillrest securely on the screws.
5.Attach the wires to the terminals on the back
ofthecrossover module (see manual).
6.Mount t
hem
oduleonthe wall.
See manualfordifferent mounting options
Gabarit pour montage mural
dela Crossover Module
1.Déterminez le lieu de montage de crossover module.
2.Tenez ou fixez le gabarit à l’endroit choisi—
enpositionverticale ou horizontale.
3.Marquez les trous pour les vis de montage
dessupportsen trou de serrure.
4.Visez les vis de montage au montant du mur—
utilisezdesancres si vous visez dans le placoplâtre.
Laissezdépasserles vis assez pour que les supports
entroude serrure s’enclenchent solidemen
ts
urlesvis.
5.Connectezles fils de h.p. aux bornes situées à l’arrière
decrossovermodule (consultez le manuel).
6.Montez module au mur.
Consultezlemanuel pour diverses options de montage.
Screw locationforhorizontal mounting
Positiondela vis pour montage horizontal
Screw locationforvertical mounting
Positiondela vis pour montage vertical
Center Point
PointCentral
Screw locationforhorizontal mounting
Positiondela vis pour montage horizontal
Screw locationforvertical mounting
Positiondela vis pour montage vertical
Customer Service Hours of Operation: Monday-Friday, 9AM-5:30PM EST polkcs@polkaudio.com 3
ENGLISH