


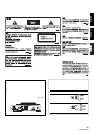

Before Operating (Names and Functions of Parts)Advanced Operations/Operaciones avanzadas
English
Español
35
<DRB1402> En/Sp
■ Recording a loop point
1. Set a loop-in point and loop-out point and begin loop play-
back.
2.
During loop playback, press the CUE/LOOP MEMORY button.
¶ The [MEMORY] indicator will light in the display, showing that the
loop data has been stored.
■ To recall a memorized cue/loop point
When cue/loop points are recorded, they are shown in red beneath the
playing address on the display.
1. Press the CUE/LOOP CALL button.
¶ When the CALL button (3) button is pressed, cue/loop points are
called up beginning with the one closest to the playback position,
and the unit will enter standby at the cue/loop point.
2. Press the PLAY/PAUSE button (6).
¶ Play/loop play will begin.
■ To delete cue/loop points
1. Press the CUE/LOOP CALL button.
¶ When the CALL button (3) button is pressed, cue/loop points are
called up beginning with the one closest to the playback position,
and the unit will enter standby at the cue/loop point.
2. Press the CUE/LOOP DELETE button at the cue/loop point
you wish to delete.
¶ The display will show the [DELETE] message, and the selected
cue point or loop point data will be erased.
■ Disc delete
This function deletes all stored information about a disc.
1. Insert the disc whose data (cue/loop points, etc.) you wish
to delete.
2. Hold the CUE/LOOP DELETE button depressed for 5 sec-
onds or more.
¶ The display will show the confirmation message [DISC DELETE?
PUSH MEMORY].
3. Press the CUE/LOOP MEMORY button.
¶ The display will show [DELETE], and all recorded information re-
garding the loaded disc will be deleted.
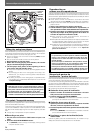
Copying recorded data to another player
Cue and loop-point data recorded in one player can be copied to another
player.
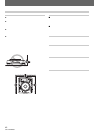
1. Use a mini plug cord to connect the DATA IN/OUT con-
nectors of two CDJ-800MK2* players (without loaded
discs). ☞ P. 1 5
¶ The supplied control cord can be used.
* Data can be copied from a CDJ-800 player to a CDJ-800MK2, but not
in the reverse direction.
2. Press the LOOP OUT (OUT ADJUST) button on the send-
ing player for five seconds or more.
¶ The sending player’s LOOP OUT (OUT ADJUST) button will light,
and the [COPY] message will appear in the display, indicating the
data transmission mode has been selected.
The BPM display will show the number of discs recorded in the player.
3. Press the LOOP IN/REALTIME CUE button on the receiv-
ing player for five seconds or more.
¶ The receiving player’s LOOP IN/REALTIME CUE button will light,
and the [COPY] message will appear in the display, indicating the
data reception mode has been selected.
The BPM display will show the number of discs recorded in the player.
4. Press the PLAY/PAUSE button (6) on the sending player.
¶ The sending player’s PLAY/PAUSE button [6] indicator will flash,
and the contents of the sending player’s memory will be transmit-
ted to the memory of the receiving player (any previous memory
contents of the receiving player will be overwritten).
¶ When the copying is completed, the [END] message will appear
in both players’ displays, and the players will return to normal op-
eration mode.
* If the [ERROR] message appears in one of the displays, the memory
data has not been copied properly. Turn the power to both players
OFF and then ON again, and repeat the copying procedure from
step 1.
* Data on the receiving player is overwritten by the data from the
sending player; this means that any previously existing data on
the receiving player will be completely lost.
1. Presione el botón CUE/LOOP CALL.
¶ Cuando se presiona el botón CALL (3), los puntos de localización/
bucle se llamarán empezando por el que esté más cerca de la
posición de reproducción, y la unidad se establecerá en el modo
de espera en el punto de localización/bucle.
2. Presione el botón PLAY/PAUSE (6).
¶ Se iniciará la reproducción/reproducción de bucle.
■ Para borrar puntos de localización/bucle
1. Presione el botón CUE/LOOP CALL.
¶ Cuando se presiona el botón CALL (3), los puntos de localización/
bucle se llamarán empezando por el que esté más cerca de la
posición de reproducción, y la unidad se establecerá en el modo
de espera en el punto de localización/bucle.
2. Presione el botón CUE/LOOP DELETE en el punto de
localización/bucle que desee borrar.
¶ El visualizador mostrará el mensaje [DELETE], y los datos del punto
de localización o de bucle seleccionado se borrarán.
■ Borrado de disco
Esta función borra toda la información del disco almacenada.
1. Inserte el disco cuyos datos (puntos de localización/bucle,
etc.) desee borrar.
2. Mantenga presionado el botón CUE/LOOP DELETE du-
rante 5 segundos o más.
¶ El visualizador mostrará el mensaje de confirmación [DISC DE-
LETE? PUSH MEMORY].
3. Presione el botón CUE/LOOP MEMORY.
¶ El visualizador mostrará [DELETE], y toda la información grabada
relacionada con el disco cargado se borrará.
Copia de los datos
grabados a otro reproductor
Los datos de puntos de localización y de bucles grabados en un
reproductor podrán copiarse a otro reproductor.
1. Emplee un cable de miniclavijas para conectar los
conectores DATA IN/OUT de los dos reproductores CDJ-
800MK2* (sin discos cargados). ☞ P. 1 5
¶ Puede utilizarse el cable de control suministrado.
* Los datos pueden copiarse de un reproductor CDJ-800 a un CDJ-
800MK2, pero no en la dirección inversa.
2. Presione el botón LOOP OUT (OUT ADJUST) del
reproductor transmisor durante cinco o más segundos.
¶ Se encenderá el botón LOOP OUT (OUT ADJUST) del reproductor
transmisor, y aparecerá el mensaje [COPY] en el visualizador,
indicando que se ha seleccionado el modo de transmisión de datos.
La visualización de BPM mostrará el número de discos grabados en
el reproductor.
3. Presione el botón LOOP IN/REALTIME CUE del repro-
ductor receptor durante cinco o más segundos.
¶ Se encenderá el botón LOOP IN/REALTIME CUE del reproductor
receptor, y aparecerá el mensaje [COPY] en el visualizador,
indicando que se ha seleccionado el modo de recepción de datos.
¶ La visualización de BPM mostrará el número de discos grabados
en el reproductor.
4. Presione el botón PLAY/PAUSE (6) del reproductor
transmisor.
¶ Parpadeará el indicador del botón PLAY/PAUSE [6] del
reproductor transmisor, y se transmitirá el contenido de la memo-
ria del reproductor transmisor a la memoria del reproductor receptor
(se sobrescribirá el contenido anterior de la memoria del
reproductor receptor).
¶ Cuando se complete la copia, aparecerá el mensaje [END] en los
visualizadores de ambos reproductores, y los reproductores
retornarán al modo de operación normal.
* Si aparece el mensaje [ERROR] en uno de los visualizadores,
significa que los datos de la memoria no se han copiado
correctamente. Desconecte la alimentación de ambos
reproductores y luego vuélvala a conectar, y repita el
procedimiento de copiado desde el paso 1.
* Los datos del reproductor receptor se sobrescribirán por los datos
del reproductor transmisor; esto significa que los datos que había
anteriormente en el reproductor receptor se perderán por
completo.