12
<DRB1232>
En
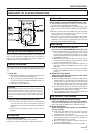
ADVANCED OPERATIONS: SPECIAL DISC JOCKEY TECHNIQUES
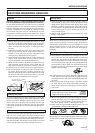
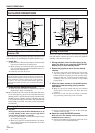
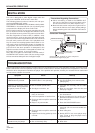
Jog dial
During fader start
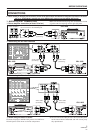
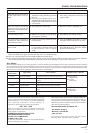
DJ Mixer DJM-300 or
DJM-500
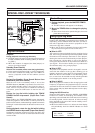
During relay play
Cotrol cables
Cotrol cable
DJ Mixer DJM-300 or DJM-500
Fader Start Playback
A commercially available mini-plug cord can be used to
connect this unit's CONTROL jack to one of the optional
DJ mixers DJM-500 or DJM-300; when this is done, the
player's CUE standby is automatically released when the
DJ mixer's channel fader is raised, thus allowing instant
playback start. The player’s fader start operation can also
be used to produce cross-fader effects. Restoring the
fader position returns the player to its cue point (back
cue) automatically.
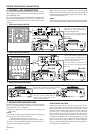
The following operations are performed on the DJ Mixer.
For details regarding connections and operation, con-
sult the Operating Instructions furnished with your DJ
Mixer.
1 Set CROSS FADER switch to ON.
2 Set FADER START switch to ON.
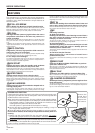
7 Confirm a cue point (cue point sampler)
After setting a cue point, press and hold the CUE
button.
÷ As long as the CUE button is held depressed, the
sound of the track at the cued point can be heard.
7 Return to a cue point (back cue)
1. During playback, press the CUE button.
÷ The player returns to the set cue point and en-
ters standby mode.
2. Press the PLAY/PAUSE button (6 ).
÷ Playback will begin instantly from the cue point.
7 Modify a cue point (cue point adjust)
1. During playback, press the CUE button.
÷ The player returns to the set cue point and en-
ters standby mode.
2. Press the SEARCH buttons (1, ¡ ).
÷ The cue point moves in 1-frame increments
(broken sound will be reversed).
÷ The cue point can also be changed by rotating
the jog dial after pressing the SEARCH buttons
(1, ¡)
3. Press the CUE button.
÷ The new cue point will be set at the point the
CUE button is pressed.
Cueing
Relay Play Using Two Players
Relay play can be performed by using a commercially
available miniplug cord to connect the CONTROL jacks
of this unit and another CDJ series CD player.
÷ Set both player’s auto cue function to ON (the AUTO
CUE indicators will light in the displays).
÷ Set your audio mixer's fader control to its center po-
sition.
1. Begin playback on the first player.
2. When the currently playing track ends, playback will
begin automatically on the standby player.
3. The first player will enter cue standby mode at the
beginning of the next track on its disc.
÷ By repeating this operation, the two players can
be used to perform continuous relay play.
÷ By loading new discs on the standby player, you
can construct a continuous program of whatever
tracks you wish.
÷ By setting a cue point on the standby player, you
can perform relay to any desired cue point on the
selected track (see page 10: Setting a Cue Point).
NOTE:
÷
Relay play may not operate properly if the audio out
jacks on the two players are not connected to the same
audio mixer.
÷
If the power to one player is turned off during its play-
back, the other player may begin playback.
3 When “A” is in standby mode at cue point, move the
CROSS FADER slider from right to left to automati-
cally start playback on “A”.
4 When “B” is in standby mode at cue point, move the
CROSS FADER slider from left to right to automati-
cally start playback on “B”. ( “A” will simultaneously
be back-cued (returns to cue point)).
NOTE:
Fader start and relay play cannot be performed simulta-
neously, since different control cable connections are re-
quired.