4) Orient the bracket so that it is level. Mark on the wall the locations for the
bracket’s mounting screws. Remove the mounting bracket from the wall.
5) Drill 2" deep pilot holes at each of the mounting screwhole marks on the wall
using the 1/8" bit if mounting into a stud, or the 1/4" bit (and then inserting the
included wall anchors) where there is no stud.
6) Place the bracket back on the wall lining up the screw holes of the bracket with
the holes on the wall. Be sure to orient the bracket with the appropriate keyhole
slots pointing down. Screw the included mounting screws fully into the pilot
holes or wall anchors. The bracket should now be securely attached to the wall.
7) Attach your speaker wires to the speaker, being sure to observe proper polarity
(amplifier speaker output positive (+) to the red terminal, amplifier speaker
output negative (-) to the black terminal).
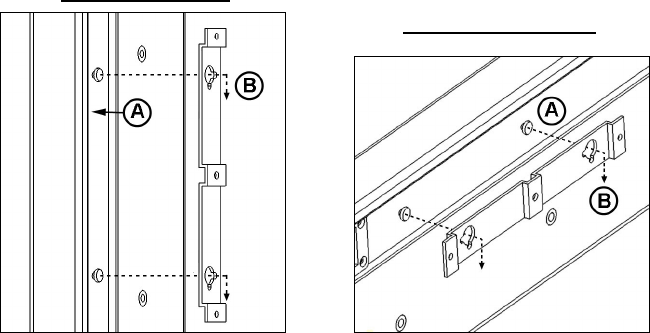
8) Position the cabinet so that the rear groove (A) is on the right rear for Vertical
Mounting or at the top rear for Horizontal Mounting. Line-up the 2 peg heads in
the rear groove with the openings in the wall mount bracket (B). Once the peg
heads are in the bracket slowly lower the cabinet approximately 1/4" until the
speaker comes to a rest. The speaker should now be secure.
VERTICAL MOUNTING
HORIZONTAL MOUNTING


