


© 2010 Phoenix Gold • www.phoenixgold.com
Component Speaker Owner’s Manual
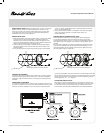
TWEETER ADJUSTMENT SWITCH
When installing your Ti Component system you may want to adjust
your tweeter setting to t your specic application. Phoenix Gold has
provided a tweeter adjustment switch in the Ti Component System
crossover.To access this switch you must rst remove the crossover
cover by squeezing the tabs on the side of the unit (Figure 4) and gently
twisting the lid counter clockwise. Once the lid is removed you will see
a switch located in the center of the circuit board. To increase the tweeter
output move the switch to the +2dB position. If this switch is in the +2dB
location and you want to decrease the tweeter output move the switch
to the 0dB position. Once you have your crossover congured place the
lid back into place by centering the lid over the circuit board and press
straight down until it snaps into place.
You will have to do this for each of the two crossovers included with this
Ti Component System. The process is the same for each.
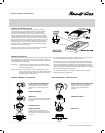
TWEETER INSTALLATION
With a variety of supplied mounting options, the Ti series tweeter is easy to install
in any vehicle. Each Ti component set comes with a ush mount and surface
mount installation kit. For other custom mounting congurations, please contact
your authorized Phoenix Gold Dealer.
Flush Mount: For optimal tweeter installation, use the Flush Mount option.
The Flush mount requires 3⁄4” depth and a 2-1/16” hole in the
mounting surface (gure 5)
Surface Mount: Screws are provided for use when cutting a hole in the door
panel or other mounting surface is not an option. Make sure that
the surface mount location is free of passenger movement that
might damage the tweeter. (gure 6)
The Ti tweeters pivot in their housings. This allows the user to align the tweeter
during the installation process for optimum listening results.
For best results, always try to maintain equal path lengths between the right
and the left tweeter and the listening position. This is usually accomplished by
mounting as low and deep as possible in a kick panel installation, or high and
deep in a dashboard installation. Be cautious in dashboard installations not to
reect the tweeter off of the windshield: this increases reections and can greatly
diminish the overall system listening quality.
For door panel installations, try to angle the tweeters toward the listener to
optimize high frequency performance.
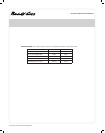
TWEETER ASSEMBLY - FLUSH MOUNT TWEETER ASSEMBLY - SURFACE MOUNT
FLUSH MOUNT RETAINING RING
Slide the retainer ring over the tweeter
housing onto the inner cup. Rotate the
retainer ring to lock all three pieces into
place.
SURFACE MOUNT RETAINING RING
Slide the retainer ring over the tweeter
housing onto the outer cup. Rotate the
retainer ring to lock all three pieces
into place.
TWEETER HOUSING
TWEETER HOUSING
INNER CUP
Once you have the inner portion assembled
slide it into the outer cup and twist to lock
into place.
OUTER CUP
OUTER HOUSING
SPRING RETAINER
The spring retainer is what holds the
tweeter in place. Its ngers clamp against
the inside of the wall you are mounting the
tweeter to.