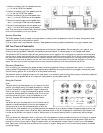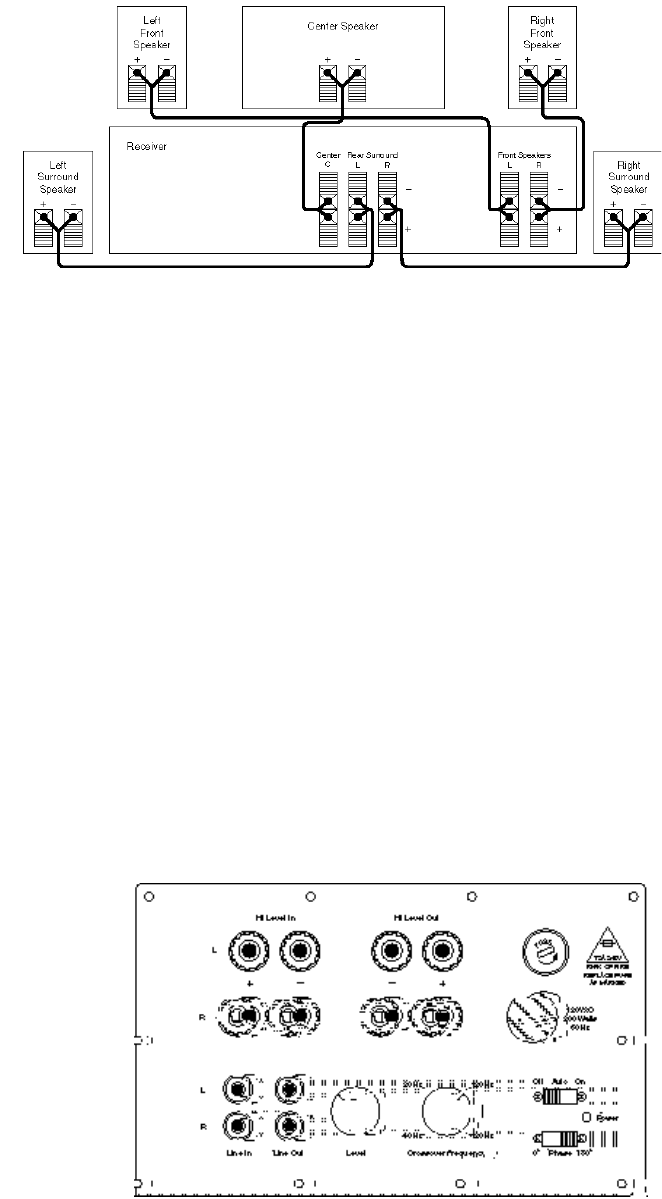
1. Connect the receiver’s left front speaker terminals
(+/-) to the left LS 300 front speaker.
2. Connect the receiver’s right front speaker terminals
(+/-) to the right LS 300 front speaker.
3. Connect the receiver’s left surround speaker termi-
nals (+/-) to the left LS 300 rear surround speaker.
3. Connect the receiver’s right surround speaker termi-
nals (+/-) to the right LS 300 rear surround speaker.
5. Connect the receiver’s center channel speaker termi-
nals (+/-) to the LS 300/C center channel speaker.
Note: If you are using an outboard Dolby
©
Surround Processor, the speaker terminals for the center and rear/surround speakers will be
found on this component, not on your receiver.
Speaker Mounting
The LS 300 speakers include U-shaped mounting brackets to instantly mount the speakers to the wall. For safety, always mount these
speakers on a wall that is reinforced from behind. Never mount a speaker on a wall made of unreinforced drywall or plasterboard.
If you are unsure, consult a professional contractor. These speakers can also be placed on bookshelves or any type of speaker stand.
SW Two Powered Subwoofer
Subwoofers extend the bass response of your system beyond the limitations of most speakers. They are used with, not in place of, your
existing left and right speakers. A subwoofer can dramatically enhance a stereo TV, a stereo system, or a full fledged home theater.
The AudioSource SW Two features a highly efficient ported enclosure, with a rugged ten-inch, reinforced driver, a powerful one hundred-watt
amplifier and an integral stereo crossover network. This precision matched combination ensures the SW Two will deliver the best sound possi-
ble, under even the most demanding conditions. Both crossover frequency and input level are variable over a wide range, allowing the SW Two
to complement a wide variety of systems. Line level and hi level inputs and outputs are provided for fast and easy connection to virtually any
system. The three-way auto power and phase reverse functions complete the generous list of features offered by the SW Two.
Placement Guidelines
Prior to installing your new subwoofer, please consider the following guidelines. Placing the subwoofer near a wall or in a corner will
greatly increase its bass response. As frequencies reproduced by subwoofers are long and need room to propagate, a subwoofer placed
near the listening position will not sound as full as one placed farther away.
The subwoofer cabinet is designed to blend in with most decors. If you decide to place anything directly atop your subwoofer, please use
great caution, as the speaker cabinet will vibrate and items placed on top may shake loose or fall.
Using the Controls
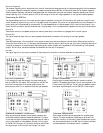
Power
The power switch has three positions: on, off, and auto. The auto
position is the default setting. This keeps the amplifier in a stand-
by mode. The amplifier is activated when a signal is detected at
either of the inputs. If no signal is detected after several minutes,
the amplifier switches back to the standby mode. The on and off
positions override this circuit, turning the subwoofer on or off
manually. The power LED indicates the subwoofer's status.
Phase
The default setting for the phase switch is the 0
º
position. As the
subwoofer is sometimes placed far from the other speakers, its
sound may arrive at your ears milliseconds before or after the
sound from your other speakers. In the rare instances where the subwoofer is out of phase, the bass will appear somewhat hollow, and
the level control may seem to have little effect. Setting the phase switch to 180
º
will compensate for these effects. Note: Phase is rela-
tive and can be different from location to location. Always return to the normal listening location to evaluate any setting changes.
Level
Since your subwoofer is designed to work in conjunction with other speakers, we have provided a level control will allow you to balance
the output of your unit with the rest of your system. Once set, the level control should not require further adjustment. Begin with the
level control at the minimum position. Slowly increase the level until the subwoofer's output is equal to that of your other speakers.
Note: Output level is relative and can be different from location to location. Always return to the normal listening location to evaluate
any setting changes.


