


ii
Package Content
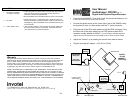
SX9100 Digital Player/Recorder unit
Power Adapter 110v AC to 9V AC 100 ma
Audio cord 3.5mm to 3.5mm 12 feet long
“Y” patch connector (3.5mm plug to 2 x 3.5mmjacks) 1inch
RCA to RCA audio cord 6 feet long
User’s Manual
MX9000 True Audio Card (optional)
Playback
Audio playback starts automatically as soon as the power is connected, the
Green LED light turns On to indicate the device is ON and is playing.
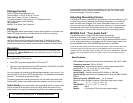
Adjusting Output Level
Use the Volume control to adjust the output level. If the Music On Hold
volume is too low turn the Volume control clockwise; If the Music On Hold
sounds too loud turn the Volume control counter clockwise to desired level.
Recording
Before you start - adjust the volume on your audio source (PC, CD player,
etc.) to about 60 to 70% level up.
• Press REC, play back stops Green LED turns OFF.
• Start your music/audio & press the REC button on the SX9100, the RED
LED light turns ON and the recording starts.
You can monitor the recording via the speakers/headset of your source. You
may press REC any time to STOP the recording; the playback automatically
resumes. To re-record do the above steps.
To prevent accidental recording remove the 3.5 mm audio cord when done.
Pressing REC button now stops/re-starts the playback and will not record.
Audio Quality If the audio quality is not acceptable the PC or other audio
source volume level may be too low or too high, when the volume of the
audio source is too high, the recordings may have some distortion specially
during spoken words, when the recordings are too soft the volume on the
audio source is too low. Adjust the audio level on your PC or other audio
source accordingly, re-record if needed.
Adjusting Recording Volume
The SX9100 is factory calibrated for recording at a mid level audio from a PC
or other sound source, therefore the recording adjustment on the SX9100
does not need to be changed. If for some unforeseen reason your audio
source is too low (even after you crank up the volume on it), you can rotate
this adjustment pot with a Philips screw driver clock wise to increase the
recording volume. (or counter clock wise to reduce the recording volume)
MX9000 Card “True Audio Card”
The MX9000 card is a Flash card that holds the recordings.
Make sure the power is OFF prior to inserting this card into the slot.
If you need to re-insert the MX9000 card or record another MX9000 card be
sure to remove the power by un plugging the 9V from the player, then insert
the new MX9000 card ( Multi MX9000 gang recorder is available)
Unlike other Flash based cards that compress the audio, voice and audio signals are
recorded directly into solid state memory in the MX9000 card in their natural, un-
compressed form, providing superior quality voice and music reproduction. MX9000
card has 100 -year retention time at zero power and can be re-recorded 100,000
times.
Specifications:
File Formats: supports file formats such as Windows .wav, MP3, WMA,
Frequency response 20Hz to 20 KHz.
Sampling rate: supports both 8-bit and 16-bit uncompressed PCM
sampled at 8, 11, 12, 16, 22, 24, 32, 44 & 48 KHz
Distortion: less than 0.1% THD
Audio Quality: supports better than CD Quality at 188 KB/s
Special effects: can record from Media player turning ON SRS & WOW
Effects
Memory Capacity (MX9000 card) 1 to 16 minutes
Maximum audio storage 8 minutes 40 seconds (high quality mode)
Size: 4” x 2” x 0.9” (L x W x H)
Size MX9000 1.5” x 1.5” x 0.37” (L x W x H)
Color: Black
Weight: 0.2 pounds (0.50 pounds with power supply)
The maximum recording time is 8 minutes 40 seconds
Please NOTE: Recording will write over the existing audio in the MX9000 card,
be sure to use a Blank MX9000 card or have the audio source file ready for re-
recording if needed.
3