


Getting started
13
VQT2Q52
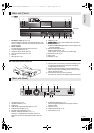
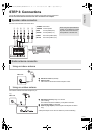
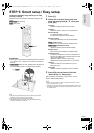
A Speaker cable sticker (included)
B Connector
Be sure to match the number on each sticker with the
connector colour.
≥ Be careful not to cross (short-circuit) or reverse the polarity of the
speaker wires as doing so may damage the speakers.
≥ Don’t use a front speaker as a surround speaker or vice versa. Verify
the type of speaker with the label on the rear of the speaker before
connecting the appropriate cable.
≥ To avoid injury by falling or dropping the speaker, place the speaker cables
with care not to stumble or hook.
≥ Do not hold the speaker in one hand to avoid injury by dropping the
speaker when carrying.
[BT330]
[BT735] [BT330]
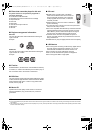
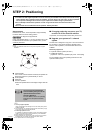
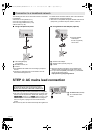
∫ Preventing the speakers from falling
≥Consult a qualified housing contractor concerning the appropriate procedure when attaching to a concrete wall or a surface that
may not have strong enough support. Improper attachment may result in damage to the wall or speakers.
≥Use a string of less than ‰ 2.0 mm, which is capable of supporting over 10 kg.
e.g., [BT735]
A String (not included)
Thread from the wall to the speaker and tie tightly.
B Rear of the speaker
C Screw eye (not included)
D Wall
E Approx.150 mm
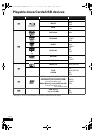
Speaker cable sticker Colour
1 FRONT (L) WHITE
2 FRONT (R) RED
3 SURROUND (L) BLUE
4 SURROUND (R) GREY
5 CENTRE GREEN
6 SUBWOOFER PURPLE
FRONT
Lch
3
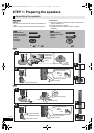
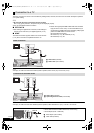
Use of the speaker cable stickers is convenient
when making cable connections.
e.g. Front speaker (L)
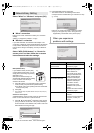
4
Push!
r: White
s: Blue line
Connecting the speaker cables. Insert the wire fully,
taking care not to insert beyond the wire insulation.
e.g. Surround speaker [BT230]
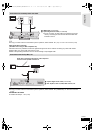
Speaker assembly option
Thread the speaker cable
through the base.
Attach the speaker.
Leave about 120 mm
You can remove and use the cable from
the stand. To reattach the cable, refer to
page 42.
Insert the wire fully.
r: White
s: Blue line
Push!
Press into the groove.
Tighten securely.
Slide into the
groove.
SCBT735_330_230EBEPEG_VQT2Q52-B.book 13 ページ 2010年2月9日 火曜日 午前10時51分