


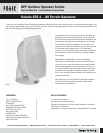
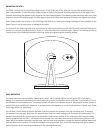

ADJUSTING THE ATS-1
The ATAS-1 comes with a convenient stand/mount . A ball at the top of the post fi ts into a socket molded into the
back of the speaker. A retaining collar holds the ball in place in the socket providing adjustment of the angle of the
speaker, permitting the speaker to be aimed at the ideal listening area. The retaining collar has three allen (hex) type
screws to secure the speaker angle. An allen wrench is provided with each speaker to loosen and tighten the screws.
Note: Always loosen the screws on the retaining collar before you attempt to change the angle of your speaker on the
bass. Failure to do so may result in damage to the post.
The screws in the retaining collar may be loosened by inserting the allen wrench into the screw head and turning the
screws in a counter-clockwise direction. Once you have determined the desired angle, tighten the retaining screws by
turning them in the clockwise direction until snug. Avoid over-tightening the retaining screws.
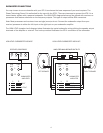
WALL MOUNTING
The base assembly is pre-drilled for fastening to a shelf, wall or ceiling. Before mounting the ATS-1 to a wall or
ceiling, it is important to consider the surface material on which the speaker will be mounted. If you intend to mount
the speaker to wood, traditional 1” long wood screws will secure the speaker properly. Mounting to stucco, plaster or
drywall will require additional measures to properly secure the speaker to one of these surfaces. Consult your Phase
Technology dealer for assistance.
You will fi nd it much easier to mount the base if you fi rst remove the speaker from the mounting post. To remove
the speaker from the post, fi rst place the speaker face down on a soft surface such as carpet or a hand towel. The
speaker is secured to the mounting post by three allen head screws located in the retaining collar. Using the allen
wrench supplied with the ATS-1, remove the three screws. You now have clear access to the mounting holes in the
base. With the speaker removed from the base, use the base as a template to locate the desired speaker placement.
Hold the base at the location at which the speaker is to be mounted, then mark the mounting holes with a pencil.
Secure the base to the mounting surfaces with the appropriate screws.
5