


ISSUED: 12-05-00 SHEET #: 100-9001-3 04-27-06
Visit the Peerless Web Site at www.peerlessmounts.com For customer care call 1-800-729-0307 or 708-865-8870.
1 of 2
Installation and Assembly - Peerless Unistrut
®
and Structural Ceiling Plate
Models:
CMJ 300, CMJ 310
Note: Some parts may appear slightly different than illustrated.
IMPORTANT! Read entire instruction sheet before you start installation and assembly.
Before you start make sure all parts listed
are included with your product.
PART # QTY. DESCRIPTION
A 100-1007 1 4" x 4" ceiling plate (Model CMJ 300)
100-1008 1 8" x 8" ceiling plate (Model CMJ 310)
B 520-9560 1 10-32 x 1/2" self-tapping screw
Parts List
B
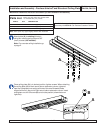
Attach plate (A) to existing Unistrut
™
using four existing spring nuts and 3/8"
(max.) screws (not included).
Note: For concrete ceiling installation go
to page 2.
A
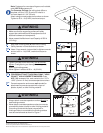
Once ceiling plate (A) is in desired position, tighten screws. When attaching
the ceiling plate (A) to flush mount tube or extension column, tighten at
least four complete turns ending with one of the small threaded holes
aligned with slot in the end of flush mount tube or extension column. Insert
and tighten one #10-32 screw (B) to lock tube position (shown below on
right side).
A
Available Accessories: Concrete Anchor Kit - order
accessory kit ACC 210. Call Peerless Customer Service.