


8
Unpacking
Installation
Basic Setup
Inspect the amplier during un-
packing. If any damage is found,
notify your dealer immediately.
Be sure to save the carton and
all packing materials. Should you
ever need to ship the unit back to
Peavey Electronics, one of its
service centers, or the dealer use
only the original factory packing.
PV professional power ampliers
are designed for durability in com-
mercial installations and provide
the quality performance required
in studio and home applications.
Two-rack-space units of 16” (406
mm) depth are designed to mount
in a standard 19” rack. Rear mount-
ing ears are provided for additional
support and should be utilized in
portable racks. The minimum rack
depth required from the mounting
surface is 17” (432 mm) to allow
adequate connector clearance.
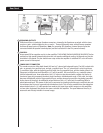
Rack mount the amplier in the
location where it is to be used, re-
membering to allow for adequate
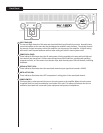
access and cooling space. Connect
your mixer or equalizer to the IN-
PUT connector and connect to the
bi-amp connectors on the speak-
ers to the speaker OUTPUT con-
nectors with 4 conductor speaker
cables. That’s all there is to it. You
now have a fully tuned, fully bi-
amped system. With the POWER
switch OFF, connect the IEC cord
(7) to the amplier and then to a
suitable electrical outlet to allow
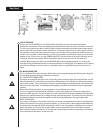
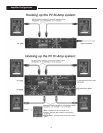
proper current draw. With both
channel gain (dB) controls at their
fully counterclockwise +32 set-
tings, turn the POWER switch to
ON, and slowly raise the gain con-
trols to desired settings. Normally,
the HF and LF controls should be at
the same setting, but should your
venue require more low end or
more high end, you can make this
adjustment. Please carefully re-
view this manual. It covers all this
information in greater detail.