


-9-
Operating Your HCA-806A
Power Switch
Manual Turn On
Press the upper side to turn the unit on manually; press the lower side to turn the unit off.
Automatic Turn On
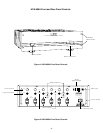
When the power switch is in the off position, the power amplifier can be turned on with an external DC
voltage applied at the DC trigger connector on the rear panel. (See above)
AC Line LED
The AC line LED on the front panel of your amplifier will illuminate whenever AC is present at the AC
connector. This LED indicates that the AC cord is connected and power is applied to the amplifier.
Standby/Operation LEDs
The Standby LED will come on red whenever you first turn the unit on. It will light for about four to
five seconds while the amplifier circuits are stabilizing before the six protection relays start to energize.
At this time the red LED will turn off and the green Operate LED will come on to signal normal
operation. It will also light up red whenever there is a short circuit or fault which triggers the protection
circuits. Whenever the red LED illuminates, the unit will not pass a signal. If the red Standby LED
lights up during operation it could indicate: 1.) that more DC is present than its servos can handle, 2.) a
short circuited speaker line, or 3.) possible internal fault. Once the problem has been corrected, the
protection circuits will automatically reset. Turn the unit off for at least 10 minutes while you check
your connections, then try again. If the red LED continues to glow, contact your Dealer, Installer or
Parasound Technical Service for further advice.
Current Overload LEDs
The current overload LEDs for channels 1 through 6 will only illuminate if the unit is driven
continuously at or past its maximum current capacity. These LEDs will indicate overload of the power
supply just before the onset of audible distortion. In virtually all imaginable listening situations, these
LEDs will rarely illuminate.
Level Controls
Each channel has a separate input level control. The HCA-806A will sound best with its level controls
set to maximum, where they are effectively out of the audio signal path. However, if your preamplifier
has very high gain, and its volume control cannot track properly for left-right channel balance near its
minimum position, it may be necessary to reduce the input level control settings on the HCA-806A. We
have deliberately located the controls on the rear panel, so they can be set once and forgotten.
Maintaining your HCA-806A
Your HCA-806A requires no periodic maintenance and has no user serviceable parts inside. Do not
remove the top cover to avoid risk of electric shock. To keep it clean use only a soft cloth and never use
any solvents or abrasives. Fingerprints may be removed with a soft cloth moistened only with a few
drops of window cleaner or water.
Fuse
The HCA-806A has an external fuse which may blow as a result of an internal fault condition. This
protects the unit from possible damage to internal parts. Never replace this fuse with a larger value.
Substitution of a larger fuse may create serious stress or damage to internal parts and will void your
warranty.