-6-
Introduction
Congratulations on your purchase of this precision audio component and thank you for your selection of
Parasound. The Parasound HCA-1205A and HCA-855A five channel amplifiers are virtually identical
in operation and sonic performance. However, the HCA-855A has slightly less power and is therefore
not THX certified like the HCA-1205A. Please take a few moments to read these instructions so that you
may fully understand the capabilities of your new Parasound power amplifier.
Unpacking Your Amplifier
Carefully unpack your amplifier and remove all the enclosed accessories. Be sure to inspect the unit for
any possible shipping damage. If you see any, contact your Parasound Dealer immediately. Save all the
packing material in case you need to ship the amplifier for repair. Before you proceed, find the serial
number located on the rear panel of your amplifier and record it here for reference:
Serial #____________________ Date of Purchase____________________
Installing and Rack Mounting Your Amplifier
Place your amplifier away from heat sources such as air ducts and radiators. Always mount the amplifier
horizontally and make sure that your cabinet or shelf can support its weight. It is best to provide a separate
shelf for your amplifier rather that stacking it directly above or below other components.
With the use of the optional Parasound RMK-3, both the HCA-1205A and HCA-855A occupy three rack
spaces (5 1/4") in a standard 19 inch equipment rack. Be sure to use the heavy duty mounting bolts with
nylon shoulder washers on both sides of the faceplate to avoid scratching the amplifier’s front panel and
to help prevent ground loops. This mounting hardware is included with the RMK-3. When rack mounting
equipment, have someone help support the unit while you bolt the component to the rack rails.
Ventilation Requirements for Your Amplifier
To insure safe and reliable operation, it is very important that the amplifier has plenty of ventilation to
prevent overheating and automatic shut down from its thermal protection circuitry. Please observe the
following ventilation guidelines when installing your amplifier in a cabinet or other enclosed area:
1) If you are not using a fan, allow at least six inches on each side and above the amplifier, and do not
close off the front with a cabinet door or panel.
2) If you are enclosing the amplifier within an equipment cabinet, use a fan to draw in cool air and
exhaust warm air. Two vent holes are required: one for intake and one for exhaust.
3) Do not place the amplifier on carpeting that will obstruct the air flow into the bottom of the amplifier
chassis and heatsinks.
4) Avoid stacking components. If you do stack components, you must use a fan to circulate the warm air
that will quickly become trapped between them when they are powered on.
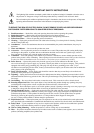
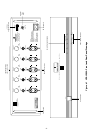
Making Connections to Your Amplifier
Leave the AC cord disconnected while making any input or speaker connections. When making
connections to the amplifier, make sure there is no strain or tension on the input leads, speaker wires, or
AC cord that could cause them to pull loose.