6
Other Connection Options
DO NOT attempt to bi-wire or bi-amplify unless you
have removed the jumper bars.
Standard Connection for Speakers with Two
Input Terminals
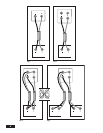
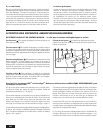
(Fig. 3)
Leave the jumper bars attached and connect using either set of input terminals
following the instructions given under “Standard Connection” on page 5.
Bi-wiring and Bi-amping
Removing the jumper bars gives separate access to each frequency
section of the speaker, which then allows for two optional connection
configurations:
1) Bi-wire Connection
(Fig. 4)
Bi-wiring can improve clarity and openness, with less grain and more
solidity to the bass. Two cables are required for each speaker that you bi-wire.
2) Bi-amp Connection
(Fig. 5)
To bi-amplify, two power amplifiers are required. Connection can be either
vertical or horizontal. Connect your speakers to one amplifier at a time.
IMPORTANT! When bi-amping, always use amplifiers with identical
gain. If uniform gain is not maintained, the speaker system’s frequency
balance will be incorrect when horizontally bi-amped; and when vertically
bi-amped the speaker-to-speaker balance will be incorrect. To prevent
problems, use identical amplifiers (Brand and Model), in identical operating
modes (single channel or bridged).
Passive bi-amping offers a dramatic improvement in clarity, openness and
detail, with much better bass solidity and definition. The presentation of
music and movie soundtracks is simply more intelligible and transparent.
With passive bi-amping, the speaker’s internal passive crossovers remain
connected. An external electronic crossover is not required and cannot be
used (there is no direct electrical access to individual drive units). This
saves expense and setup difficulties. Passive bi-amping optimizes your
speakers to achieve the best possible high-end performance.
Horizontal Bi-amplification (Fig. 5) dedicates one amplifier to your
speakers’ mid/low-frequency inputs and another to their high-frequency
inputs. This configuration can maintain better clarity when listening at
loud levels—if low-frequency demands cause amplifier clipping, distortion
will still be kept away from high-frequency drivers.
Vertical Bi-amplification
(not shown)
dedicates one amplifier to each
speaker. This configuration provides complete channel separation which
optimizes your system’s imaging ability.
Once you have your speakers positioned in the room, and have set speaker
distances and speaker level calibration with your Processor or A/V
Receiver, it’s time for a little fine tuning. Since Paradigm
®
Reference
speakers are designed to provide exceptional high-end performance in a
variety of room settings, fine tuning is simply a matter of making slight
adjustments to speaker placement in the room. To fine tune your front
speakers, center channel, and subwoofer refer to the Owners Manual
included with those speakers.
Fine tuning Surround and Rear speakers is a matter of making adjustments
that may be required for a particular multichannel music or movie program.
If necessary, adjust your Processor or Audio/Video Receiver levels to
ensure that there is a cohesive overall soundstage.
FINE TUNING
SOLUTIONPROBLEM
TROUBLESHOOTING GUIDE
No Sound from One or
More Speakers
No Sound
Lack of Bass or
Dislocated Image
Make sure receiver, preamp or amplifier is plugged in and turned on. Check power outlet at the wall is working.
Are headphones plugged in, or is system on Mute?
Re-check all connections.
Check your balance control or VC-150 Volume Control (if using).
Check that all power cords are properly plugged in and functioning.
Swap a non-working speaker with one that works to determine if the problem is with the speaker or something else (i.e. wiring, amplifier).
One or more speakers may be connected out of phase (their polarity is reversed).
Re-check to ensure that each speaker’s cable is connected with correct polarity: red (+) to red (+) and black (-) to black (-).


