


WALL-MOUNTING THE SPEAKERS
PRECAUTION! Mount speakers securely enough that they do not fall and cause personal
injury or damage to property.
MOUNTING SURFACES: Carefully evaluate the composition, construction
and strength of the surface on which you are mounting the speaker. When
mounting in masonry, wood, and/or other solid surfaces, consult with a
professional regarding the proper hardware for mounting the brackets
provided with your Stylus
®
speakers.
SPECIFIC USE: Brackets provided with Stylus
®
speakers are only suitable
for the speaker they come with. Do not use them with any other speaker.
Always use secondary restraining hardware to prevent personal injury or
damage to property.
NON-LIABILITY: We are aware that the mounting assembly provided with Stylus
®
speakers could
be used for purposes and in ways other than those for which it was intended. The Manufacturer,
Distributor, Retailer, and their respective Agents cannot be held responsible or liable for injuries or
property damage—direct, indirect, or consequential—arising from the use of, or inability to use, this
product safely and properly.
Every effort has been made to provide accurate and error-free installation instructions.
Paradigm Electronics Inc. disclaims liability for difficulties that may arise from the misinterpretation
of information contained in these instructions.
If you are not comfortable performing the following mounting procedures, contact a qualified
installer
(see dealer)
.
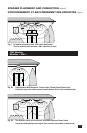
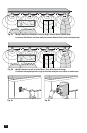
Wall-Mounting with Supplied ‘Hanger Bracket’
(For Stylus
®
170 only)
Stylus
®
speakers can be mounted horizontally or vertically.
1. Using appropriate screws/mounting hardware
(not included)
, mount the bracket with the supplied
safety strap on the wall at the desired location (Fig. 3a) and at the desired angle. Make sure
the bracket is straight.
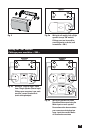
2. Screw two 1-inch #12 screws
(included)
into the upper and lower holes (spaced 60 mm, 2-3/8˝
apart) on the back of the speaker’s enclosure. Do not screw them all the way in—make sure
they remain about 3 mm (1/8 in) proud.
3. Bring the speaker to the bracket and connect the cables as outlined in the “Connecting the
Speakers,” page 6. Connect the safety strap to the speaker using the middle hole (Fig. 3b).
Mount the speaker onto the bracket using an ‘in and down’ motion.
4. This bracket may also be used for horizontal mounting. Simply mount bracket horizontally with
key hole slots facing up
. Follow steps 1 to 3
(above)
to complete horizontal installation.
5