


31
RQT7125
Sound field/sound quality operations
Selection of tapes for recording
Use normal position tapes.
High position and metal position tapes can be used, but this unit will
not be able to record or erase them correctly.
Preparation:
Wind up the leader tape so recording can begin immediately.
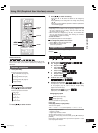
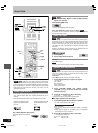
1 Press [c DECK 2] on the main unit and insert the
cassette to be recorded.
Insert with the side to be recorded facing towards you and the
exposed tape facing down.
The tape direction is automatically set to “F”.
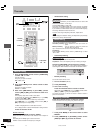
2 Press and hold [PLAY MODE] on the remote control to
select the reverse mode.
Every time you press and hold the button:
: One side only records.
, : Both sides record (forward → reverse).
“
” is automatically changed to “ ” when [[ REC] is pressed.
Recording
REC
DECK 2
STOP
DVD/CD
DECK 1
PROGRAM
PROGRAM
TV/VIDEO
TV/VIDEO
SETUP
SETUP
DIMMER
DIMMER
CSM
CSM
DISC
DISC
REPEA
REPEA
T
GUI DISP
GUI DISP
ENTER
ENTER
RETURN
RETURN
SLOW/SEARCH
SLOW/SEARCH
ZOOM
ZOOM
QUICK REPLA
QUICK REPLA
Y
SOUND EQ
SOUND EQ
S.SOUND EQ
S.SOUND EQ
S.WOOFER
S.WOOFER
S.SRND
S.SRND
PL
PL
C
A
N
C
E
L
D
I
R
E
C
T
N
A
V
I
G
A
T
O
R
T
O
P
M
EN
U
P
.M
E
M
O
R
Y
D
V
D
/
C
D
P
L
A
Y
L
I
ST
M
E
N
U
V
O
L
U
M
E
SHIFT
SHIFT
MANUAL
MANUAL
EQ
EQ
T
A
P
E
T
UN
E
R
/
A
U
X
TV
TV
VOL
VOL
TV
TV
VOL
VOL
TV
TV
CH
CH
TV
TV
CH
CH
PAGE
AGE
GROUP
GROUP
D.RE-MASTER
D.RE-MASTER
SLEEP
SLEEP
AUT
AUT
O OFF
O OFF
CLOC
CLOC
K/
TIMER
IMER
PLAY/
REC
REC
SKIP
TV
TV
ECHO
ECHO
MUTING
MUTING
V.MUTE
.MUTE
AUDIO
AUDIO
C.F
C.F
CH SEL
CH SEL
S.POS
S.POS
TEST
TEST
MIX 2CH
MIX 2CH
PLA
PLA
Y MODE
MODE
#
SUBTITLE
SUBTITLE
PLAY MODE
TAPE
/
/REW/
/FF/
DVD/CD
MIX 2CH
SKIP
SHIFT
TAPE
Recording operations
3 Select the source to be recorded.
Radio recording:
Tune in the station. (A page 26)
Disc recording:
Insert the disc(s) you want to record.
Press [-/J DVD/CD] (remote control: [- DVD/CD]) and then
[L STOP] (remote control: [L]).
Prepare the desired disc recording mode.
• To record programmed tracks (A do steps 1–3 on page 17
for CD, MP3 or WMA).
• To record specific disc(s)/tracks (A do steps 1–2 on page
16 for CD, MP3 or WMA).
Ensure disc is stopped.
For 1-SONG mode: Press [g/REW/4] or [3/FF/f]
(remote control: [g, 4] or [f, 3]) to select the track.
Tape-to-tape recording:
Press [/ - TAPE] and then [L STOP] (remote control: [L]).
Press [c DECK 1] on the main unit and insert the cassette
you want to record.
4 Press [[ REC] on the main unit to start recording.
To stop recording
Press [L STOP] (remote control: [L]).
If the tape finishes before the disc
The disc continues playing. Press [L STOP] (remote control: [L]) to
stop it.
Reducing noise when recording AM
Remote control only
Hold down [PLAY MODE] while recording.
Every time you hold down the button: BP1 ↔ BP2
Choose the setting with the least noise.
Note
• Changes to volume and sound/field quality do not affect recording
except for Double re-master.
• You cannot open deck 1 while recording.
• You cannot fast-forward or rewind one deck while recording with
the other.
• Before recording multi-channel sources (3 to 5.1 channels), press
[SHIFT]+[MIX 2CH] to down-mix the signals to 2 channels.
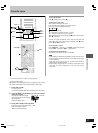
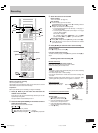
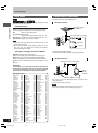
Erasure prevention
Use a screwdriver or similar
object to break out the tab.
To re-record on a protected cassette
Cover the hole with adhesive tape.
To erase a tape
1. Press [/ - TAPE] and then
[L STOP] (remote control: [L]).
2. Insert the recorded tape into deck 2.
Ensure there is no tape in deck 1.
3. Press and hold [PLAY MODE] on the
remote control to select reverse mode.
4. Press [[ REC].
Side A
Tab for side B Tab for side A
Adhesive tape
RQT7125(29-35)3 7/11/03, 11:33 AM31