


Programming the Steering Wheel Buttons
SWI-ECL2
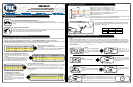
Step 6.
Turn the vehicle key to the ignition
or On position.
Th e LE D wi ll
flash indicating
the programmed
Version Number.
OFF
ACC
IGN
STRT
If you programmed the interface for version #4, proceed with the following steps.
If you did not program the interface for version #4, skip to Step 9.
SWI-ECL2
Step 7.
Press the Program Button 1 time and release.
The LED will turn on and
stay on.
SWI-ECL2
Step 8.
The HVAC control buttons need to be pressed in the order listed below.
The LED will turn off indicating that the button pressed has been stored
into memory. The button should be held an additional 2 seconds after
the LED turns off. Once the button has been released the LED will come
back on, waiting for the next button to be pressed.
SWI-ECL2
TEMP
FAN
The LED will turn off
and stay off until the
button pressed has
been released.
1) TEMP UP
2) TEMP DOWN
3) FAN UP
4) FAN DOWN
• If TEMP UP and TEMP DOWN are the only 2 HVAC buttons on the steering wheel, press the Program
Button 1 time after the TEMP DOWN button has been released. The LED will fl ash once and stay
on indicating that the HVAC button programming has been completed. You are now entering a timed
programming sequence.
• If all 4 buttons are programmed the LED will fl ash 1 time and stay on after the FAN DOWN button has
been released indicating that the HVAC button programming has been completed. You are now entering
a timed programming sequence.
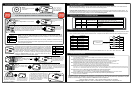
Step 9.
The SWI-ECL2 must be programmed in the specifi c order shown in the chart aside.
Now that the LED is on you have 7 seconds to press a SWC button. As long as the
SWC button is held the LED will stay off and the timer is NOT active. It is recommended
to hold the steering wheel button for an additional 2 seconds after the LED turns off.
Once the SWC button has been released the LED turns on and the timer is reset,
starting over again. If a function is not needed, it may be skipped by pressing and
releasing the Program Button in its place. The LED will fl ash and then stay on
indicating the function has successfully been skipped.
1) Volume Up
2) Volume Down
3) Mode
4) Seek Up
5) Seek Down
SWI-ECL2
Step 10.
Within 7 seconds, press and hold the
button on the steering wheel that is to
be learned.
The LED will turn off instantly
and stay off as long as the
steering wheel button is held.
This indicates the button is
being stored into memory.
SWI-ECL2
SEEK
PRESET
AM FM
VOLUME
PLAY
MUTE
SWI-ECL2
Step 11.
Release the steering wheel
button that is currently being
pressed.
The LED will turn back on. You now have 7 seconds to press
a SWC button which will program the next function in the
above chart (go to Step 10). To skip the next function in the
above chart, go to Step 12. Go to Step 13 when fi nished
programming the SWC buttons
SEEK
PRESET
AM FM
VOLUME
PLAY
MUTE
Step 12. To Skip a Radio Control Function:
SWI-ECL2
Press the Program Button 1
time and release in place of
the radio function that is to be
programmed. To program the
next function go to Step 10.
SWI-ECL2
The LED will FLASH 1 time to
indicate the button was pressed.
The LED will stay on waiting for
the next button to be pressed
SWI-ECL2
After releasing the last button that is to be
programmed, wait 7 seconds. The LED will
fl ash three times to indicate that the steering
wheel programming sequence has ended.
The interface will then flash the Version
Number it was programmed for. You can
now test and use the interface.
Step 13. To Exit the Steering Wheel Button Programming Sequence:
GM vehicles with HVAC controls: Test each heater function on the steering wheel. With the HVAC system on, the TEMP and FAN
buttons should respond accordingly. The LED will not indicate a button being pressed.
Testing the Radio Control Buttons: The LED on the SWI-ECL2 will light up indicating a programmed button has been pressed. The
radio should be controlled by the button press as it was programmed to do. If any function does not control the radio as desired, repeat
the pro gram ming in struc tions starting at Step 6 or refer to the Troubleshooting Guide.
Steering Wheel
Interface
Connect SWI white
wire to resistors
47
100
150
560
1000
1500
Value Color Stripes
47 ohm yel, vio, blk, gold
100 ohm brn, blk, brn, gold
150 ohm brn, grn, brn, gold
560 ohm grn, blue, brn, gold
1k ohm brn, blk, red, gold
1.5k ohm brn, grn, red, gold
3.9k ohm org, wht, red, gold
5.1k ohm grn, brn, red, gold
Some vehicles have a separate wire for each of the steering wheel buttons. Use the supplied resistor kit for the steering wheel push buttons
that do not already have a resistor network connected to them. Examples are older Nissan vehicles and Harley Davidson motorcycles.
By putting two or more resistor in series, you can come up with additional values. Ex. 150 + 1000 + 1500 = 2650 ohms.
Testing the SWI-ECL2
Appendix A: Known Incompatible Vehicles
VehicleNotSupported
Make Years Model Description
BMW All All with a 5v SWC wire
All with 5-volt SWC data wire at the steering column or a
factory installed cellular phone that is in use!
Mercedes 2005-2007 All
Go to www.pac-audio.com for up-to-date Mercedes CAN
bus solutions
Toyota All-2003 Sienna Sienna Vans
Volvo All All
Go to www.pac-audio.com for up-to-date Volvo CAN bus
solutions
Page 1
Appendix B: Resistor Kit
No power / won’t go into programming mode:
• Check the Red wire connection and fuse. Make sure Red wire is connected to a key switched 12v, not constant 12v.
• Make sure vehicle ignition is on.
The interface controls the stereo immediately without pressing any buttons on the steering wheel:
• During programming, press the buttons on the steering wheel fi rmly until the left LED turns off and hold for 2 additional seconds.
• Releasing the button too early will cause the interface to send out a radio command even when no buttons are pressed.
When programming the SWC buttons, it takes 5 seconds for the light to go out and it never comes back on:
• If a plastic crimp or tap style connection was used, remove and strip wire shielding to verify a wire to wire connection is made.
• Were there any additional connection notes (i.e. connect pin x to ACC voltage or chassis ground)?
The interface controls the stereo immediately without pressing any buttons on the steering wheel:
• Is the LED on - if so, during programming press the SWC buttons on the steering wheel fi rmly and hold for 2 additional seconds after the LED goes out.
• If the LED is not on - Make sure the interface has power and ground. Also make sure the Red wire is connected to the same power source as the radio
I am using Version # 3, 8, 9 or 11 and the LED goes out immediately after I release the program button:
• Remove any resistors connected to the White interface wire and ground; then try to program again.
• Detach the White interface wire from the vehicle. Visit www.pac-audio.com/bulletins/swicalculator.htm and use the SWI Calculator.
The interface controls the radio whenever the steering wheel is turned (mostly late 80’s early 90’s Honda/Acura).
• Program the interface for Version #12.
Troubleshooting Guide
Pacifi c Accessory Corporation - 1502 S. Santa Fe Street, Santa Ana, CA 92705
techsupport@pac-audio.com • Voice: 714-835-3022 • Fax: 714-835-3233 • www.pac-audio.com
DISCLAIMER: Under no circumstances shall the manufacturer or the distributors of the SWI-ECL2 parts be held liable for consequential damages
sustained in connection with the SWI-ECL2. The manufacture and it’s distributors will not, nor will they authorize any representative or any other
individual to assume obligation or liability in relation to the SWI-ECL2 other than its replacement.
Page 3 Page 4