


Before You Start
A. Is this product compatible with the ve hi cle?
• See Vehicle Application Guide (separate sheet) for listing of vehicles and connection information.
• If your vehicle is not listed, check www.pac-audio.com/swixprogramming for the most current list of com pat i ble
vehicles.
B. Prepare for the installation.
• Review the application guide for vehicle specifi c wiring details and note where the steering wheel control wires will be
found. Keep in mind that the supplied interface wire harness is two feet long
• Use a digital multi meter for checking and verifying vehicle circuits.
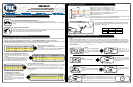
Using the Vehicle Application Guide
C. Select your make, year and model.
• Choose your Make, Year, and Model and highlight the complete column
across the page.
• If the exact model and year is not listed, choose a broad Model name
such as “All Models” or one that describes the radio connector.
E. Version number, loops and notes.
• The Version number will tell the interface what SWC circuit type is being used. This will be
addressed on the next page. The Note ID is a vehicle specifi c programming tip or connection
instruction. Only read notes in the note chart specifi ed by the Note ID. Disregard all others.
• Cut Purple? Cut Brown? This refers to the loops on the SWI-ECL2 connector. Cut these loops
only if instructed to do so.
D. Locating the vehicle steering wheel control wire.
• Determine your Interface Wire Color (Green, Yellow, Orange
or White). This wire will be connected to vehicle’s steering wheel
control wire
• The Interface Connector (if available) is an image of the vehicle
plug. This image is found on the Vehicle Connector Chart.
• The Pin Number and Color (if available) refers to the vehicle’s
SWC wire located in the Interface Connector (if available).
F. Additional Notes and Interfaces.
• The Additional Notes are connections that may
have been supplied by the radio prior to removal.
These must be made in order to complete the steering
wheel control circuit.
• Some vehicles will require an additional CAN bus
interface. This will be needed if “Yes” is printed below
CAN Interface heading.
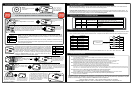
Programming the Interface Version Number
SWI-ECL2
Step 5.
3 seconds after the last press of the Program Button, the LED will fl ash the same
number of times as just pressed. This indicates the programmed version number. Turn
vehicle key to the Off position. The version programming sequence is now complete.
If the repeated fl ash count of the LED does not match the version number needed, you must start over at Step 2.
OFF
ACC
IGN
STRT
Step 1.
Refer to the Vehicle Application Guide for the version number that corresponds to your vehicle. Write the Version Number below for quick reference.
Make sure to read all steps before programming as some are time sensitive. If the result indicated to the left of the arrow does not result from the step
performed, you must start again. Double checking connections may be necessary before continuing. At this point all connections should be made and
the key should be in the off position. Keeping the door open during programming is recommended to disable the R.A.P. feature (if available)
Version Number: ____________ (Write Version Number here)
Step 3.
Release the Program Button.
The LED will turn off immediately
after the Program Button is released
indicating previously stored memory
has been cleared.
SWI-ECL2
SWI-ECL2
Step 2.
Press and hold the Program Button.
While holding the Program Button,
turn the vehicle key to the ignition or
On position.
The LED inside of the
SWI-ECL2 will turn on
and stay on as long as the
Program Button is held in.
SWI-ECL2
OFF
ACC
IGN
STRT
SWI-ECL2
SWI-ECL2 Connections
1 amp
fuse holder
Purple Loop
Brown Loop
Green
Orange
Yellow
Red
White
Blue
Black
Power
SWI-ECL2
Radio Control Wires
Connecting to the New Radio
SWI-ECL2 Eclipse Radio Eclipse Radio
Brown Brown Brown
White White Brown/Black
• Green - SWC signal input. Used with Version # 1, 2 or 4 only.
• Orange - SWC signal input. Used with Version # 6 or 7 only.
• Yellow - SWC signal input. Used with Version # 5 or 10 only.
• Red - Interface power wire. Must be connected to a 12v ACC. or IGN. source controlled by the key.
• White - SWC signal input. Used with Version # 3, 8, 9, 11 and 12 only.
• Blue - GM HVAC data output. Used with Version # 4 only.
• Black - Interface ground wire.
Cut the Brown or Purple loop if instructed to by the Vehicle Application Guide. All connections (including
notes and additional notes) must be made before programming the interface.
*NOTE - It is recommended that the Red wire is connected to the same ACC. or IGN. wire as the radio.
Connect the SWI-ECL2 Radio Control wires to the newly installed Eclipse radio.
There are 2 known wiring color combinations for the Eclipse radios. Connect
according to the chart below.
The Vehicle Application Guide and Connector images (included with interface) contain the known locations of steering wheel
control wires for vehicles compatible with this interface. If your Year, Make or Model is not listed below check
www.pac-audio.com/swixprogramming for the most current and up-to-date list of compatible vehicles and radios. You can
also reference similar vehicles or years. They may be the same as what you are working with.
Step 4.
Press and release the Program Button
the same number of times as the version
number.
The LED will flash each
time the Program Button is
pressed.
SWI-ECL2
SWI-ECL2
xVers.#
J1850
Class 2
VPW
Class 2
Class 2
J1850
J1850
1 00 0
11
1 0
111
1 00 1 00
1
1 0
1
1 0
0
1 1
1 0 10 0 00
1
1 0
1
1 0
1 1
1 0 0
1
1 0
0
Arbitration
EOD
EOD
CRC
CRC
1 00 0
1 00 0
1 00 0
1 00 0
1 00 0
1 00 0
1 00 0
1 00 0
11
11
11
1 0
1 0
1 0
1 0
1 0
1 0
111
111
111
111
1 00 1 00
1 00 1 00
1 00 1 00
1 00 1 00
1 00 1 00
1 00 1 00
1 00 1 00
1 00 1 00
1 00 1 00
1 00 1 00
1 00 1 00
1
1 0
1 0
1 0
1 0
1 0
1
1 0
1 0
1 0
0
0
0
1 1
1 1
1 0 10 0 00
1 0 10 0 00
1 0 10 0 00
1 0 10 0 00
1 0 10 0 00
1
1 0
1 0
1 0
1
1 0
1 0
1 1
1 1
1 0 0
1 0 0
1
1
1 0
1 0
0
0
Class 2
Class 2
Class 2
Class 2
Class 2
Class 2
J1850
J1850
J1850
SWI-ECL2
Universal Steering Wheel Radio
Remote Interface for Eclipse Radios
with a Wired Remote Input Connection
Page 2Page 1