6
Outlaw Audio
Owner’s Manual
7
Model 7100 Seven-Channel Power Amplier
Owner’s Manual
Amplier Operation
Power Control Connections
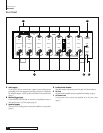
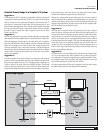
The Outlaw 7100 features a built-in remote turn-on system that will automati-
cally switch the amplier when another device in the system is switched on.
Remote Turn-On Using Products
Equipped With a 12 Volt Trigger Jack
Press the front panel power switch on the amplier so that it is in the ON
position. Then, using an accessory cable with a 3.5mm mono mini-plug on
each end, connect the trigger-output jack on the rear of the source device to
the trigger input jack on the back panel of the amplier. When these connec-
tions are made, the 7100 will automatically turn on whenever the triggering
device is turned on.
Remote Turn on Using External AC to DC
Power Converter
If your processor or receiver does not have a dedicated trigger jack, it is still
possible to activate the unit for automatic turn on when a Switched Outlet
is available on the rear of the source device. To control the amplier in this
fashion you will need a small AC to DC power converter, capable of delivering
a 3 to 32 volt DC signal. The DC voltage should terminate in a standard 3.5mm
type mini plug. This type of converter may be obtained as a Power Adapter from
many electronics retailers.
When installing, press the Main Power Switch on the front panel of the amplier
in so that it is in the ON position. Plug the AC adapter into a switched outlet
that will be activated when you wish to have the amplier turn on. This may
be the switched outlet at the rear of an AC receiver or other audio equipment.
Connect the 3.5mm mini-plug from the adapter to the trigger-input jack on the
back panel of the 7100. The amplier will now turn on and off automatically,
based on the status of the controlling device.
Power Connection
Once all audio and system connections have been made, connect the power
cord to an AC power source. Please make certain that the amplier is turned
off and that the device connected to the remote trigger input is off when con-
necting the power cord and plugging it into an AC outlet.
CAUTION: Do not plug the 7100 directly into the “Switched Accessory”
outlet of another device! These outlets are intended for use with low
current draw products having a low current draw, such as tuners, CD
players or cassette decks. These cannot handle the high current draw of
a power amplier. Using these outlets for a power amplier is a signicant
safety hazard.
NOTE: It is not recommended that you connect other power ampliers
or products with a high current draw, to the same AC power circuit as the
7100, unless they are used with the remote power turn on and sequencing
system. The simultaneous turn-on of multiple ampliers on the same circuit
may cause circuit breakers to trip, due to the high current draw.
Amplier Operation
After all connections have been made you are ready for listening. First, turn on
the source components and processor in your system. It is always a good idea
to turn on your amplier LAST. This avoids the possibility of any turn on pops
or transients from other equipment being amplied and sent to your speakers
where they may cause damage. Always start with a low volume level on your
controller or preamp to avoid damage to your speakers.
Manual On
Simply press the front panel Power/Standby button until the light is illuminated.
There will be a short pause from the time the power is turned on until power
is applied to the speakers. This is intentional, and protects your speakers from
damage while the amplier stabilizes. You may also hear a relay click during
start up. This is also normal.
To turn the unit off, press the Power/Standby button again. The indicator
light will go out.
Automatic On
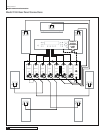
Make certain that the connection to the processor, or other controlling device is
correct, as shown on page 6. Whenever the controlling device is turned on, the
7100 will automatically turn on after a short pause. This pause is intentional,
and it protects your speakers from damage while the amplier stabilizes. You
may also hear a relay click as during start up. This is also normal.
To turn off your amplier, simply turn off the unit that feeds the amplier it’s
audio signals. The 7100 will automatically go into a stand by mode in a few
moments.
Output Settings
All volume and level adjustments are made at your preamp, controller or sur-
round processor. To assure proper sound eld imaging, it is always a good idea
to re-set the output levels of the channels on your processor when using the
amplier for the rst time. The circuitry in your new amplier may be different
from your previous one, and by checking the output levels you will make certain
that the processor, amplier and speakers are properly matched.
Care and Maintenance
Cleaning
When the unit becomes dirty, wipe it with a clean, soft, dry cloth. If necessary,
rst wipe the surface with a soft cloth slightly dampened with mild soapy water,
then with a fresh cloth dampened with clean water. Wipe dry immediately
with a dry cloth. NEVER use benzene, thinner, alcohol or any other volatile
cleaning agent. Do not use abrasive cleaners, as they may damage the nish
of the metal parts. Avoid spraying insecticide, waxes, polishing agents, or any
aerosol product near the unit.
When You Are Away
If you will not be using your home theater system for an extended period of
time, it is always a good idea to turn the unit off using the Power Switch on the
front panel of the amplier. This will prevent the automatic turn on circuits
from accidentally turning the system on during your absence.


