SRCD5670 English (371 x 210mm) 17 July 2010 /L
1. Stop button
2. Skip/search backward button
3. Eject button
4. Program button
5. Repeat button
6. Play/Pause button
7. Skip/search forward button
8. Battery compartment
(batteries not included)
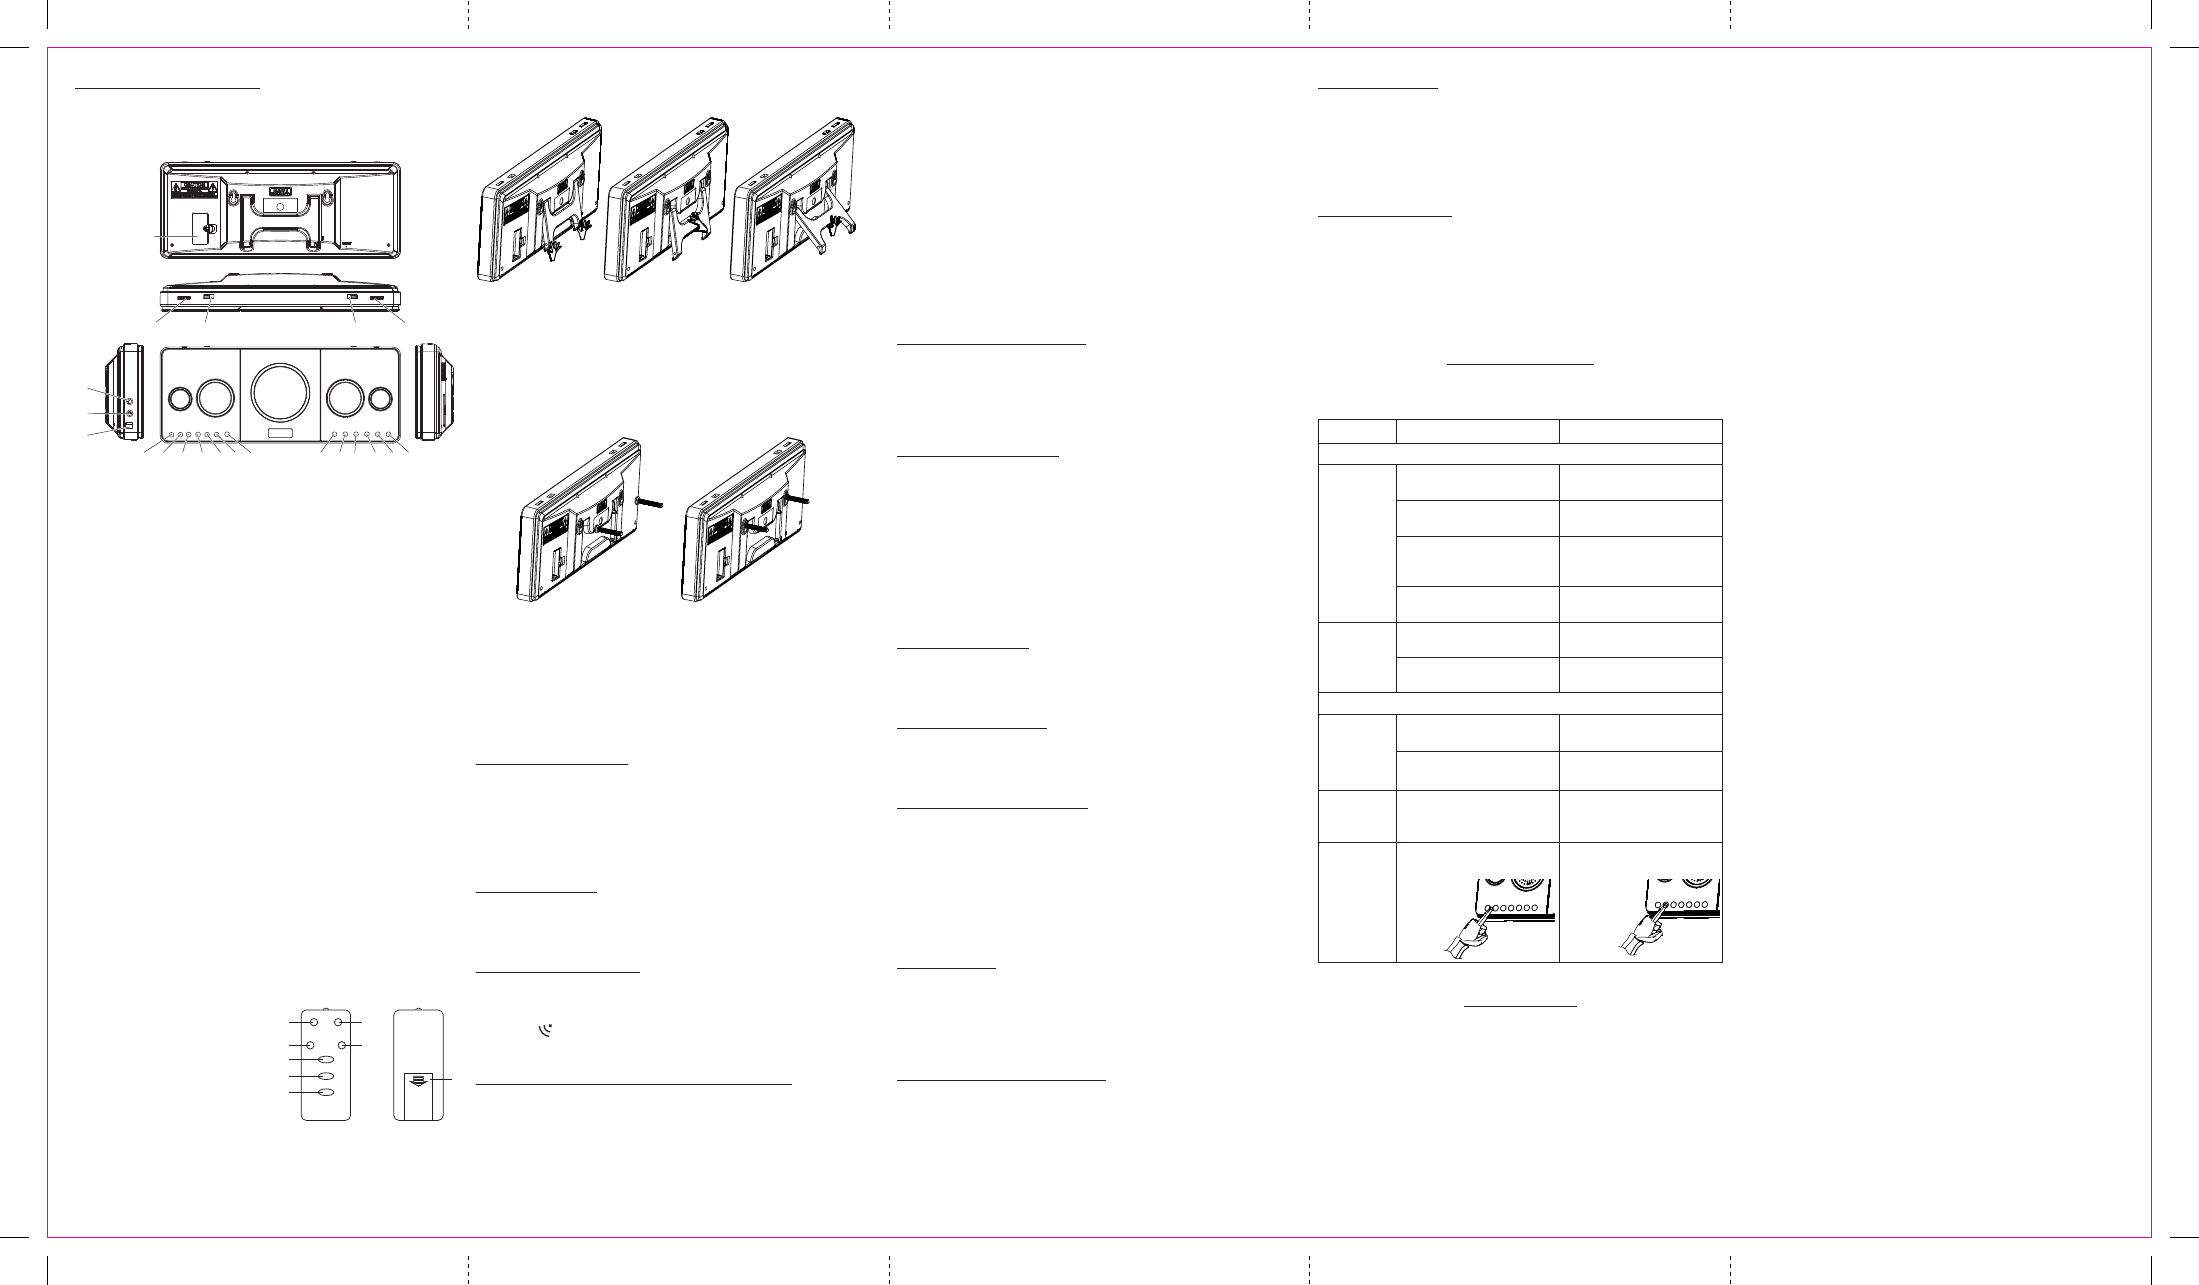
LOCATION OF CONTROLS
1. Power Button
2. AL. On/Off Button
3. Minute Button
4. Hour Button
5. Time Set Button
6. AL.Set Button
7. Play/Pause Button
8. Stop Button
9. Skip+ Button
10. Skip– Button
11. Repeat Button
12. Prog. Button
13. Eject Button
14. Aux in Jack
15. Phone Jack
16. DC Jack
17. Volume Control Knob
18. Function Switch (Buzz/CD/Radio/Aux)
19. Band Switch
20. Tuning Control Knob
21. Battery Compartment (for clock backup)
12345678910111213
14
17 18 19 20
15
16
21
REMOTE CONTROL
1
2
3
4
5
6
7
8
HOW TO USE THE STAND
Fig.1 Fig.2 Fig.3
1. Open the stand located at the back cabinet. (Fig.1)
2. Slide down the stand to the end. (Fig.2)
3. Open the stand again to the end and then the stand can support
the unit well.(Fig.3)
WALL MOUNT
Fig.1 Fig.2
SPECIFICATION
Power Supply…………… DC 9V 800mA
Power Adaptor………..… AC 120V ~ 60Hz Output: DC 9V 800mA
Back up……………....... DC 3V (2 x 1.5V “AAA” size batteries
not included)
Radio Frequency Range…FM: 88 – 108 MHz
AM: 530 – 1700 KHz
Symptom Possible Cause Solution
Radio
Noise or
sound is
distorted on
AM or FM
broadcasts
Channel is not tuned
properly for AM or FM
Fine tune the AM or FM
broadcast station
FM: The FM antenna wire
is not aextended
Extend the FM antenna
fully
AM: The built-in ferrite
bar antenna is not
positioned correctly
Reposition/ rotate the unit
until the best reception is
obtained
The station signal is too
weak
Retune to another FM
station
No sound in
AM or FM
The unit is not in TUNER
mode
Slide the FUNCTION
switch to TUNER mode
Volume is at the minimum
position
Adjust the volume level
CD Player
CD player
does not
play
The unit is not in CD mode Slide the FUNCTION
button CD mode
CD is not placed or placed
incorrectly
Load disc with unlabelled
side facing downwards
CD skips
while
playing
Disc is dirty or scratched Clean disc with cloth or
use another disc
Touch
function is
not right
This touch operation is not
right
This touch operation is
right
TROUBLESHOOTING
Consult your local service technician if you are unable to find a solution
by following these hints.
✔✘
UNIT POWER SUPPLY
This unit is designed to operate on wither AC/DC adaptor.
Operation with AC/DC Adaptor
Insert the small plug of adaptor into the DC Jack.
Insert the AC/DC adaptor into any convenient having 120V~AC,
60Hz household outlet in vertical or horizontal direction.
CLOCK SETTING
1. Touch and hold Time Set Button to set the clock
2. Touch Hour Button or Minute Button respectively to set the
correct time
ALARM TIME SETTING
1. Touch and hold AL. SET button to set the Alarm time
2. Touch Hour Set Button or Min Set Button respectively.
3. Touch the AL. ON/OFF button to turn on the Alarm Function.
The alarm icon appears.
Note. To turn off the alarm, press the AL.ON/OFF button again.
WAKE UP ALARM (RADIO, BUZZER, CD, AUX)
FOR RADIO ALARM
1. Slide the RADIO/BUZZ/CD/AUX switch to “RADIO” position.
2. Slide the AM/FM switch to FM or AM position
3. Tune in to a desired station using the Tuning Control.
4. Adjust the volume by rotating the VOLUME CONTROL KNOB
5. The radio will sound at the set alarm time.
AUX INPUT JACK
1. Slide the Function Switch to AUX position.
2. Press “Power” Button.
3. Connect the AUX connect wire from the out jack of your Personal
Player such as portable MP3 player to the AUX input jack.
4. Turn on your Personal Player to begin playing, adjust the volume
to desire listening level.
HEADPHONE JACK
This unit will accept stereo headphones with a Ø 3.5mm plug. Before
connecting the headphones set the volume to minimum level as not
to damage your ears or the headphones. Connect the headphones to
the headphones jack. The speakers will be automatically disconnected.
Warning: Prolonged exposure to high sound levels may permanently
damage your hearing. You may not hear some warning sound while
wearing these headphones.
1. Dirll two holes through Wall for mounting screws (not included)
as indicated in Fig.1
2. Screw lower mount to wall,Choose appropriate mounting screws(not
included) for wall material
3. Hang up the unit as indicated in fig.2 .
FOR CD ALARM:
1. Slide the RADIO/BUZZ/CD/AUX switch to “CD” position.
2. Adjust the volume by rotating the VOLUME CONTROL KNOB.
3. The CD will sound at the set alarm time playing the first track on
the CD.
4. To deactivate the alarm (CD playing), press either the STOP/ADJ
button or press the AL.ON/OFF button
FOR BUZZER ALARM:
1. Slide the RADIO/BUZZ/CD/AUX switch to “BUZZ” position.
2. The alarm buzzer will sound at the set alarm time.
FOR AUX ALARM:
1. Slide the RADIO/BUZZ/CD/AUX switch to “AUX” position.
2. The Aux will sound at the set alarm
LISTENING TO THE RADIO
1. Slide the RADIO/BUZZ/CD/AUX switch to “RADIO” position.
2. Press “Power” Button
3. Slide the AM/FM switch to FM or AM position
4. Turn Tuning Knob to tune in desired radio station.
5. Adjust the volume by the Volume Control Knob.
LISTENING TO THE CD
PLAYING A CD
1. Slide the RADIO/BUZZ/CD/AUX switch to “CD” position.
2. Press “Power” Button.
3. Touch the Eject Button to open the CD Door,
4. Insert a CD with the label facing up.
5. Touch the Eject Button to close the CD Door
6. Press PLAY/PAUSE button to start CD playback from the first
track.
7. Press once more PLAY/PAUSE button to momentarily pause
8. To stop the playback, Press STOP button.
SKIPPING TRACKS
Touch during play.
Backward------------SKIP –
Fast Forward--------------SKIP +
SEARCHING TRACKS
Touch and hold during play
Backward---------- SKIP –
Fast Forward---------- SKIP +
PROGRAMMED PLAYBACK
Up to 20 tracks can be programmed to play in any desired sequence.
1. Touch Program Button until “PROG.” flashes in display.
2. Press SKIP + Button or SKIP - Button to select a desired track to
be memorized.
3. Press Program Button to program the track.
4. Repeat steps 2 and 3 to program tracks.
5. Press PLAY/PAUSE button to start playing.
To cancel program play, Press STOP button twice.
REPEAT PLAY
To Repeat Single Track
Press Repeat Button while the track you want to repeat is playing.
The “RPT 1” will appear in display.
------To repeat another track, press SKIP + Button or SKIP – Button.
------To cancel repeat play, Press Repeat Button twice.
TO REPEAT ALL THE TRACKS
Press Repeat Button twice during play. The “RPT ALL” will appear
in display.
------All tracks will be played through in sequence and then the
sequence will be repeated continuously.
------To cancel repeat play, press Repeat Button once.


