


8
13
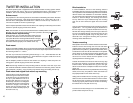
Termination
The woofer uses .187 spade lugs for electrical connections. Use standard .187 or .205 female
quick disconnects to attach wires to the woofer.
The tweeter is terminated with bare wire. Use insulated butt connectors, bullet connectors, or
quick disconnects to extend the tweeter wires to the crossover location. Alternatively you may
solder all connections and insulate them with high quality heatshrink tubing.
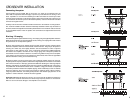
SPEAKER MOUNTING
Woofer installation
The HCCA woofer will fit into standard factory mounting locations using the existing mounting
holes in the automobile. The woofer uses .187 spade type terminals for electrical connections.
To connect the woofer, use .187 or .205 female quick disconnects of a size appropriate for the
wire gauge you chose. You may also solder wire directly to the terminals. If you choose to solder
the wires, be careful not to use excessive heat so you do not melt the plastic around the terminal,
which is not covered by the warranty
Remove the trim panels and inspect the installation locations before you cut and drill the holes
required to mount the woofer. Removing the panel will also make it much easier to route wiring
inside the door. Look for original equipment speaker installation cutouts that can be used to
install the HCCA woofers with little or no modifications. Use the template supplied to help you
locate and mark the holes needed to install the speakers.
If the planned installation location is in a door panel be sure the speaker will not interfere with
the window lowering mechanism. Be sure that the speaker wires clear all moving parts inside
the door.
For each woofer you will need to cut one large hole and drill small holes around the circumference.
If the mounting surface is covered by carpet or fabric, use a knife or razor to cut the material
away from the holes and cutting path. This prevents material or fibers from becoming tangled in
the drill bit or cutting blade.
If you are using the sheet metal screws provided in the hardware kit, drill the four speaker
mounting screw holes with a 1/8" / 3mm drill.
Clean the work areas of all filings and shavings with a vacuum cleaner before you proceed with
woofer mounting.
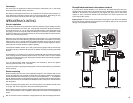
Woofer mounting
Route the speaker wire from the woofer installation locations to the crossovers. Pull the wire
through the installation hole and attach the terminals on the ends to terminals on the speakers.
Connect the positive wire to the positive (+) terminal, which is indicated by a “+” on the speaker
magnet. See the information in the speaker wiring section of this manual and the wiring diagrams.
Push the wire back into the area behind the installation location and be sure it will not interfere
with the speaker.
Adhere the supplied foam gasket strip to the mounting surface of the speaker. This will ensure
an air tight seal, which is required to achieve the best bass performance.
When installing the speakers drive the supplied sheet metal screws by gradually tightening them
in turn. Drive the screws in until the speaker is well seated, but take care not to overtighten the
screws.
Each of the HCCA woofers is installed in a slightly different way. See the following illustrations.
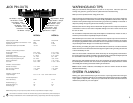
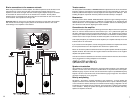
Bi-amplified connections to the crossover network
If you have two 2 channel amplifiers or a 4 channel amp, the HCCA components can be bi-
amplified. Each driver will have its own discrete channel of amplification. Connect the channel
selected for the tweeter to the positive (IN+) and negative (IN-) inputs next to the tweeter
outputs (T+ and T-). The woofer channel will be connected to IN+ and IN- inputs next to the
woofer outputs (W+ and W-).
Important note: You must cut the red and black wire jumpers on each side of the crossover
that connect the low and high frequency sections of the crossover. Failure to do so could cause
damage to the amplifiers or the crossover.