


2 X 50 Watt Truck Amp (120-1971) Mounting Faxback Doc. # 6716
Mount the amplifier as follows in the location you chose earlier. Unplug
the wiring harnesses to make mounting more convenient.
1. Using the mounting holes on the amplifier as a guide, mark the
locations for the mounting holes.
2. Drill 9/64-inch holes in the marked locations, taking care not
damage anything behind the mounting surface.
3. Attach the amplifier to the mounting surface using the supplied
sheetmetal screws and washers.
Plug in the wiring harnesses.
TURNING ON THE AMPLIFIER
The amplifier automatically turns on whenever you turn on your
radio/cassette player. The POWER indicator lights when the amplifier is
on.
SETTING THE INPUT LEVEL CONTROL
LEVEL lets you adjust the level of audio signals that enter the amplifier.
For the best performance, follow these steps to adjust the input level.
1. Turn LEVEL fully counterclockwise.
2. Turn on your stereo system and turn up the volume to about one-third
of its full range. Turn on the ignition, if necessary, to turn on
the amplifier.
3. Adjust LEVEL until the volume is at the maximum level you desire
the radio/tape player to produce.
4. Adjust the stereo system's volume control to a comfortable listening
level.
CAUTIONS: Never turn LEVEL up any farther than you need to get clear
sound at 2/3 volume.
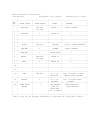
The overload red indicator illuminates under the following
conditions: