


67
En
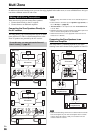
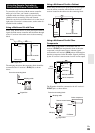
12V Trigger Out
When Zone 2/3 is turned on, the output from the 12V
TRIGGER OUT jack goes high (+12 V and max. 150 mA
for Zone 2, +12 V and max. 25 mA for Zone 3).
Connecting this jack to a 12-volt trigger input on a
component in Zone 2/3 will make that component turn on
or off as the AV receiver turns on or off the Zone 2/3.
■ Operating on the AV receiver
■ Operating on the remote controller
To control Zone 2/3, you must press the remote
controller’s ZONE first.
ZONE turns red while Zone 2 is on, and green while
Zone 3 is on.
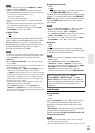
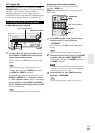
Controlling Zone 2/3 Components
1
To turn on Zone 2/3 and select an input source,
press ZONE 2 or ZONE 3 followed by an input
selector button within 8 seconds.
Zone 2/3 turns on, the Z2/3 indicator lights on the
display.
Tip
• The corresponding trigger output goes high (+12 V).
To select AM or FM, press TUNER input selector
and ZONE 2 or ZONE 3 repeatedly.
To select the same source as the main room’s, press
ZONE 2 or ZONE 3 twice. “Z2 Selector: Source”
or “Zone 3 Selector: Source” appears on the display.
To turn off Zone 2/3, press ZONE 2 or ZONE 3.
The Z2/3 indicator on the display flash. Press OFF.
The zone is turned off.
Tip
• The corresponding trigger output goes low (0 volts).
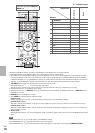
ZONE 3
ZONE 2 OFF
MASTER VOLUME
Input selector buttons
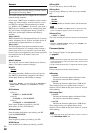
1
Press ZONE repeatedly, then point the remote
controller at the AV receiver and press
RECEIVER.
Zone 2/3 turns on, the Z2/3 indicator lights on the
display.
Tip
• The corresponding trigger output goes high (+12 V).
2
To select an input source for Zone 2/3, press ZONE
repeatedly, followed by INPUT SELECTOR.
To select AM or FM, press the TUNER input selector
and ZONE repeatedly.
Note
• You cannot select different AM or FM radio stations for
your main room and Zone 2/3. The same AM/FM radio
station will be heard in each room.
3
To turn off Zone 2/3, press ZONE repeatedly,
followed by RECEIVER.
Tip
• The corresponding trigger output goes low (0 volts).
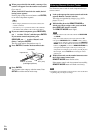
RECEIVER
MUTING
VOL /
ZONE
Input selector buttons