


36
Connecting Your Components
—Continued
■
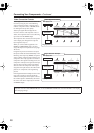
Video Signals
Digital video signals received by the HDMI IN jacks are normally output by the HDMI OUT for display on your TV.
Composite video, S-Video, and component video sources can be upconverted for the HDMI output. See “Video Con-
nection Formats” on page 28 for more information.
■
Audio Signals
Digital audio signals received by the HDMI IN jacks are output by the speakers and headphones connected to the AV
receiver. Normally, they are not output by the HDMI OUT, unless the Audio TV Out setting is set to On (see page 82).
To listen to audio received by the HDMI IN jacks through your TV’s speakers, set the Audio TV Out
setting to On (see page 82), and set your DVD player’s HDMI audio output setting to PCM.
Notes:
• The HDMI video stream is compatible with DVI (Digital Visual Interface), so TVs and displays with a DVI input can
be connected by using an HDMI-to-DVI adapter cable. (Note that DVI connections only carry video, so you’ll need
to make a separate connection for audio.) However, reliable operation with such an adapter is not guaranteed. In
addition, video signals from a PC are not supported.
•To listen to an HDMI source component through the AV receiver, you must configure your system so that video from
the HDMI source component can be displayed on your TV (i.e., on your TV, select the HDMI input that’s connected
to the AV receiver’s HDMI OUT). This is necessary because a component identification check has to be performed
on your TV before an HDMI source component can output any signals. If your TV is off or set to a different input
source, the AV receiver may produce no sound or the sound may be distorted.
• The HDMI audio signal (sampling rate, bit length, etc.) may be restricted by the connected source component. If the
picture is poor or there’s no sound from a component connected via HDMI, check its setup. Refer to the connected
component’s instruction manual for details.
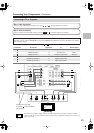
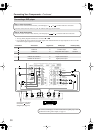
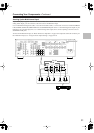
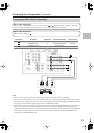
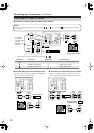
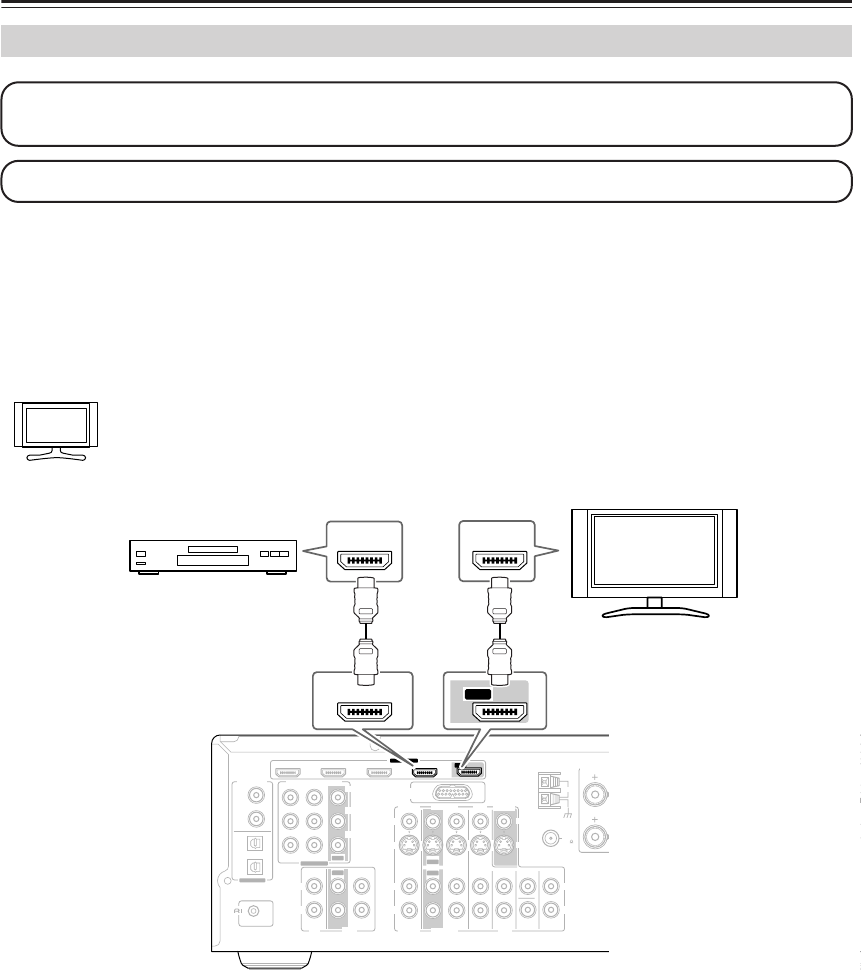
Making HDMI Connections
Step 1: Use HDMI cables to connect the AV receiver’s HDMI jacks to your HDMI-compatible DVD player, TV,
projector, and so on.
Step 2: Assign each HDMI IN to an input selector in the HDMI Input Setup (see page 46).
Hint!
OUT
OUT
OUT
R
L
IN IN
IN
IN
IN IN
IN
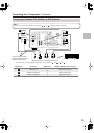
IN 1(DVD)
OUT
COMPONENT VIDEO
Y
C
B/PB
CR/PR
SUB
WOOFER
FRONT
SURR CENTER
SURR BACK
CD
R
L
TAPE
CBL/SAT
CBL/SAT
VCR/DVR
VCR/DVR
DVD
DVD
R
L
R
L
S
V
MONITOR
OUT
S
V
REMOTE
CONTROL
L
R
SURR SPEAKERS
FRONT SPEAKERS A
CENTER SPEAKER
ASSIGNABLE
COAXIAL
OPTICAL
1
(DVD)
2
(CBL/SAT)
1
(VCR/DVR)
2
(CD)
DIGITAL IN
ASSIGNABLE
ANTENNA
FM
AM
75
HDMI
IN 4 IN 3
(CBL/SAT) (VCR/DVR)
(DVD)IN 2 IN 1
ASSIGNABLE
OUT
FRONT SPEAKERS B
L
R
SURR BACK SPEAKERS
PRE OUT
SUB
WOOFER
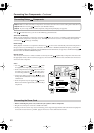
IN 2
(CBL/SAT)
DOCK
(for DS-A1L)
HDMI
IN
HDMI
OUT
IN 1
(DVD)
OUT
DVD player
TV