


34
Connecting Your Components
—Continued
■
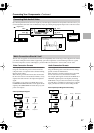
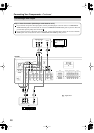
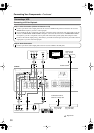
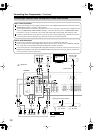
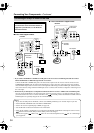
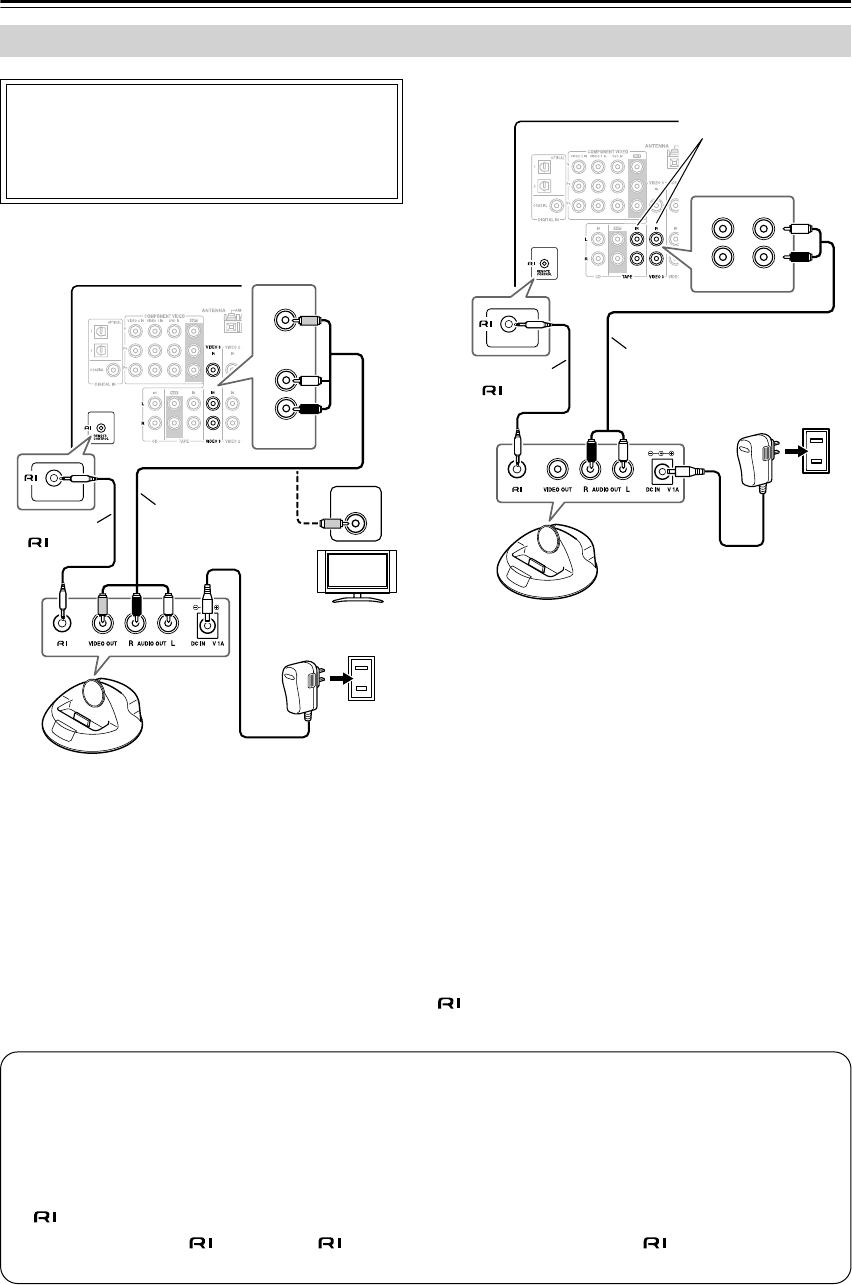
If Your iPod Supports Video:
■
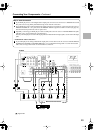
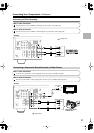
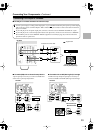
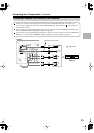
If Your iPod Doesn’t Support Video:
• If you connect the RI Dock’s AUDIO OUT L/R jacks to the AV receiver’s TAPE IN jacks and also want to
connect the RI Dock’s VIDEO OUT jack to the AV receiver:
Connect the RI Dock’s VIDEO OUT jack to an unused video input on the AV receiver. Do not connect it to the
COMPONENT VIDEO jacks. To watch an iPod slideshow or video, select the video input source first, and then
select the TAPE input source. The AV receiver will output the audio being fed to the TAPE input, and because the
video source doesn’t change when the TAPE input source is selected, it’ll continue to output the video being fed to
the video input.
• What to do if you already have a component connected to the AV receiver’s VIDEO 3 IN or TAPE IN jacks:
You can connect the RI Dock to an unused AV input on the AV receiver, however, you will not be able to control
your iPod with the AV receiver’s remote controller, as the functionality will be unavailable. The VIDE 3 IN and
TAPE IN jacks are especially designed for use with the RI Dock.
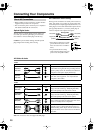
Connecting an Onkyo RI Dock for the iPod
Not all iPods output video.
For information about which iPod models are
supported by the RI Dock, see the RI Dock’s
instruction manual.
V
VIDEO 3
5
L
R
IN
VIDEO 3
REMOTE
CONTROL
VIDEO
INPUT
HT-R340
AC adapter
Wall outlet
TV
Supplied
AV cable
Supplied
cable
or
IN
VIDEO 3
L
R
IN
TAPE
5
REMOTE
CONTROL
Connect one
or the other
HT-R340
AC adapter
Wall outlet
Supplied
AV cable
Supplied
cable
Notes:
• If you have an Onkyo DS-A1 RI Dock, connect its S-VIDEO jack directly to an S-Video input on your TV.
• Set the RI Dock’s RI MODE switch to HDD or HDD/DOCK.
• Set the AV receiver’s Input Display to HDD (see page 38).
• See the RI Dock’s instruction manual for more information.
• When the AC adapter is unplugged or not connected to the RI Dock, the RI Dock will output no sound or video,
functions will not work, and your iPod’s battery will not be charged.
• Connect the supplied cable to only jacks. Do not connect headphones to the jack, as it will damage
your equipment.