


page 2 of 2Rev. A
may help reduce hum and RF interference.
When securing the wire, use care not to staple
or nail the electrical conductors. Doing so
could result in a short that might damage the
electronics.
More than two pair of these speakers can
be connected to one amplier. However, we
suggest that you consult a professional if you
are installing more than two pair.
When connecting your speakers, make sure
proper polarity (phasing) is maintained.
Simply put, this means being sure the same
wire which is hooked to the positive terminal
of the amplier has its other end hooked
to the positive terminal of the speaker. It is
important to check this on all speakers. If
the connections on one of the speakers are
reversed, (out of phase) the quality of your bass
will be seriously impaired.
INSTALLATION
As the diagrams show, the speakers utilizes
a metal mounting ring which, after tightening
with the screws provided, acts as a clamp to
hold the speakers in place.
To aid in speaker performance, a brous material, such
as berglass or polyester ber, may be placed behind
the speaker. This may also help to reduce unwanted
sound from being transmitted into adjoining rooms.
Once you determine where you wish the speakers to be
placed, do the following:
Using the paper template provided, mark the speaker
cut-out location making sure that where you wish the
speakers to be placed will not be obstructed by a stud
or other material hidden in the wall.
Proper use of an electronic stud-
nder is invaluable for this operation.
Using the proper equipment, cut the
appropriate sized hole in the wall.
On drywall, the cleanest cuts will be
made with a drywall saw.
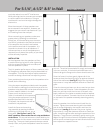
Install the frame and mounting
ring assembly by passing the black
mounting ring through the cut-out as
illustrated. (see gures 1 and 2) For
the 8” speakers, observe that there is a top and bottom
to the frame. The top and bottom are identiable by the
spacing between the six vacant screw holes in the black
clamp ring. The more-closely spaced holes are toward
the top. Next, verify that the speaker frame ts into the
cut-out. The white frame should t snugly and smoothly
in the cut-out hole. If the hole should have been cut a
little too large, the ange on the frame should cover this.
Once the frame is in place, gently tighten all of the
screws so that the mounting ring is up against the back
side of the wall board. (see g. 3) Avoid over-tightening
the screws or it may later become difcult to install the
grille.
If the wire has not yet been run, do so, now that you have
access to the wall’s interior. Once the speaker wire has
been run, pull the end of the wire out of the wall, strip
back a section of the jacket as needed, and then expose
½" of each conductor. Connect the wire to the terminals
on the back of the speaker assembly, observing polarity
(+ & -).
Insert the speaker into the frame and install the six
screws. Tighten the screws starting with the middle
pair of screws followed by the top pair and then the
bottom pair. (see g. 4) Use care not to over-tighten
the screws or it may later become difcult to install the
grille. Install the grilles after testing the operation of the
speakers. The grilles are installed by gently working the
edge of the grille into the frame of the speaker, beginning
at one corner and working one or both directions around
to an adjacent or opposite corner.
For 5-1/4", 6-1/2" & 8" In-Wall
2-Piece Baffle & Frame