


Device 1
Connect to
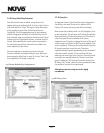
NV-I8GM
ConcertoEZPort
ModelNV-I8GEZP
www.nuvotechnologies.com
NuVoTechnologies LLCHebron, Kentucky USA
Device 2 Device 3
Device 4 Device5 Device 6
R
SYS ON
EXT. MUTE
SUM1
3033118
C
US
CONFORMS TO
UL STD.6500
CERTIFIED TO
CAN/CSASTD.E60065
NuVoTechnologies CincinnatiOhio USA
FUSE:T5A
120V 60Hz 500W
MODEL NV-I8DM
SIXSOURCE EIGHT ZONE
AUDIODISTRIBUTION SYSTEM
www.nuvotechnologies.com
VARIABLE
OUTPUT
FIXED
OUTPUT
TIP=L
RING=R
RS-232
CONNECT TO
NV-I8X
USE NV-SLC1
CABLE
CONNECT TO
NV-I8EZP1
USE NV-NC1
CABLE
USE CNLYWITH 250V FUSE
SUM2
OUTPUT POWER
20W/6OHM X2
ZONE7&8
SYSTEM
NETWORK DIGITALLINK
PROGRAM
SOURCELINK
SOURCEINPUTS
ZONE1
ZONE3
ZONE2
CONNECTTO
NV-I8X
USENV-SLC1
CABLE
12345
6
12345
6
ZONE1
ZONE3
ZONE2
OUTPUT POWER
OUTPUT POWER
OUTPUT POWER
20W/6OHM X2
20W/6OHM X2
20W/6OHM X2
VARIABLE
OUTPUT
VARIABLE
OUTPUT
VARIABLE
OUTPUT
FIXED
OUTPUT
FIXED
OUTPUT
FIXED
OUTPUT
TIP=L
RING=R
TIP=L
RING=R
TIP=L
RING=R
L
AUDIO OUT
AUX IN
R
TRIGGER
ON=+12V
AUDIO
OUTPUT
TUNERBANTENNAINPUT
IN
USE ONLYNuVo
NV-T2PAS
POWEREDANTENNA SYSTEM
9
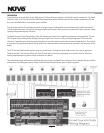
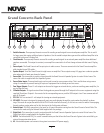
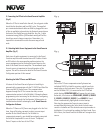
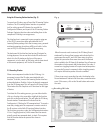
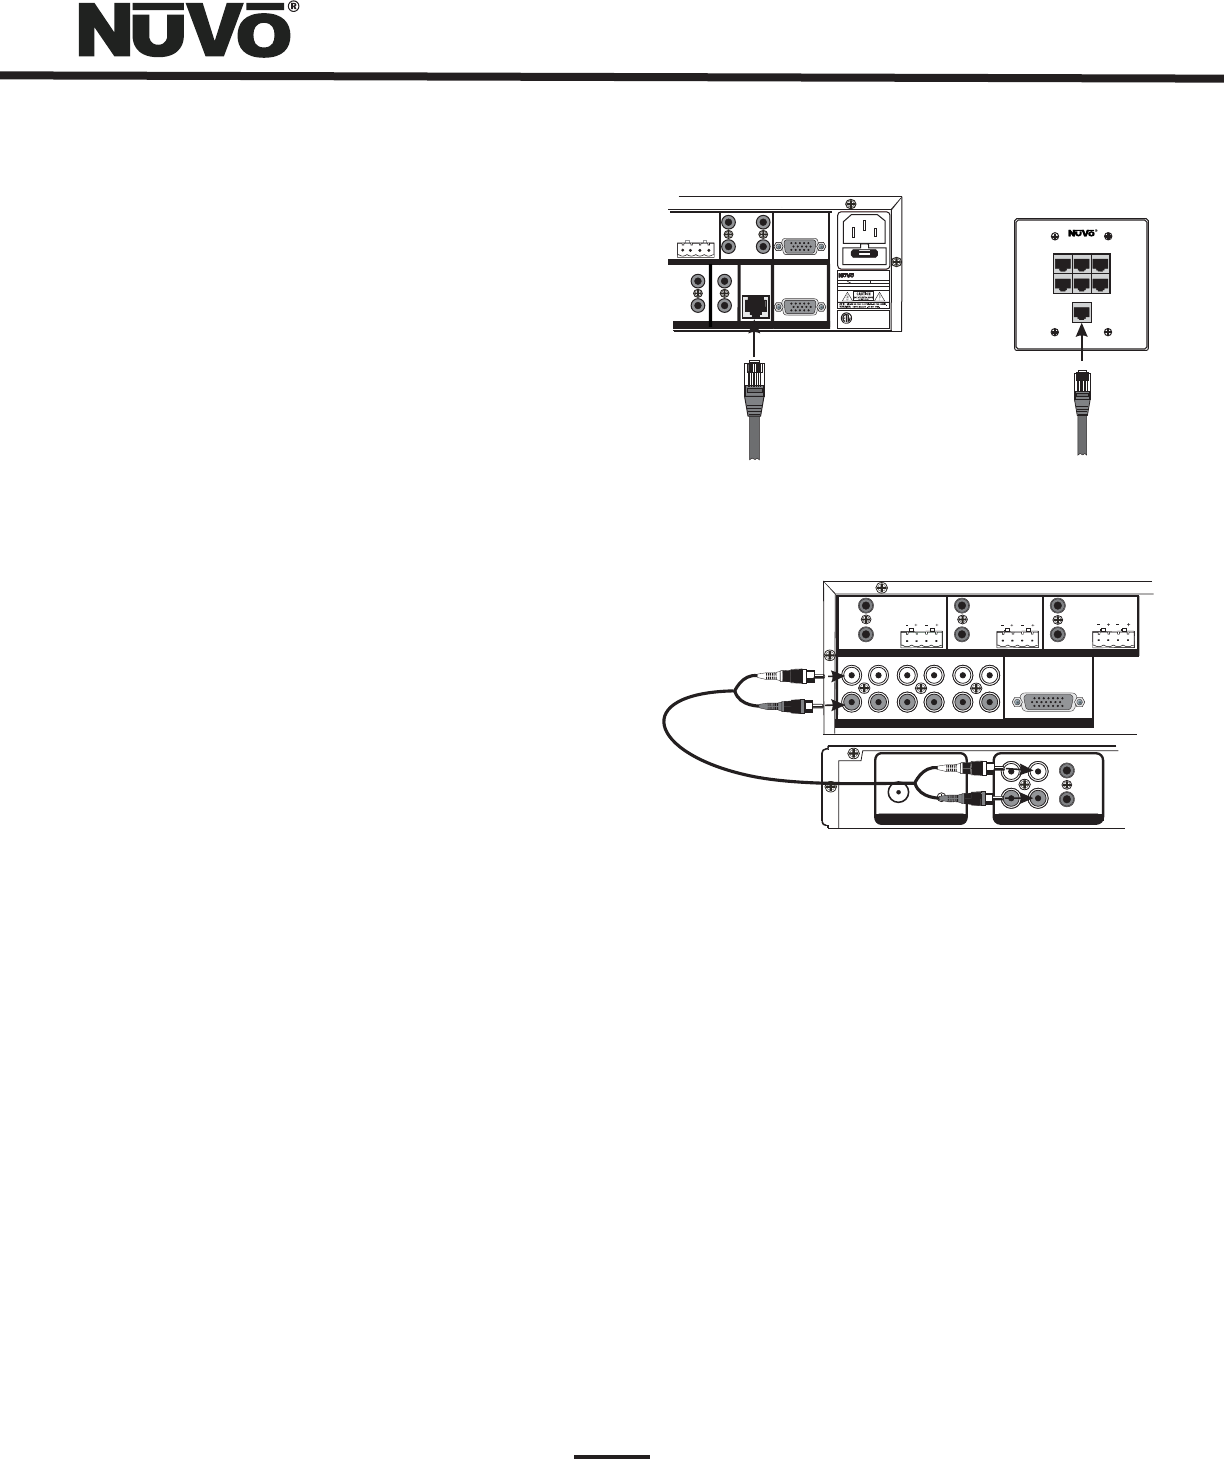
V. Connecting the EZ Port to the Grand Concerto Amplifier
(fig. 4)
When the EZ Port is installed in the wall, the only part visible
should be the faceplate and four RJ45 jacks. The supplied
pre-terminated network cable can then be plugged into one
of the six available jacks and into the Network connection on
the back of the Grand Concerto Amplifier. Any Cat-5 cable
terminated using 568A or 568B network wiring will suffice
should you need a longer connection. Remember, it is
important to terminate the cable the same way on both
ends.
Fig. 4
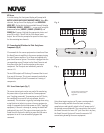
VI. Attaching Audio Source Equipment to the Grand Concerto
Amplifier (fig. 5)
Each piece of audio equipment is connected to the Grand
Concerto amplifier with standard stereo RCA cables. Attach
an RCA cable to the corresponding audio output on the
source equipment and to the desired source input on the
back of the Grand Concerto amplifier. The numbered input
for each source is important in the configuration of the
system. This will be covered in detail in the Grand Concerto
Configurator portion of this manual.
Fig. 5
Attaching the NuVo T2 Tuners and M3 Server
X. Grand Concerto
Configurator Software.
A feature of the Grand Concerto System is its ability to
automatically communicate with the T2 AM/FM and Satellite
Tuners and the M3 Audio Server. The communication
happens through the EZ Port connection hub, across a
communication protocol called NuVoNet. Although software
programming is not necessary for this function, configuring
the installation through the Configurator Software prior to
installation has distinct advantages, see
When the T2 Tuners or M3 Server are plugged in for the first
time, they will display a prompt to select a source input
number for the Grand Concerto. For NuVoNet to
communicate properly, you should have already connected
the NuVoNet components to one of the six “Peripheral
Device” inputs on the face of the EZ Port.
T2 Tuners
OPERATING MODE
STAND ALONE, SOURCE 6, SOURCE
5, SOURCE 4, SOURCE 3, SOURCE 2, SOURCE 1
Each of the T2 Tuner components actually houses two
individual AM/FM or Satellite receivers, which have their
own display on the front panel. Once the T2 is plugged in
and the NuVoNet CAT-5 is connected to the EZ Port and
initial display, will appear for each tuner.
Below this, the choices are
and . Stand
Alone is automatically highlighted at initial startup.
Selecting the appropriate Concerto source input is
accomplished by turning the Select knob for each tuner
counter-clockwise until the desired source input number is
highlighted. It is selected by pushing the Select knob. Once
this is done, the Grand Concerto NuVoNet will recognize that
source.