


PRO TT-2 Turntable
- The Leader in DJ Technology
©2000 Industries - 7 - http://www.numark.com
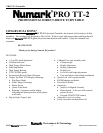
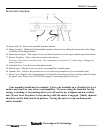
TONE ARM ASSEMBLY
18
19
20
21
22
23
24
25
26
27
28
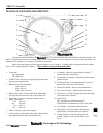
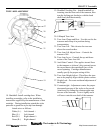
18. Headshell- Install cartridge here. When
installing a cartridge, refer to the installation
instructions supplied by the manufacturer of that
cartridge. During installation, attach the stylus
protector to guard the stylus tip from damage.
Attach wires as follows:
White (L+) Left channel +
Blue (L-) Left channel
Red (R+) Right channel +
Green (R-) Right channel
19. Headshell Locking Nut - Attach headshell by
inserting into the front end of the tonearm, then
turn the locking nut clockwise with the head
shell firmly held horizontally.
20. S-Shaped Tone Arm
21. Tone Arm Clamp and Rest - Use this rest for the
tone arm and clamp it in position during
transportation.
22. Tone Arm Lift - This elevates the tone arm
above the record surface.
23. Tone Arm Lift Adjust Screw - Controls the
amount of lift.
24. Tone Arm Lever - Controls the up and down
action of the Tone Arm Lift.
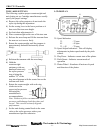
25. Anti-Skate Control - This applies inward force
to the tonearm so it doesn’t skip outward across
the record due to the centrifugal force of the
record spinning. Cartridge manufacturers
usually specify the proper setting of this.
26. Tone Arm Height Adjust - This allows the tone
arm to be properly align with the platter surface.
27. Height Lock - Prevents accidental adjustment of
the height.
28. Counterweight - Adjustment creates the proper
downward pressure of the stylus to the record.
Attach now by sliding the counterweight onto
the rear of the tonearm. Twist it lightly and it
will screw onto the rear shaft of the tonearm.