


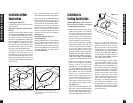

9. Install the grille into the speaker. The
grilles should fit snugly. If you have diffi-
culty fitting them in, try loosening the
mounting dog screws (excessive tighten-
ing can distort the shape of the frame
holding the grille in place).
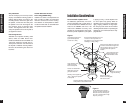
Painting the Speakers
All models may be painted. The plastic
will readily accept most paints.
The speakers must be masked prior to
painting them. The inside circular portion
of the hole template can be used as a
paint mask. Remove the outside portion of
the template by gently pulling along the
perforation. Affix the mask to the front of
the speaker using a piece of tape. Fold the
tape onto itself to form a double-sided
loop. Affix the tape to the tweeter and
place the mask onto the speaker.
The grilles should be painted before they
are installed. For all models, the best
results will be obtained by using a spray
gun or airless sprayer, thinning the paint
(prevents clogging of the grille holes), and
by applying several light coats instead of
one heavy one.
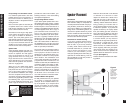
Speaker Phase
Speaker wire has two conductors. One
conductor is attached to the negative (-)
terminals and one conductor is attached
to the positive (+) terminals of both your
speaker and your amplifier. Usually, the
wire is marked for your convenience.
There are different ways wires are marked:
a stripe on one wire, a ribbed area of one
conductor you can only feel, different col-
ors of metal wire on each conductor, or
there might be a fabric strand or string
wound into one of the conductors. Of
course, there are some wires which
appear completely identical. Be careful, or
you might make a mistake.
If you make a mistake, one speaker will be
playing “out-of-phase” with the other
speaker. An out-of-phase pair of speakers
work against each other and the sound of
the two speakers playing together will be
lacking in bass and be “phasey” sounding.
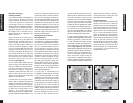
If you suspect the sound is not right and
you cannot see any markings on the wire,
try this simple test:
1. Stand half way between the speakers.
2. Play some music with the amplifier
or radio set to Mono.
3. Listen to the richness of the bass and
the loudness of the sound.
4. Turn off the amplifier and reverse the
connections on one amplifier chan-
nel only.
5. Repeat the listening test with the
same setting of the volume control.
When the sound has a richer bass
and is slightly louder the speakers are
working together or “in-phase”.
16
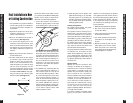
Final Installation in New or Existing Construction
Final Installation in New
or Existing Construction
1. If it is possible to lay a batt of insulation
into the ceiling cavity do so. Remember
to use equal amounts of insulation for
each speaker.
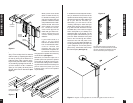
2. Separate the speaker end of the two-
conductor speaker-wire run to free at
least 2" of each conductor.
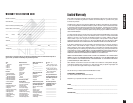
3. Strip 1/2" of insulation from the end of
each conductor. (See Figure 15.)
4. To connect the stripped end of one
conductor to the black terminal, push
down on the black terminal lever. Insert
the stripped end of the conductor into
the opening. Release the pressure on
the lever.
5. Repeat step 4 with the other conductor
and the red terminal.
6. On both models, there are four clamps
or mounting “dogs” which hold each
speaker in place. The dogs are tight-
ened via four front-baffle screws. To
install the speaker, first rotate the dogs
inward. Insert the speaker into the
cutout and tighten the dogs by turning
the screws clockwise. DO NOT OVER-
TIGHTEN THESE SCREWS. Over-tight-
ening the clamps may make the grille
difficult to install. (See Figure 16).
NOTE: The screws will be easier to turn if
you “prime” them first. Before installing each
speaker, turn the screws in and then turn
them back out to their original positions.
7. Direct the Tweeter. The tweeter is
directed by gently pushing on the edge
of the tweeter grille. It will move 20° in
any direction. For critical listening point
the tweeter to the user’s favorite listen-
ing position minimizing reflections from
the side walls. For surround sound or
low volume background listening cre-
ate more reflections and thus more
ambience by directing the tweeter
towards the side walls. See Speaker
Placement on Page 6.
8. On CM8MP only, adjust the bass and
treble control settings by listening to a
well-recorded piece of music at the
user’s favorite listening position. Listen
to a well-recorded piece of music at the
user’s favorite listening position. a)
Listen for bass boominess, particularly
when the speaker is placed near a cor-
ner. Use the -2dB Bass cut to correct. b)
Listen for treble harshness or ringing, par-
ticularly when the speakers are placed in
a room without carpet/ Use the -2dB
Treble cut switch to correct.
15
Final Installation in New or Existing Construction
Figure 16
2” min.
0.5”
Figure 15