Prepare the wires by stripping 1/4" to 3/8" of insulation
from the ends and, if the wire is stranded rather than
solid, tightly twisting the exposed wire strands.
Finally, connect your speaker to your amplifier or
receiver, connecting the conductors "in-phase;" that is,
the same half of the wire-pair to the positive / red ampli-
fier terminal and the positive /red speaker terminal.
Similarly, connect black output and input. If you have
trouble following which wire half is which, look closely,
and you'll see that your speaker wires have some sort of
marking -- lettering, ridges, or color difference -- to help.
Before powering up your amplifier or receiver, separate
different kinds of cables to minimize noise. Keep
speaker wires at the maximum practical distance from
line-level, digital, and power cables, and if they must
cross, keep them at right angles.
Bi-amplification
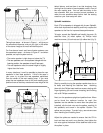
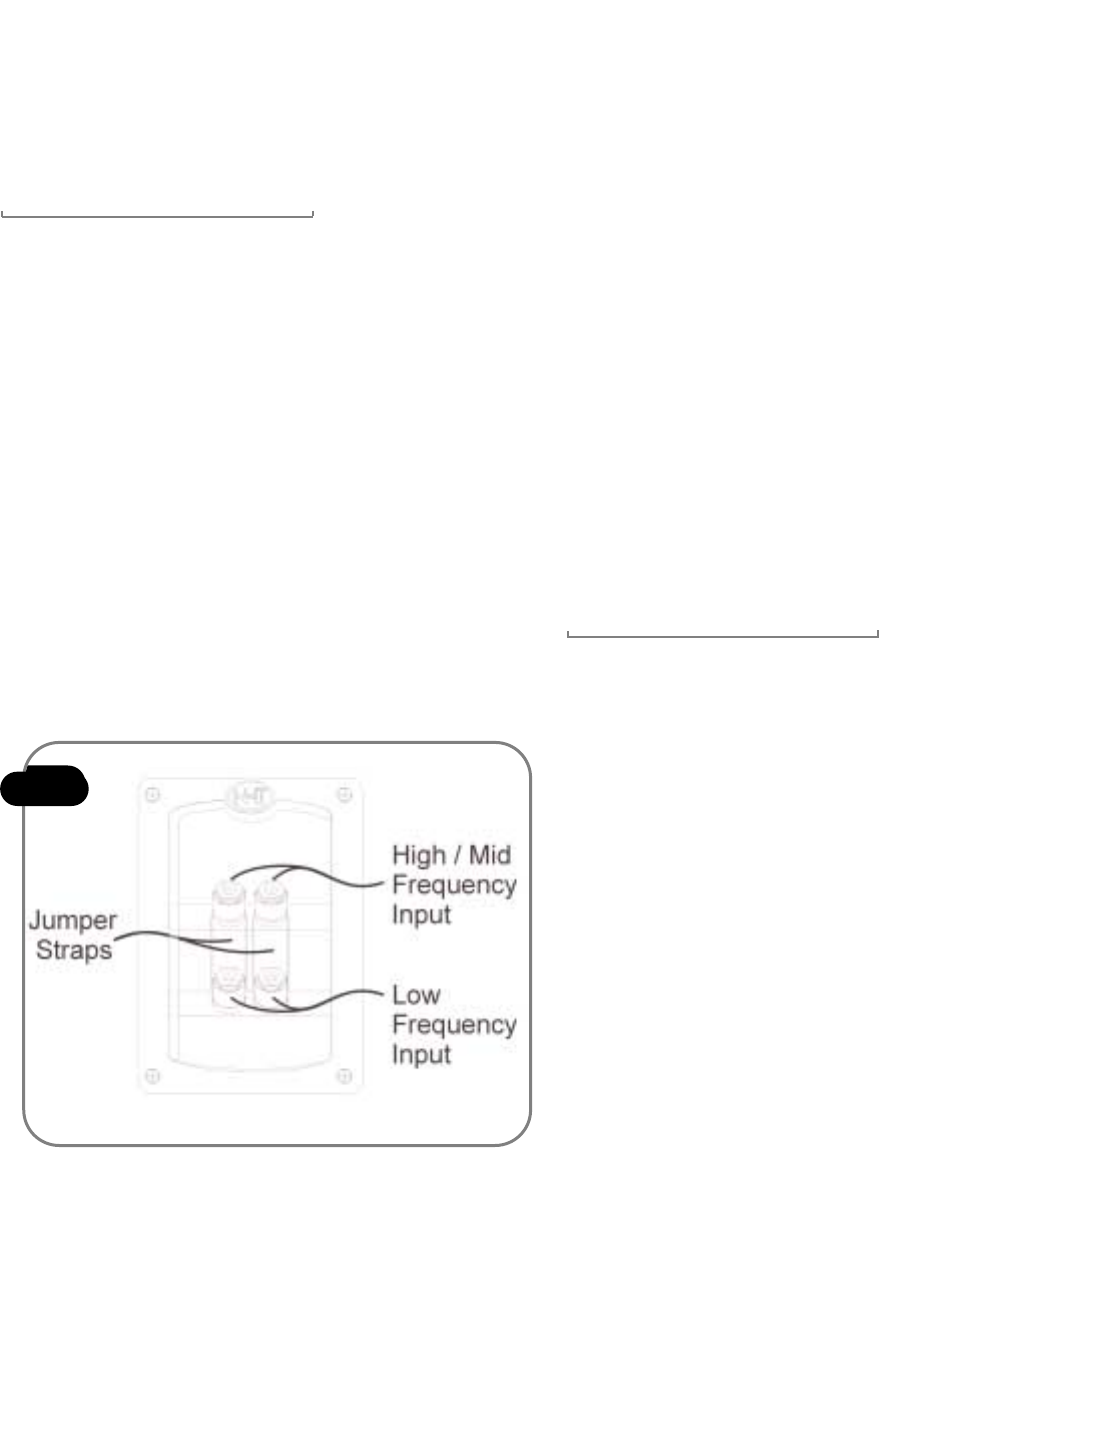
On the back panel of the ST4 you'll find two sets of
binding posts (fig. 4) and a metal jumper strap
connecting them. These provide a different way to
connect the ST4's to your system, namely, bi-amplifying.
Bi-amplification is the use of two amplifiers, one to power
the bass driver and a separate one to power the
midrange / high frequency drivers. Why bi-amplify?
Because this configuration provides greater dynamic
range, since each of the two amplifiers is spared the task
of reproducing the entire frequency range. And in home
theater systems, bi-amplifying turns the passive
subwoofer section of the ST4 into a powered subwoofer.
The most important factor in bi-amplifying is making sure
that identical line-level audio signals -- ie, signals
matched in tone and level -- both reach the two amplifiers
and, after amplification, reach the ST4's. This involves
three steps.
1) Sending identical audio signals to your amplifiers:
Check whether your preamplifier or system controller
offers multiple sets of line-level output jacks. If so,
simply lead two sets of connectors to your two amplifiers.
When your pre-amplifying component offers only one
If you have hardwood or other soft floors, which the
spikes might scratch or pierce, you may prefer to use the
rubber feet included in the SpikeKit. To do so, simply
peel the adhesive backings from the rubber feet and
place them over the spike holes on the stabilizer bars.
Connections
Before connecting your ST4 loudspeakers to your
system, turn off the power to your amplifier / receiver to
avoid damaging the components or the speaker.
First, please take a look at the five-way binding posts on
the back of your speaker. They accept raw wire, banana
plugs or spade plugs. They should always be tightened
by hand, since pliers can strip or break them.
You'll notice that there are two sets of binding posts: a
top set and a bottom set, joined by a metal jumper strap.
For a normally-amplified connection, simply connect the
speaker wires to either the top set or bottom set of bind-
ing posts; it doesn't matter which, since the jumper straps
will carry the audio signal to the other set. Only remove
the strap if you're bi-amplifying (fig. 4).
Next, choose your speaker wires. Like all wires,
speaker wires are rated by a gauge number representing
how many fit in an inch-thick tube, so the numbers get-
ting smaller as the wire gets thicker. Thicker wires
transmit more signal easily; we recommend 14-gauge for
shorter runs, and thicker for runs longer than ten feet
(your authorized NHT dealer can help with wire). Equal
lengths of wire for all speakers is ideal, but not
absolutely necessary.
ig. 4
Fig. 4


