


10. TUNE/PRESET AND
The function of these buttons depends on the tuning mode
indicated in the display and selected with the Search/Preset button
(No. 4). In normal operation there are 3 modes:
a) Preset mode: Press the button to scroll to a lower
number Preset; press the button to scroll to a higher
Preset number. This is a “wrap-around” function, so that going
from the highest number Preset the tuner will go to the lowest
Preset number when is pressed.
b) Search mode: By pressing the Tune/Preset button (No. 10)
or you can engage automatic tuning respectively up
or down the frequency band . The tuner will search
automatically for the first reasonably strong radio station,
where it will stop. Press the Tune/Preset button again to start
searching again.
c) By pressing the Tune/Preset button (No. 10) or you
can engage manual tuning respectively up or down the
frequency band for precise tuning to a specific frequency.
Refer also to section 4 for additional information.
NOTE: The Tune/Preset buttons are also used in conjunction with
the Memory (No. 6) and Search/Preset (No. 4) buttons to add and
memorise user defined names to Presets. Refer to the separate
chapter “Storing, recalling and naming Presets” for more
information.
15. DISPLAY PANEL
The Display Panel shows information about the NAD C440
operating modes and information about the station currently
selected.
STATION DATA Displays the station name, frequency and other
information supplied on the RDS service or entered manually by
the user.
STORING, RECALLING AND NAMING PRESETS
To store a Preset:
• Tune to the radio station you wish to enter into a Preset (refer
to chapter “Front Panel Controls; section 4). If the station is
transmitting RDS information, the RDS indicator will light up
and station initials or name will be shown in the Display Panel.
If a non-RDS station is found, then just the frequency will be
shown.
• To store that station as a Preset, press Memory (No. 6). The
Memory indicator will be displayed and the Preset section will
flash in the Display Panel.
• Press Bank (No. 3) to select which of the three Banks of
Presets (A, B or C) you want to store the station into. Press
either the Tune/Preset or button to select which
Preset number you wish to assign to the station (from 1 to 10),
shown as a flashing number in the Display Panel, and then
press Memory (No. 6) again. The Memory light in the Display
Panel will go out and the station is now stored in your NAD
C440 memory.
To exit the Memory mode without storing a station, leave all the
controls untouched; the Memory mode will automatically cancel
itself after 8 seconds. The Memory Presets have a memory back-
up, so they will remain stored for several weeks even if the Tuner
is switched off or unplugged from the mains supply.
NOTE: You can enter a new station into an unused Preset or over-
write an existing programmed Memory Preset. By doing this you
will replace all the data previously held on that Preset number.
RECALLING A PRESET STATION
• To select a Preset station, select the Preset mode by pressing
the Search/Preset button (No. 4) until “PRESET” lights up in
the display.
• By pressing the Bank button (No. 3) select which Bank of
Presets you want to use (A, B or C, indicated in the display).
• Press either the Tune/Preset or buttons (No. 10)
until the right Preset is found and shown in the Display Panel.
Any unused Presets will be skipped and it is not possible to select
a Bank unless it has at least one Preset stored into it.
DELETING A STORED PRESET
You can empty a Preset by deleting the stored information:
• Select the Preset to be emptied.
• Press the Memory button (No. 6), hold it down and press the
FM Mute/Mode button (No. 7). The Preset will then be deleted
and ‘--’ appears as the Preset number.
You can also store a new station into a used Preset, by simply
going through the Preset storing process and placing a new station
over the existing one.
STORING A STATION NAME
When a station is transmitting RDS information, your NAD C440
will automatically show the station initials when its Preset is used.
Although the Tuner automatically shows the frequency of any other
AM or non-RDS Preset station, it also allows you to type in the
station name to make it easier to identify which station is stored in
the Memory Preset. To enter a name:
• Select the Preset you want to attach a name to.
• Then press Character (No. 9) and the first space in the Station
Data area of the Display Panel will flash.
• Press either the Tune/Preset or (No. 10) button to
scroll and select the first character (see Character list for
reference).
• Pressing Memory (No. 6) will store the first character and
move forward to the next space on the line.
• Use the Tune/Preset buttons again to select the next character
in the name and press Memory to store it. Continue until the
station name is complete (up to 8 characters).
• Press Character again to store the completed name.
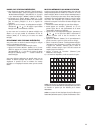
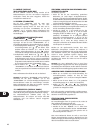
There are 54 characters available including a blank space.
NOTE: This function is only available for non-RDS stations. RDS
stations will always display their transmitted name and this cannot
be over-written using CHARACTER.
NOTE: The 120V versions (North America) do not have RDS
(Radio Data System)
GB
6
_
A B C D E F G H
I J K L M N O P Q
R S T U V W
*
X Y Z
" & '
( )
+ , –
. / = ?
[
\
]
| 0
1 2 3 4 5 6 7 8 9