


SPEAKER INSTALLATION FOR NEW CONSTRUCTION
Step 1. After you have determined the speaker locations using the
guidelines above, secure a 16 gauge 2 conductor cable, such as the
M&S Systems MS16X, (DO NOT USE STAPLES) for attachment to
the speakers after the dry wall has been installed. Leave at least
18 inches additional cable for the connection during fi nal speaker
installation.
Run the other end of the speaker cables to the speaker volume
control location and secure in a single gang box along with a 4
conductor 16 gauge cable, such as the M&S Systems MS164X,
that will connect to the amplifi er. NOTE: Make a drawing of each
speaker location. This will assist you in locating the wires that have
been covered by the sheet rock.
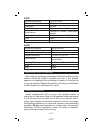
Step 2. To begin installation of the speakers, fi rst locate the area
where the wires are installed. At each location, cut a hole to the
dimensions shown in the tables (Mounting Dimensions) found
on pages 2-3 for the model being installed. The cutout should be
centered in the stud space opening. Prepare the speaker wiring by
striping off approximately 3 inches of the outer jacket (care should
be taken so the insulation on the wires inside the jacket are not
damaged) also strip approximately 3/8 inch off the ends of the two
inside conductors. Twist the ends of the stranded cable until the
wires are tight.
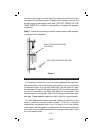
Step 3. You are now ready to install the speaker. Remove the
front grille from the speaker. (Be careful not to touch the speaker
cones in order to prevent any damage). Attach the speaker cable
to the speaker by pressing down on the red (+) or black (-) tabs
and inserting the red wire in the red terminal and the black wire
in the black terminal. Make sure that none of the strands from the
black and red wires are touching each other. This can create a short
circuit that can damage your electronics. Index the mounting tabs
to make sure that all tabs will clear the opening. Insert the speaker
in the wall with the large speaker at the bottom and tighten the tabs
with the screws on the front of the grille. (Make sure that the grille is
straight on the wall). DO NOT OVERTIGHTEN THE SCREWS, the
screws should only be tight enough to secure the speaker.
Step 4. After the speaker is mounted, adjustments to the swivel
tweeter (small speaker) can be made by either directing the sound
3 of 7
115913
IMAGE 4 OF 8